How printing works in Atlas
Every item on your menu can carry one or more tags (for exampleprint_food, print_drinks, print_retail). Every printer in an outlet is set to listen for one or more tags. When an order comes in, Atlas checks each item against each printer — every item prints on every printer where the tags match.
Three rules cover almost every setup:
- Match = print. If an item carries any tag the printer is listening for, that printer prints it. No match, no print.
- A printer with no tags is a catch-all. Leave the tag list blank and the printer will print every item on every order. This is how your customer receipt printer keeps the receipt complete.
- One tag, three jobs. The same tags drive your printers, your Kitchen Display Screens (KDS), and your delivery dispatch — that’s why the field is called Printer / KDS / Dispatch tags. Set them once on the product, they work everywhere.
print_drinks, Print_Drinks, and print-drinks are three different tags. Use lowercase with underscores and apply the same convention across every outlet.
A simple setup: Sunny Beans café
Sunny Beans runs three prep stations, each with its own Atlas printer:print_drinks, food gets print_food, retail gets print_retail. A customer orders a latte, an avocado toast, and a tote bag. Three items, three tags. Atlas sends each item to the station that prepares it:
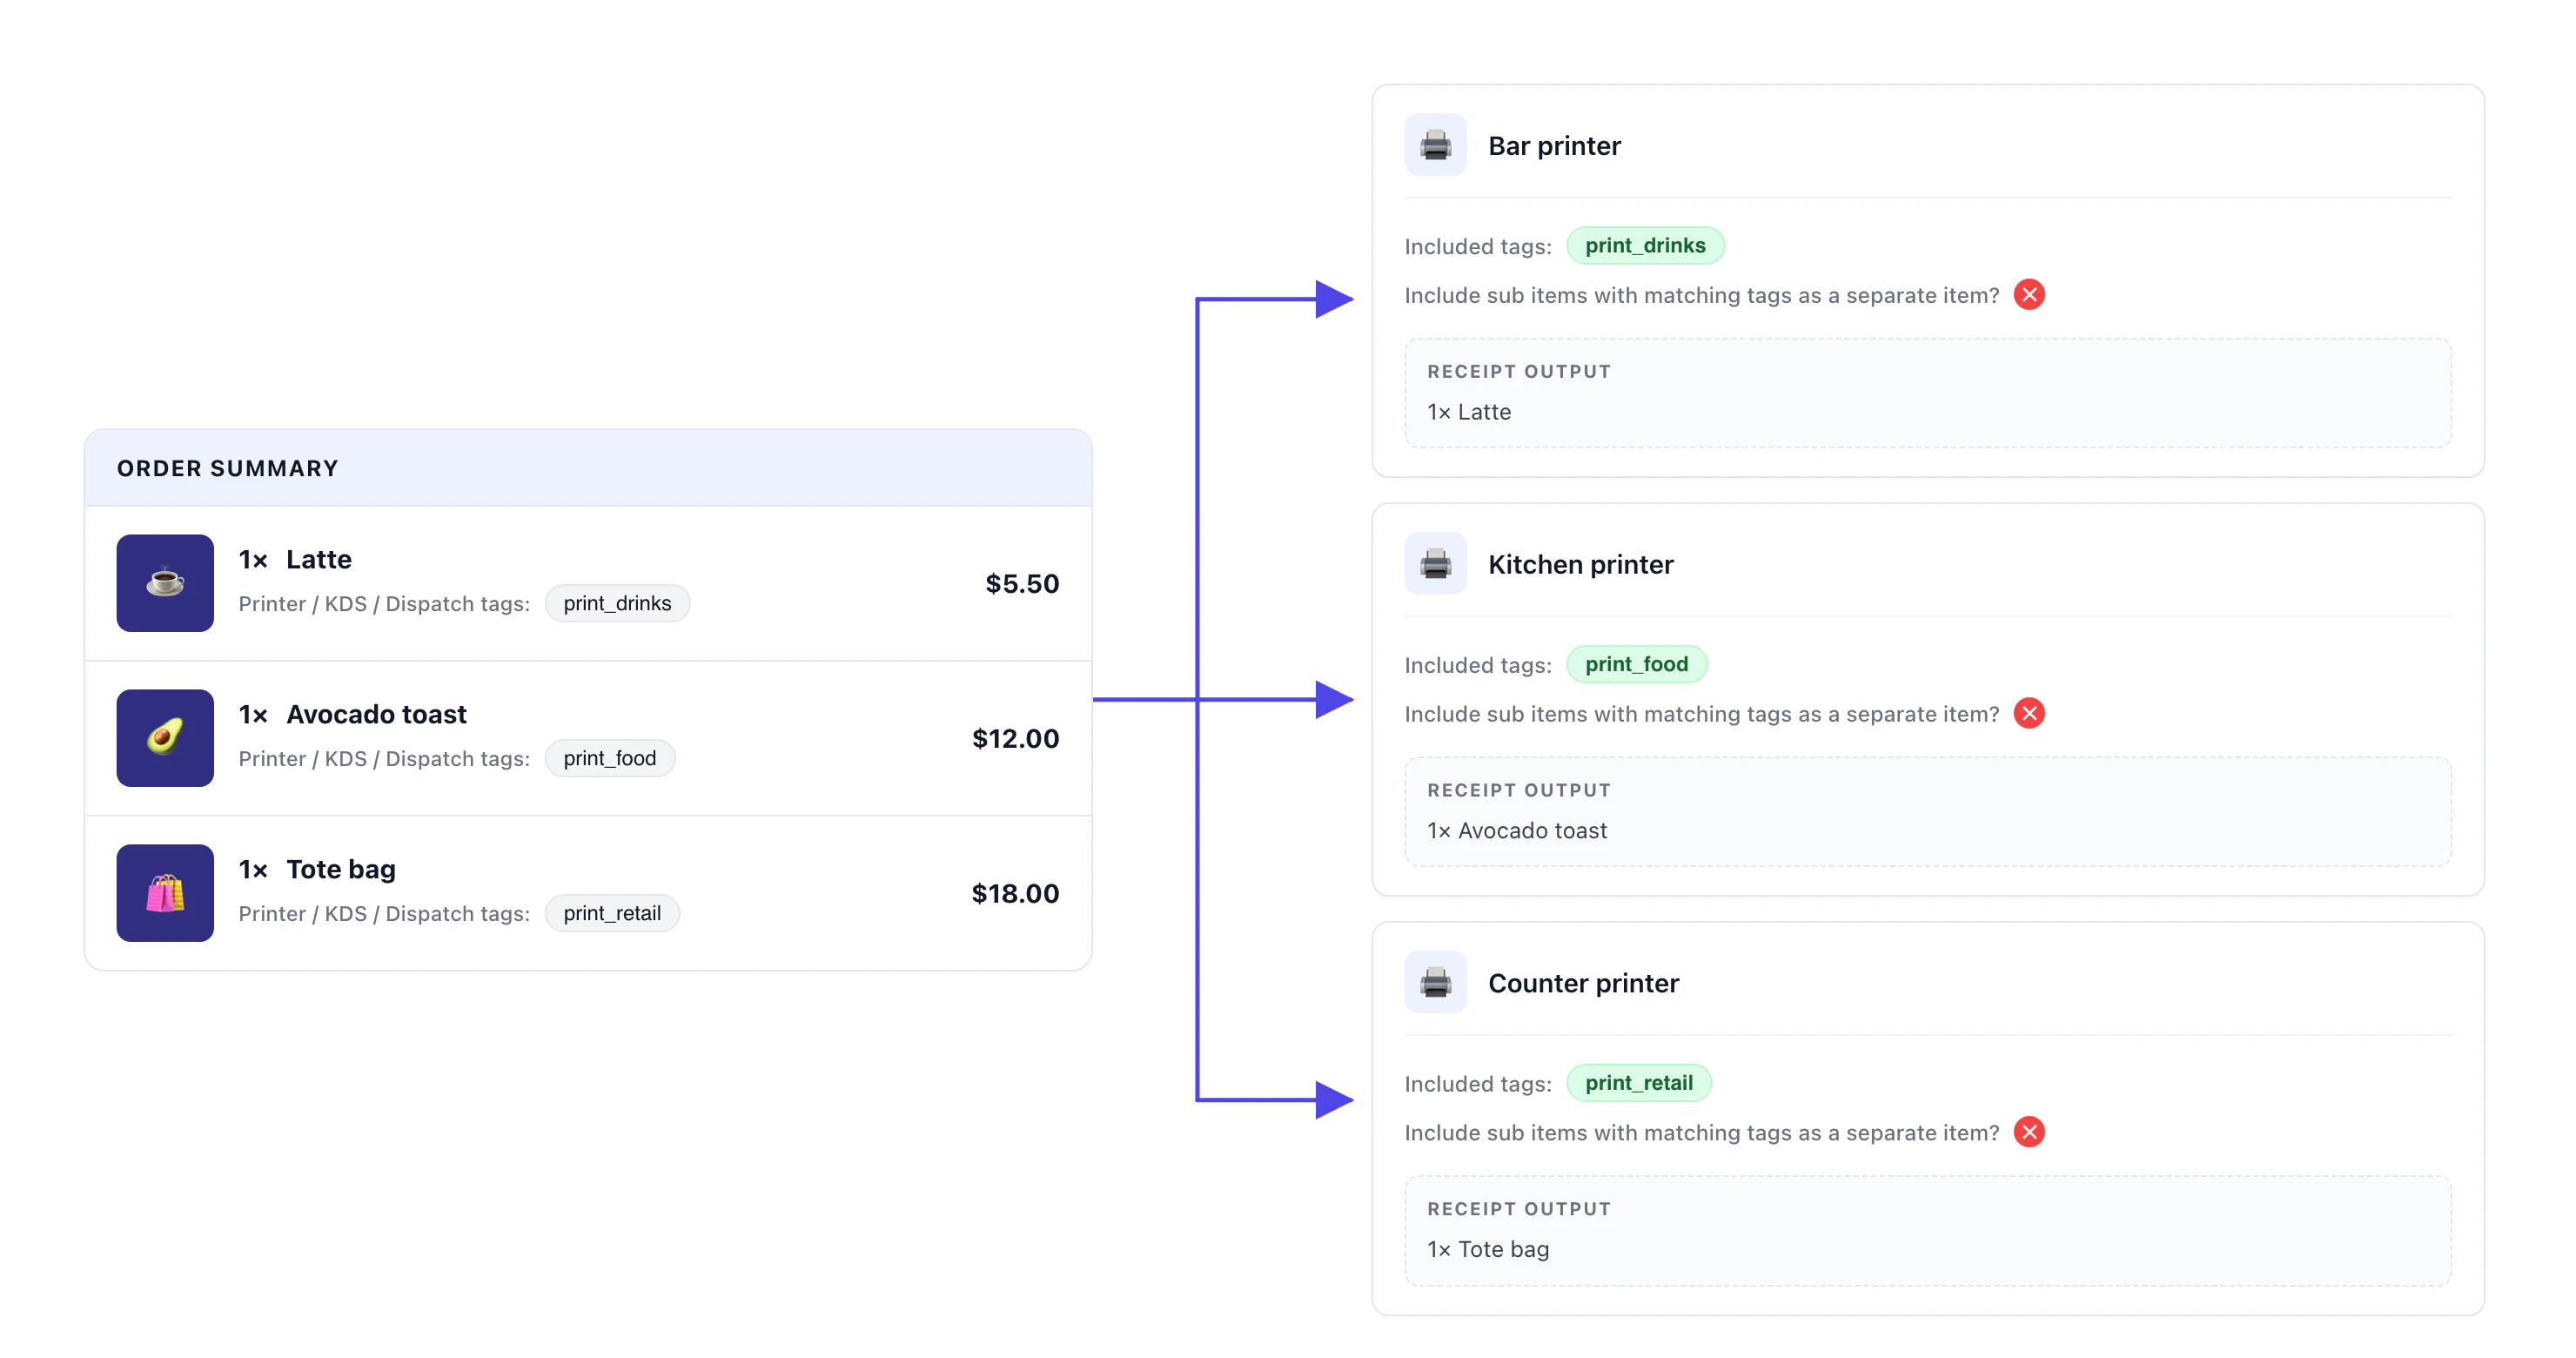
Sunny Beans' setup: one tag per item, one tag per printer.
Setting up a printer on Atlas
Plan your tags
print_drinksfor the barprint_foodfor the kitchenprint_retailfor the counter
print_drinks and Print Drinks won’t match. Choose one convention and use it across every outlet.Tag your products
- Go to your menu and open the product. See the Create menus guide if you’re new to editing products.
- On the Product details dialog, scroll down to the Printer / KDS / Dispatch tags field.
- Type the tag (or pick an existing one) and confirm. Repeat for additional tags if the item belongs on more than one printer.
- Save.
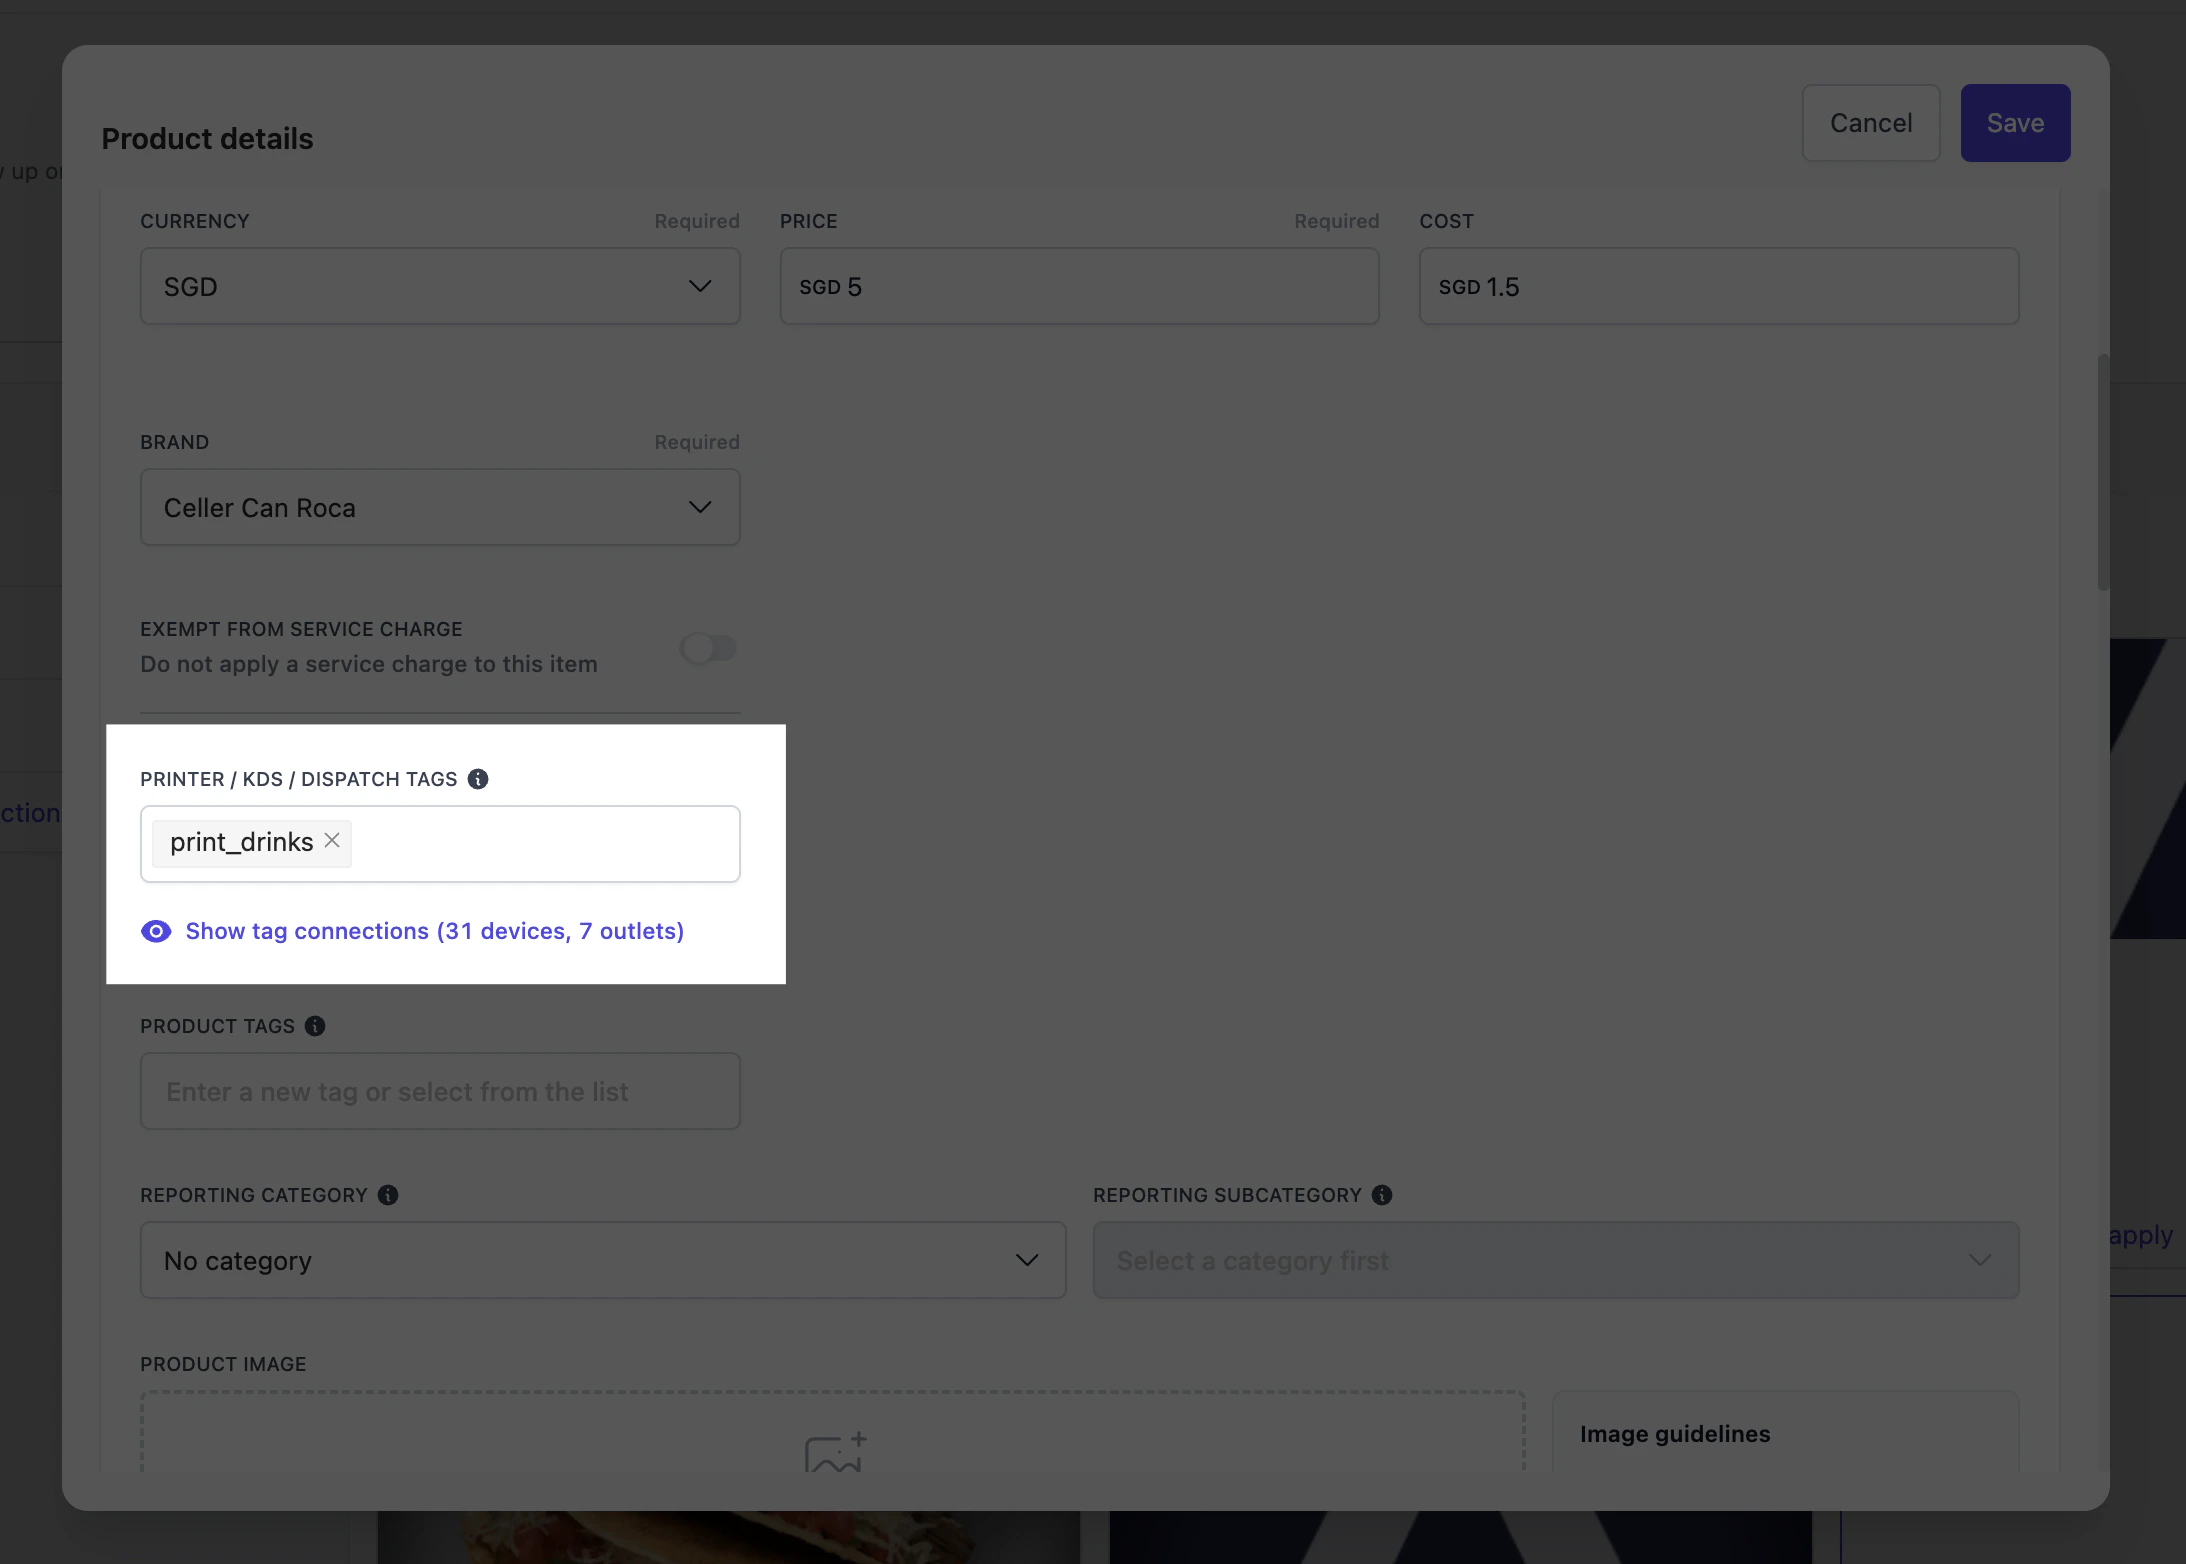
The Printer / KDS / Dispatch tags field on the Product details modal.
Add a printer
- Go to Outlet settings → Outlets and open the outlet you want to configure.
- Open the Printers & receipts tab from the left side menu.
- Click Create new printer.
- Fill in the brand, name (e.g. “Bar printer”), and serial number (printed on the back of the printer, usually below a QR code). See Connect Atlas printer to WiFi if you haven’t connected the device yet.
- Toggle Print on POS checkout and/or Print on Online checkout depending on which channels should trigger this printer.
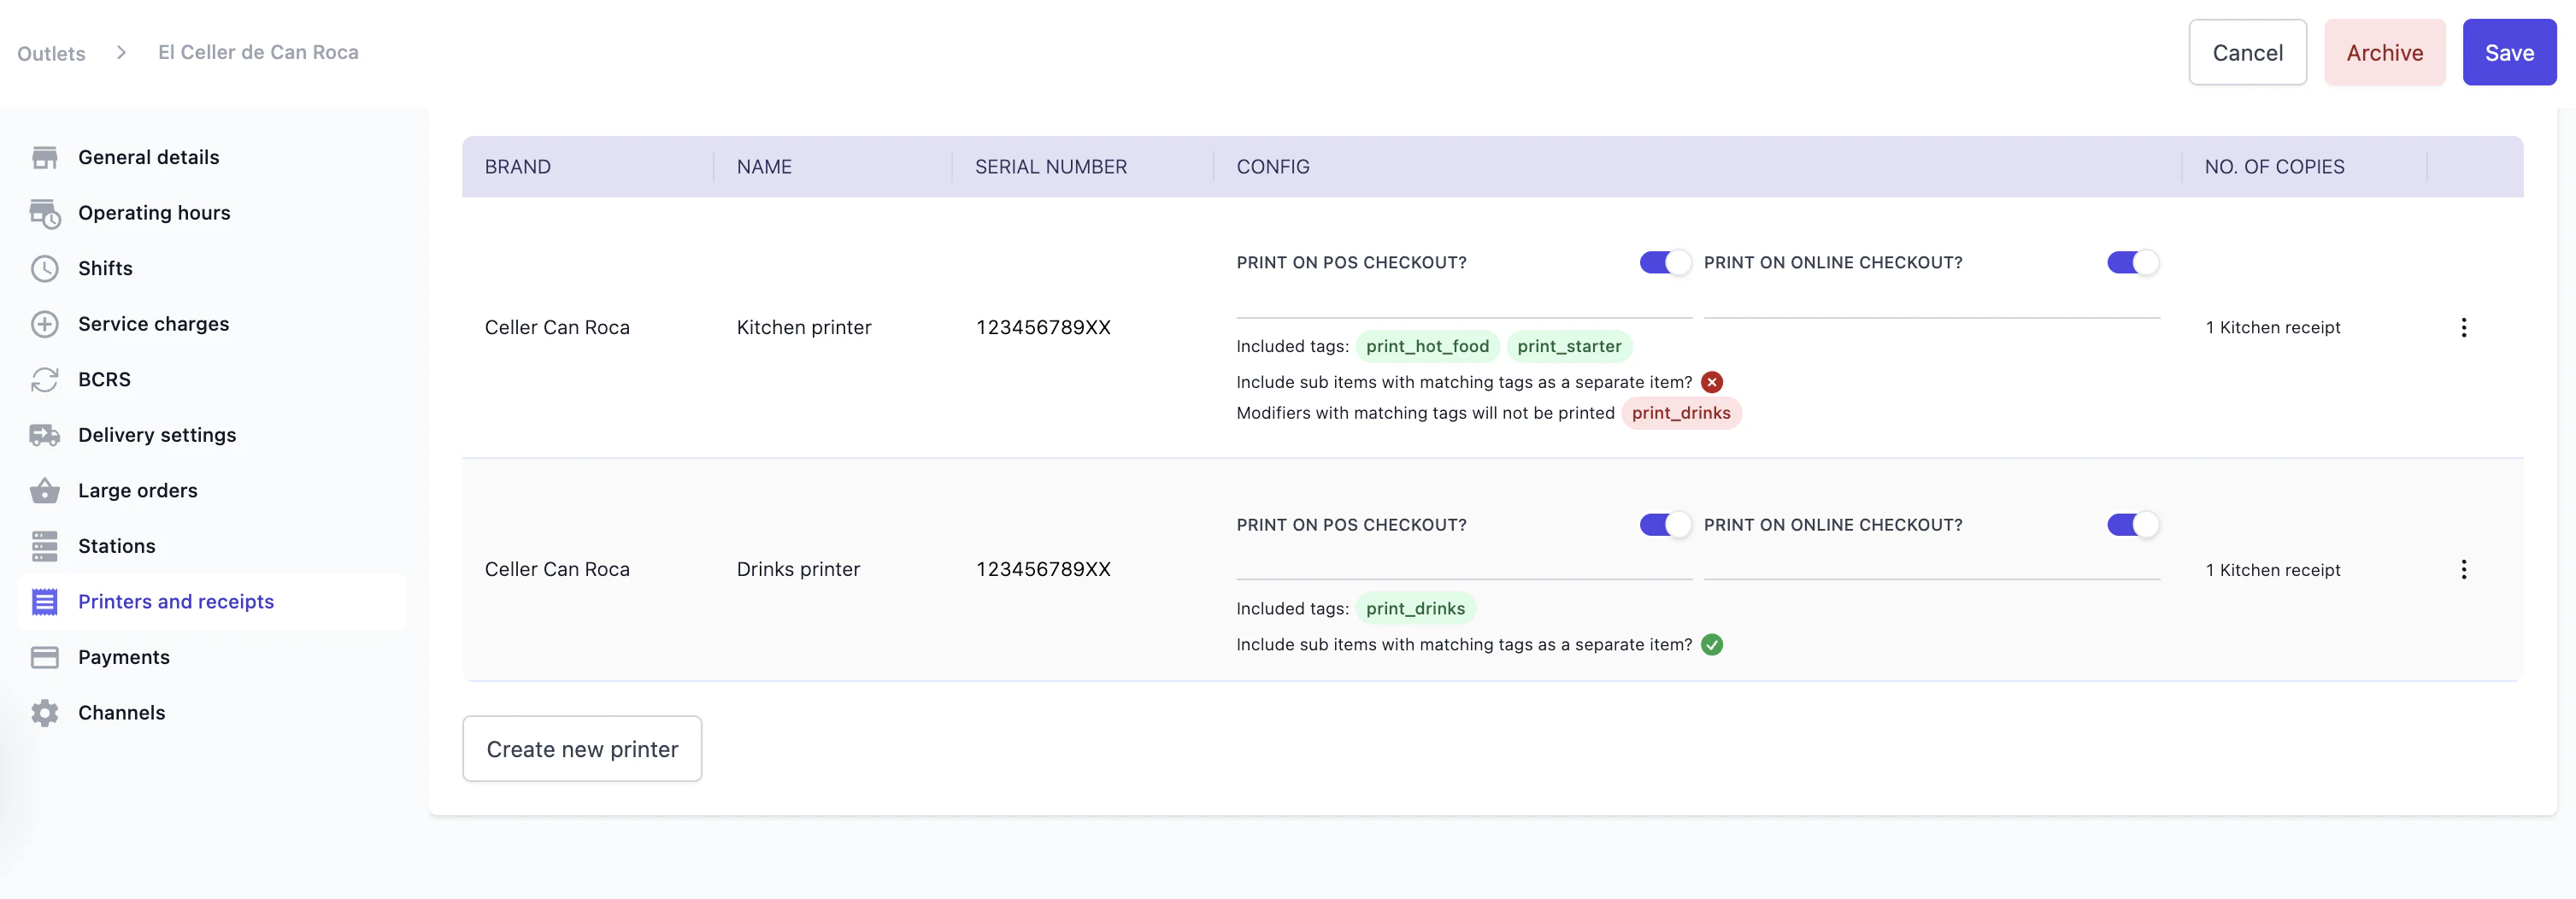
The Printers & receipts page for an outlet, showing two printers (one for the kitchen, one for drinks).
Choose what item tags get printed on this printer
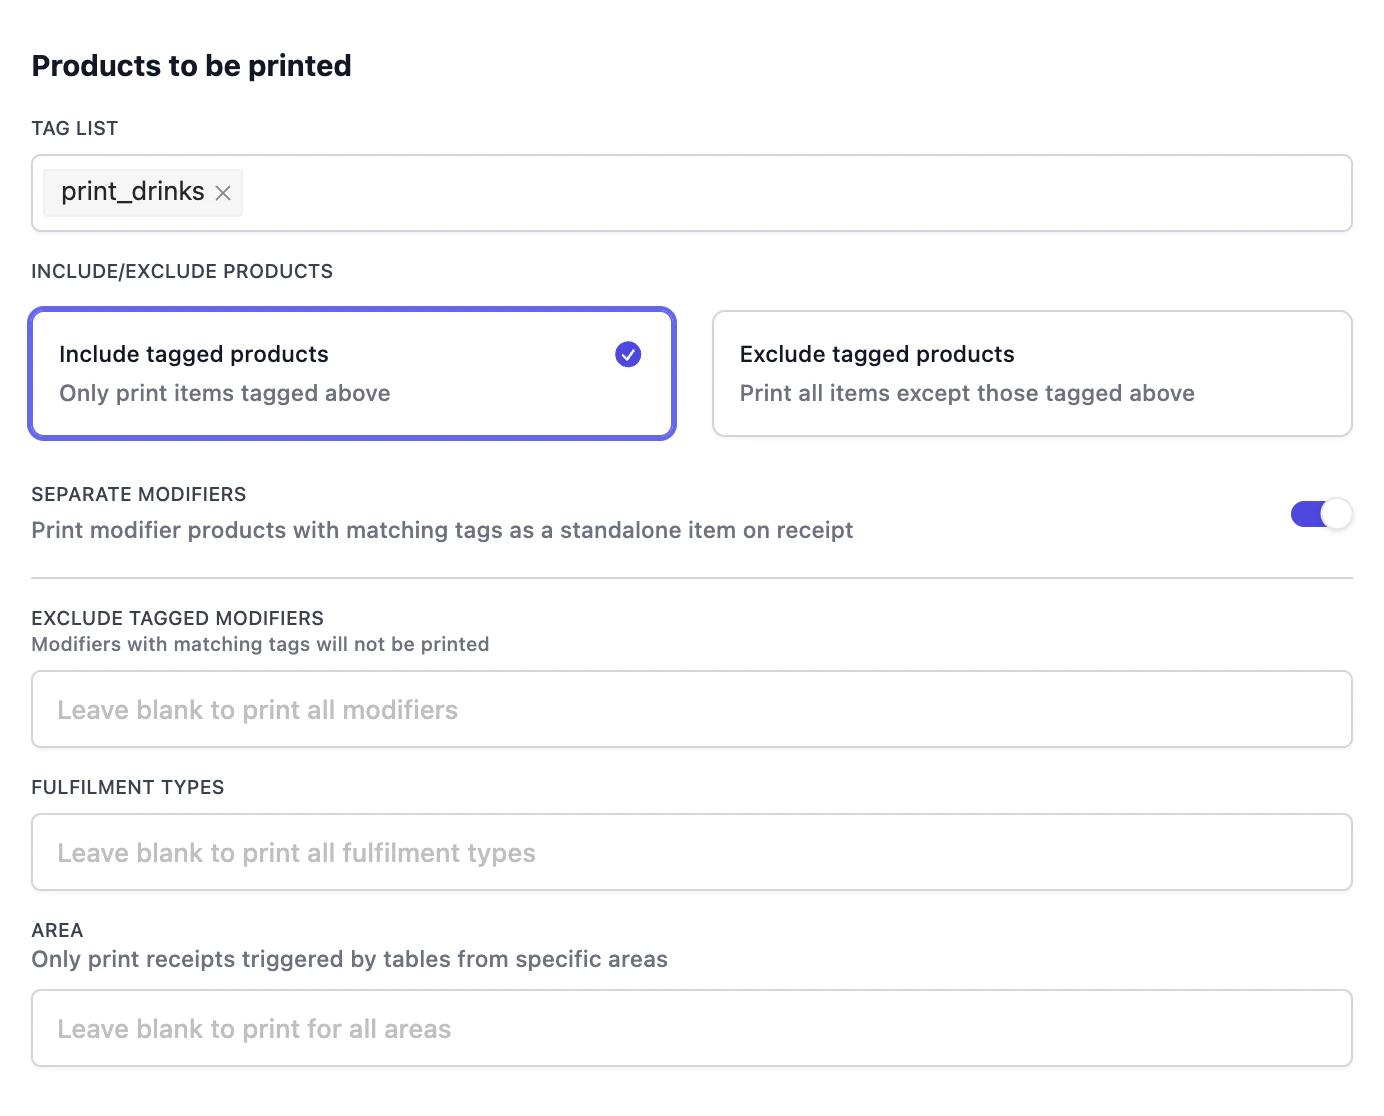
Products to be printed — the filter that decides which items reach this printer.
Choose which receipts this printer produces
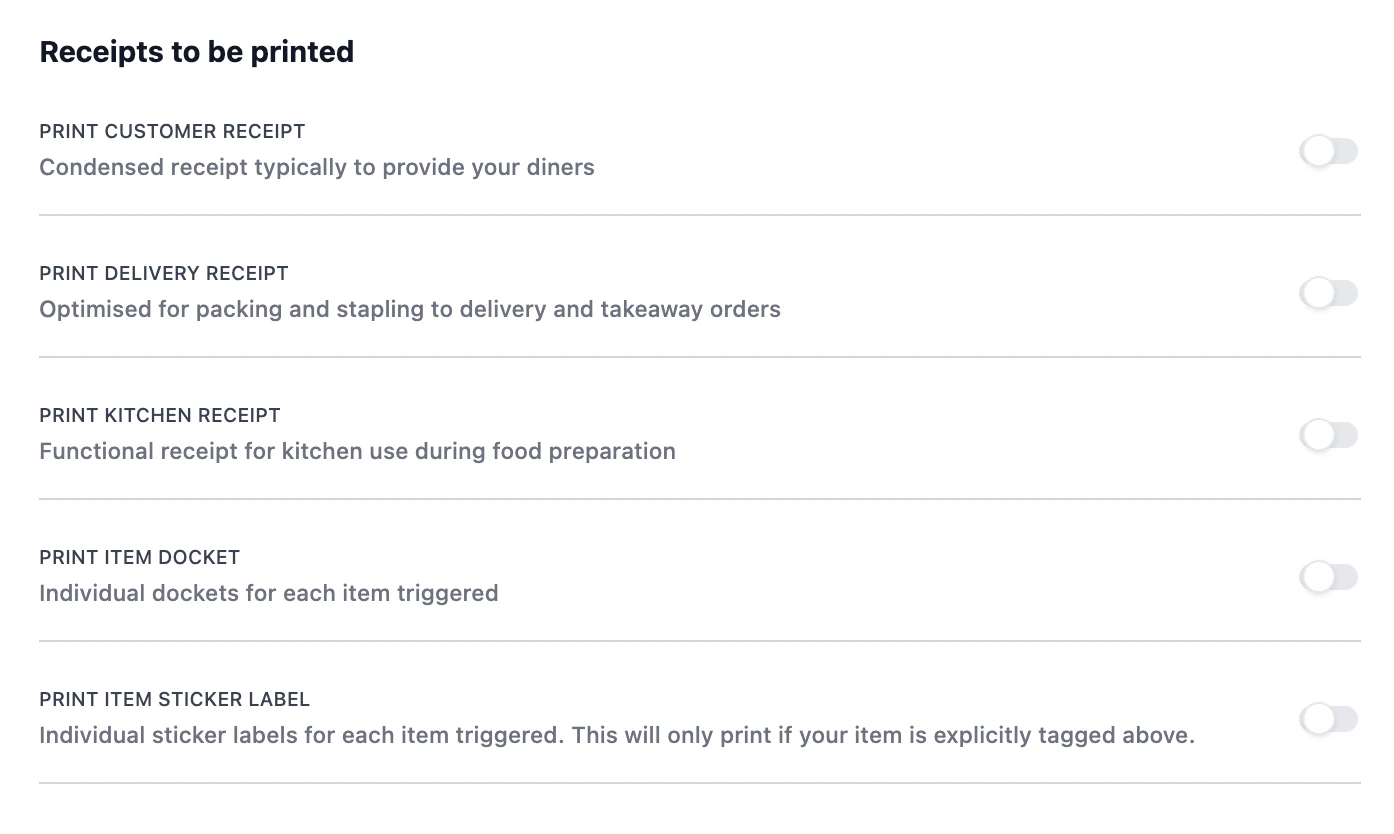
Receipts to be printed. Each toggle enables a different receipt format on this printer.
Test it
Routing tags configuration
The Products to be printed modal has five settings beyond the tag list. The tag list is what you need for the basic case; the rest are for layered or unusual setups.Tag list: include vs exclude
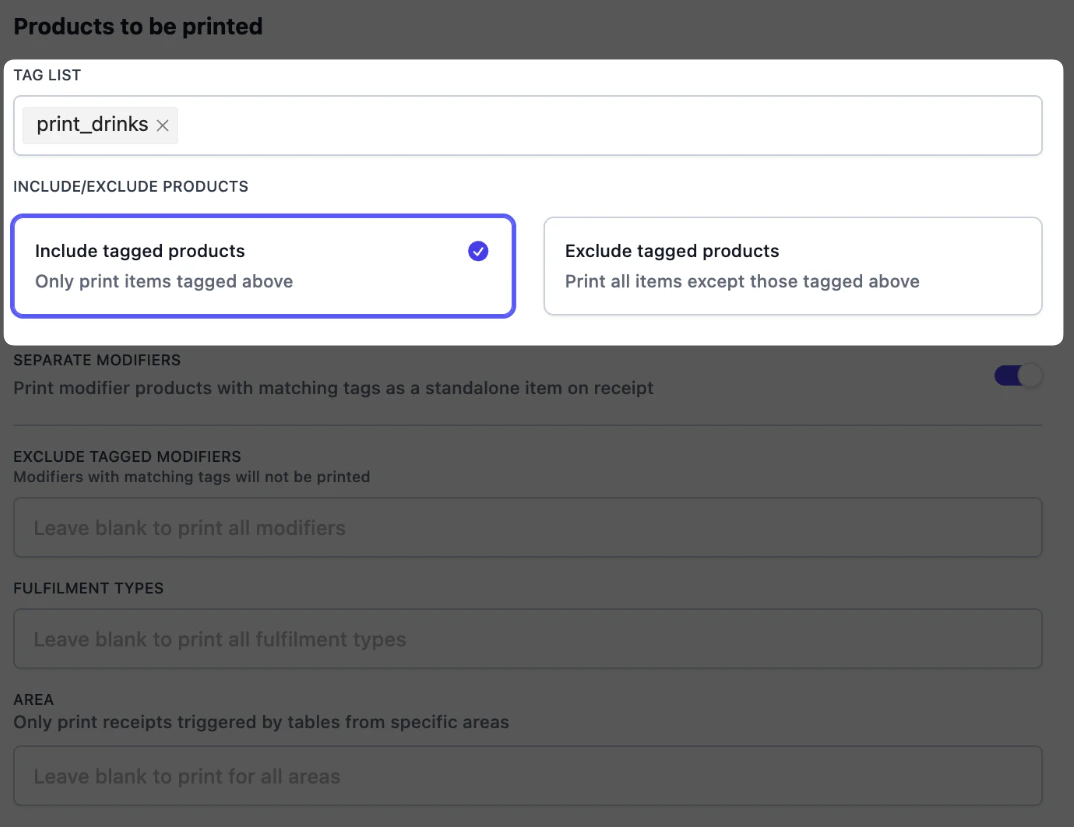
Tag list and Include / Exclude products on the Products to be printed modal.
- Include tagged products: print only items whose tags match. Use this on every station printer (bar, kitchen, counter).
- Exclude tagged products: print everything except items whose tags match. Use this on catch-all printers that should print most items but skip one category.
print_retail. The printer prints everything except retail items.
Separate modifiers
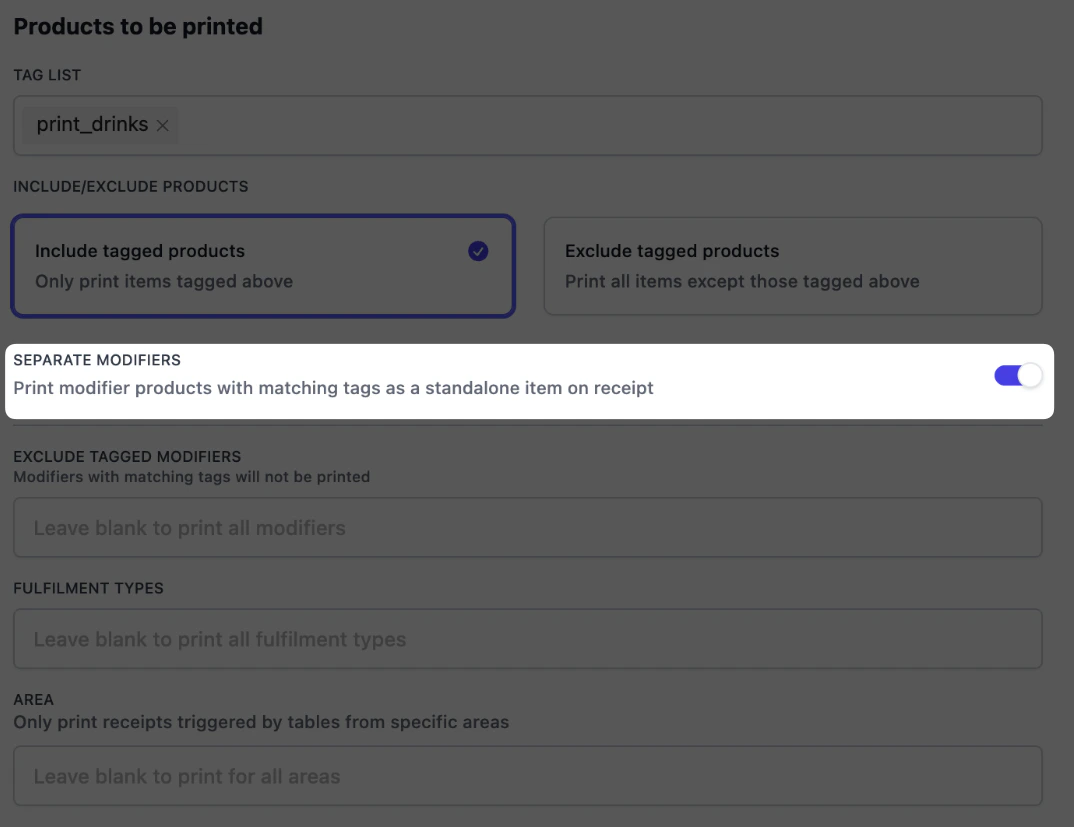
Separate modifiers toggle on the Products to be printed modal.
print_food and goes to the kitchen. One of its modifiers, “Add chocolate milkshake”, is tagged print_drinks. With Separate modifiers turned on at the bar printer, the bar receives the milkshake as its own line. The kitchen still receives the burger ticket without it. If Separate modifiers wasn’t turn on, nothing would print at the Bar printer, as only top level items are matched.
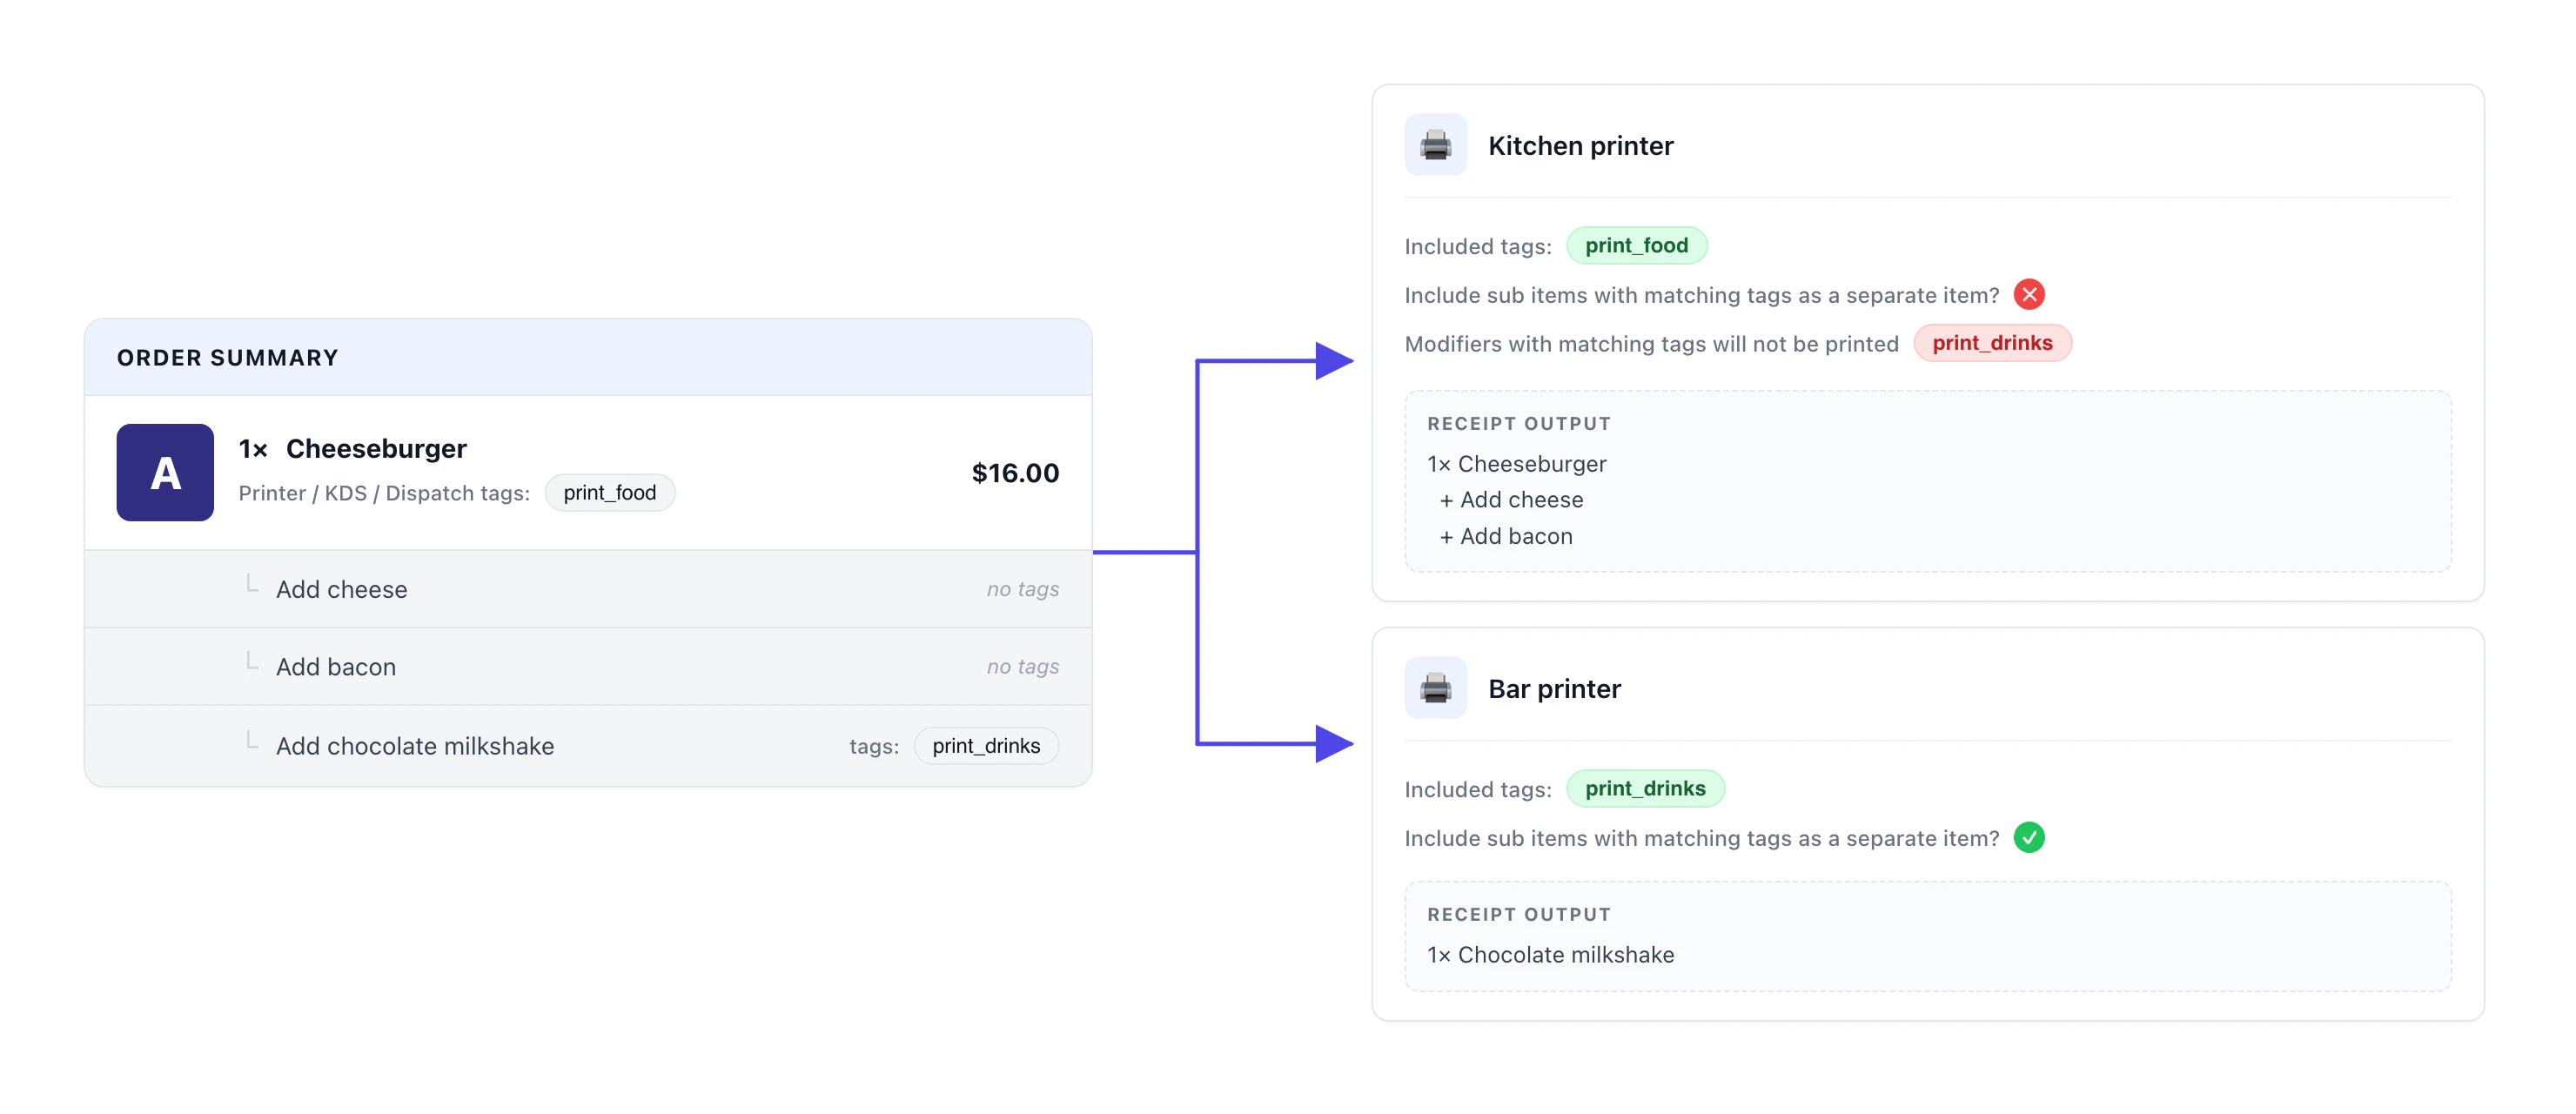
A cheeseburger with three modifiers — two untagged extras print with the burger on the kitchen ticket; the tagged milkshake breaks out as its own line on the bar ticket.
Exclude tagged modifiers
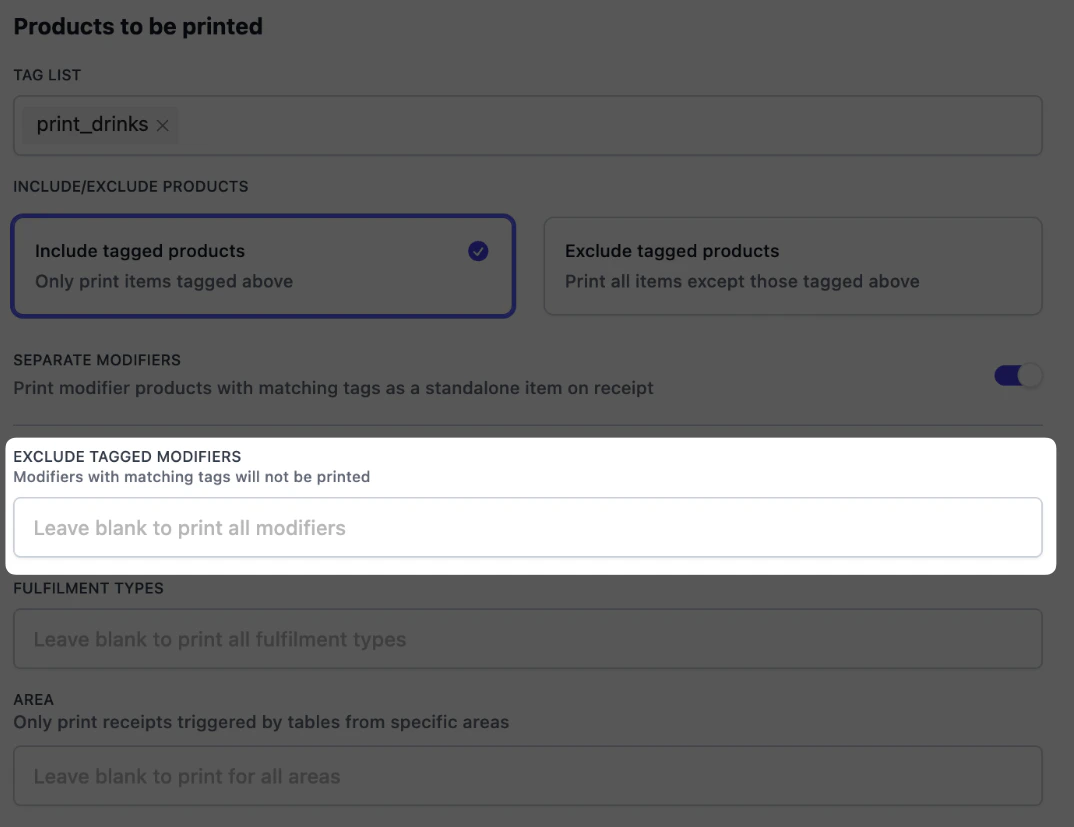
Exclude tagged modifiers field on the Products to be printed modal.
In the previous example, we use Exclude modifiers to avoid showing the drinks modifiers at the kitchen printer.
Fulfilment types and area
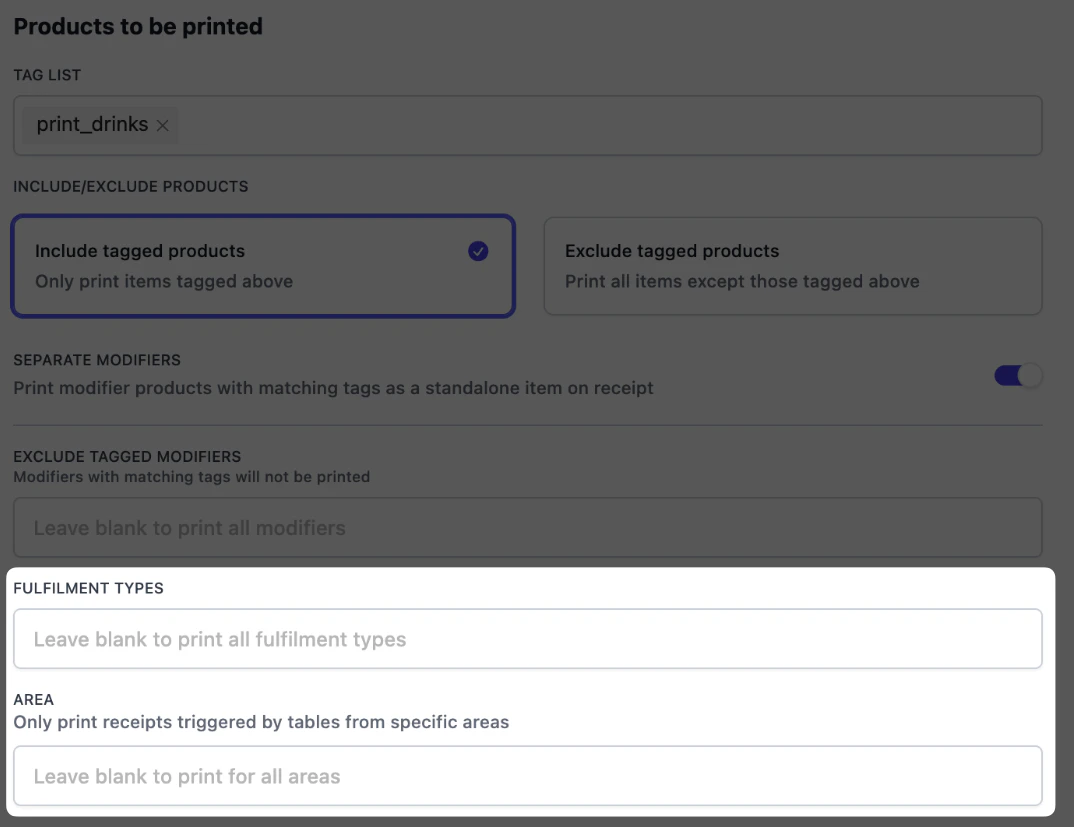
Fulfilment types and Area fields on the Products to be printed modal.
- Dine-in — orders linked to a table.
- Pickup / takeaway — customer collects in-store.
- Delivery — your own delivery or third-party aggregators (foodpanda, Deliveroo, etc.).
- Pickup and delivery orders bypass the Area filter — they aren’t tied to a table.
Receipt types and their settings
Each receipt type enabled on a printer has its own formatting panel: copies, sorting, fonts, what to show on the slip, and so on. These are independent of routing: routing decides which items reach a receipt; these settings decide how the receipt looks. Enable a receipt type in Receipts to be printed, and the matching settings panel appears below it on the same page.CUSTOMER RECEIPT. Condensed receipt typically given to your diners.
CUSTOMER RECEIPT. Condensed receipt typically given to your diners.
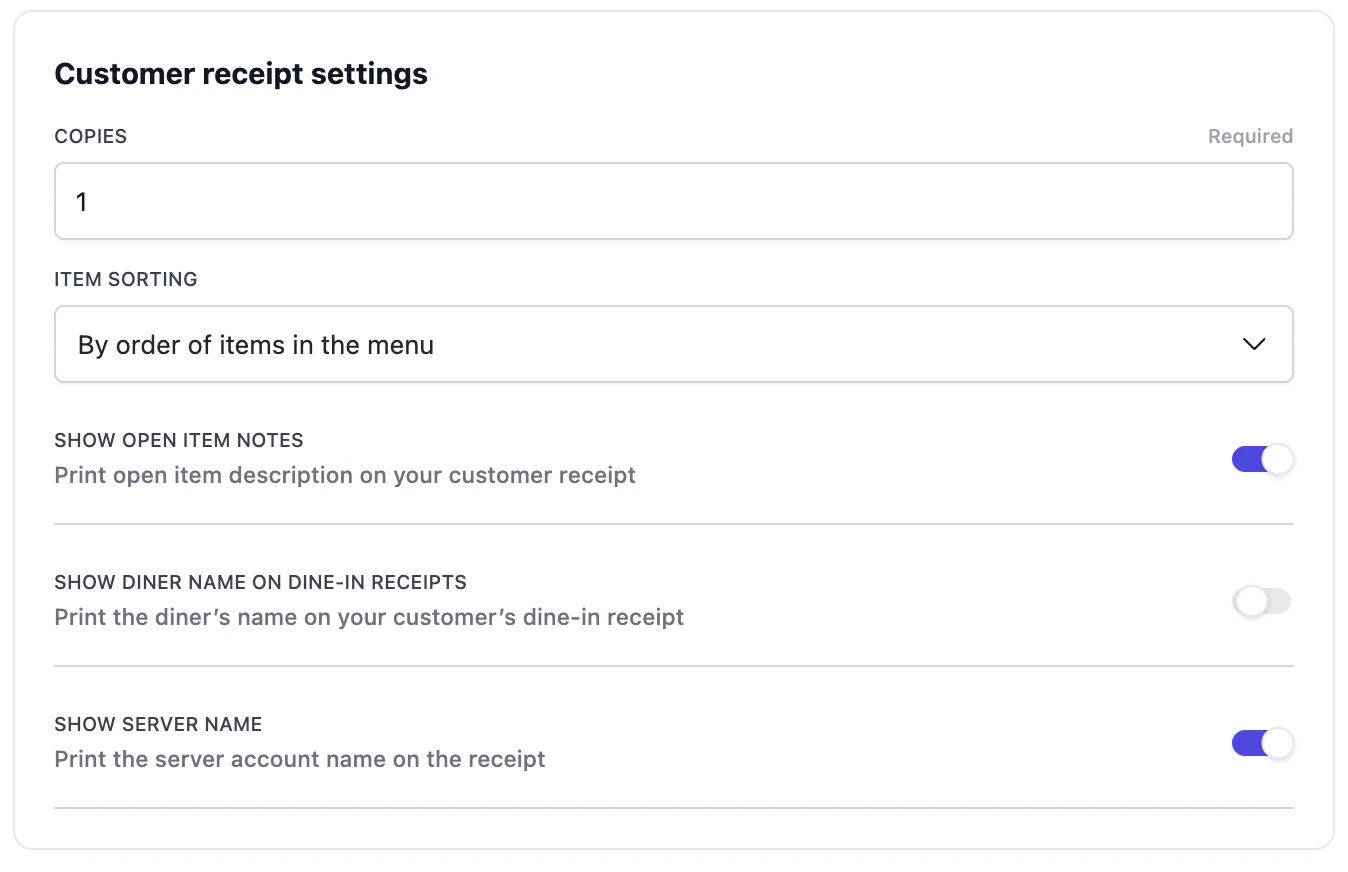
Customer receipt settings panel.
- Number of copies
- Item sorting: You can choose to sort: i) by when the item was added, ii) by how items are sorted in the menu, iii) by order of printing tags or iv) with configurable items to the end.
- Show open item notes: print free-text notes you add at checkout.
- Show diner name on dine-in receipts: useful for quick service restaurants calling diners by name.
- Show server name: adds the staff member who took the order.
DELIVERY RECEIPT. Optimised for packing and stapling to delivery and takeaway orders.
DELIVERY RECEIPT. Optimised for packing and stapling to delivery and takeaway orders.
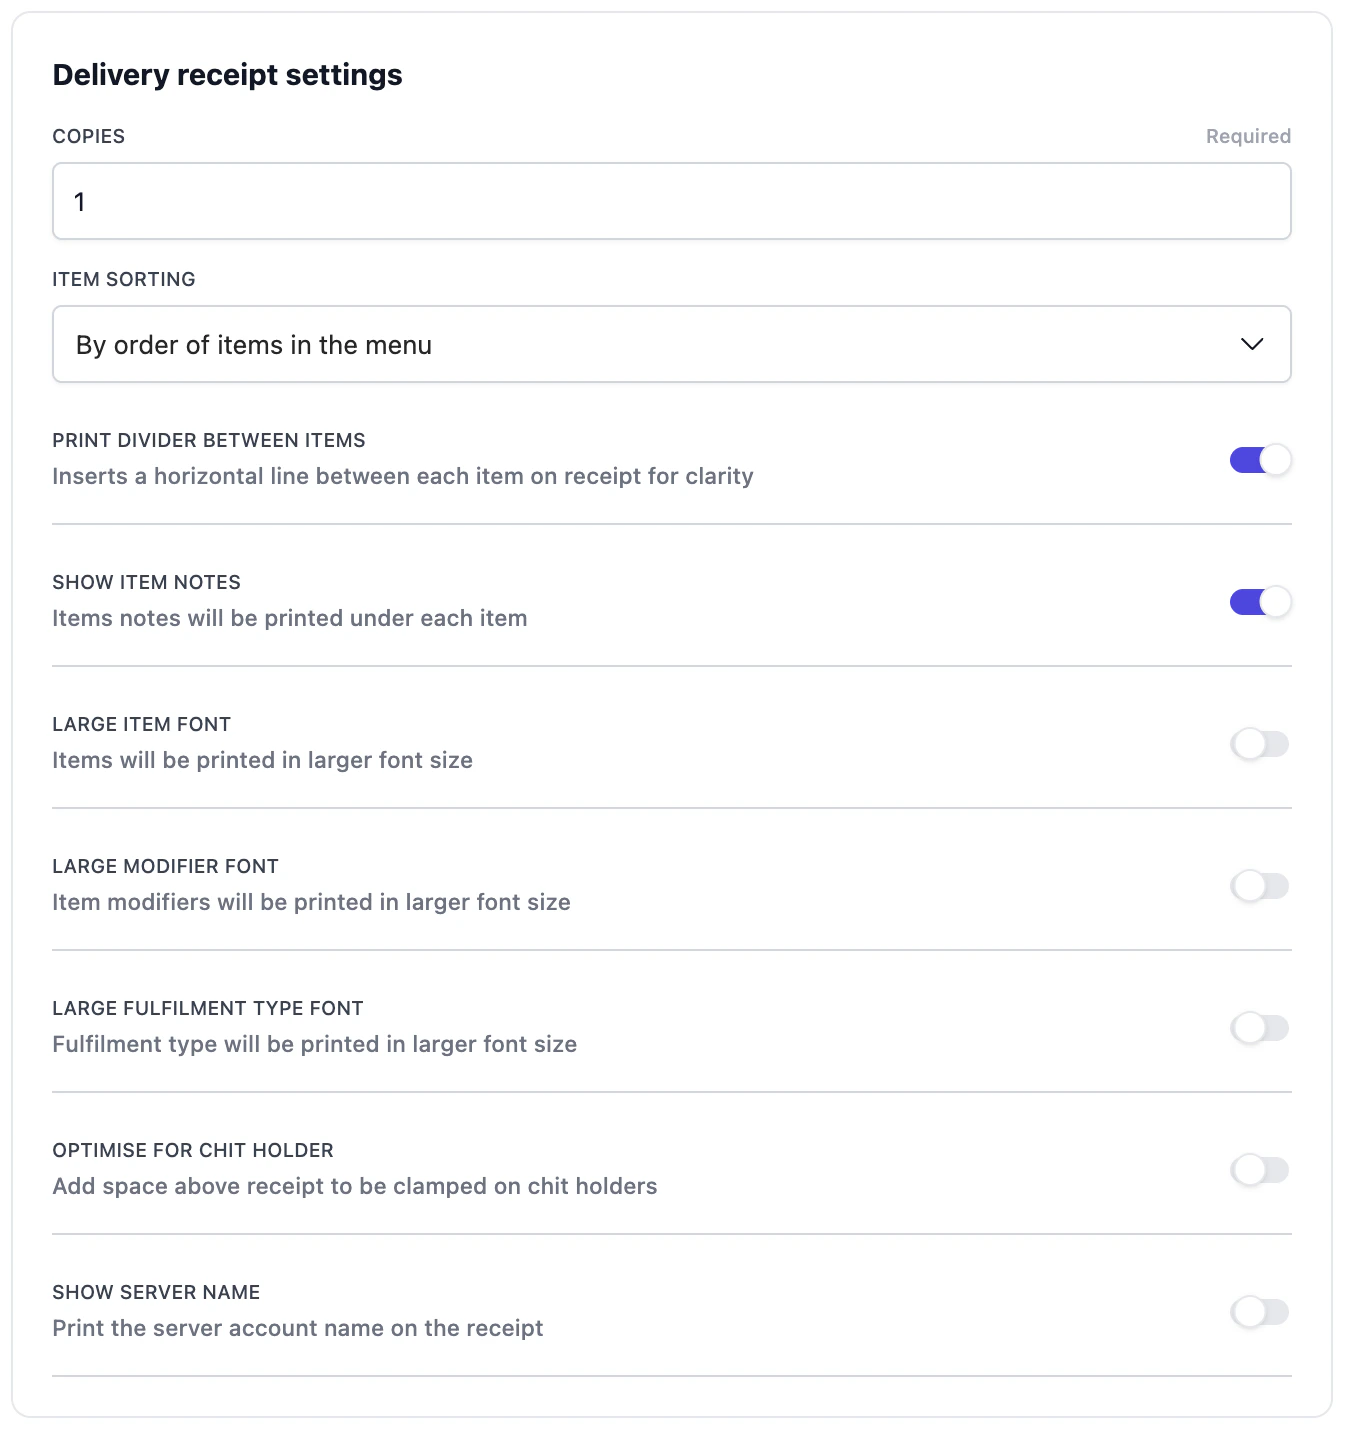
Delivery receipt settings panel.
- Print divider between items: adds a horizontal line between items for legibility while packing.
- Larger item / modifier / fulfilment type font: easier to read at speed.
- Optimise for chit holder: adds space at the top so the slip can be clamped without obscuring text.
KITCHEN RECEIPT. Functional receipt for kitchen use during food preparation.
KITCHEN RECEIPT. Functional receipt for kitchen use during food preparation.
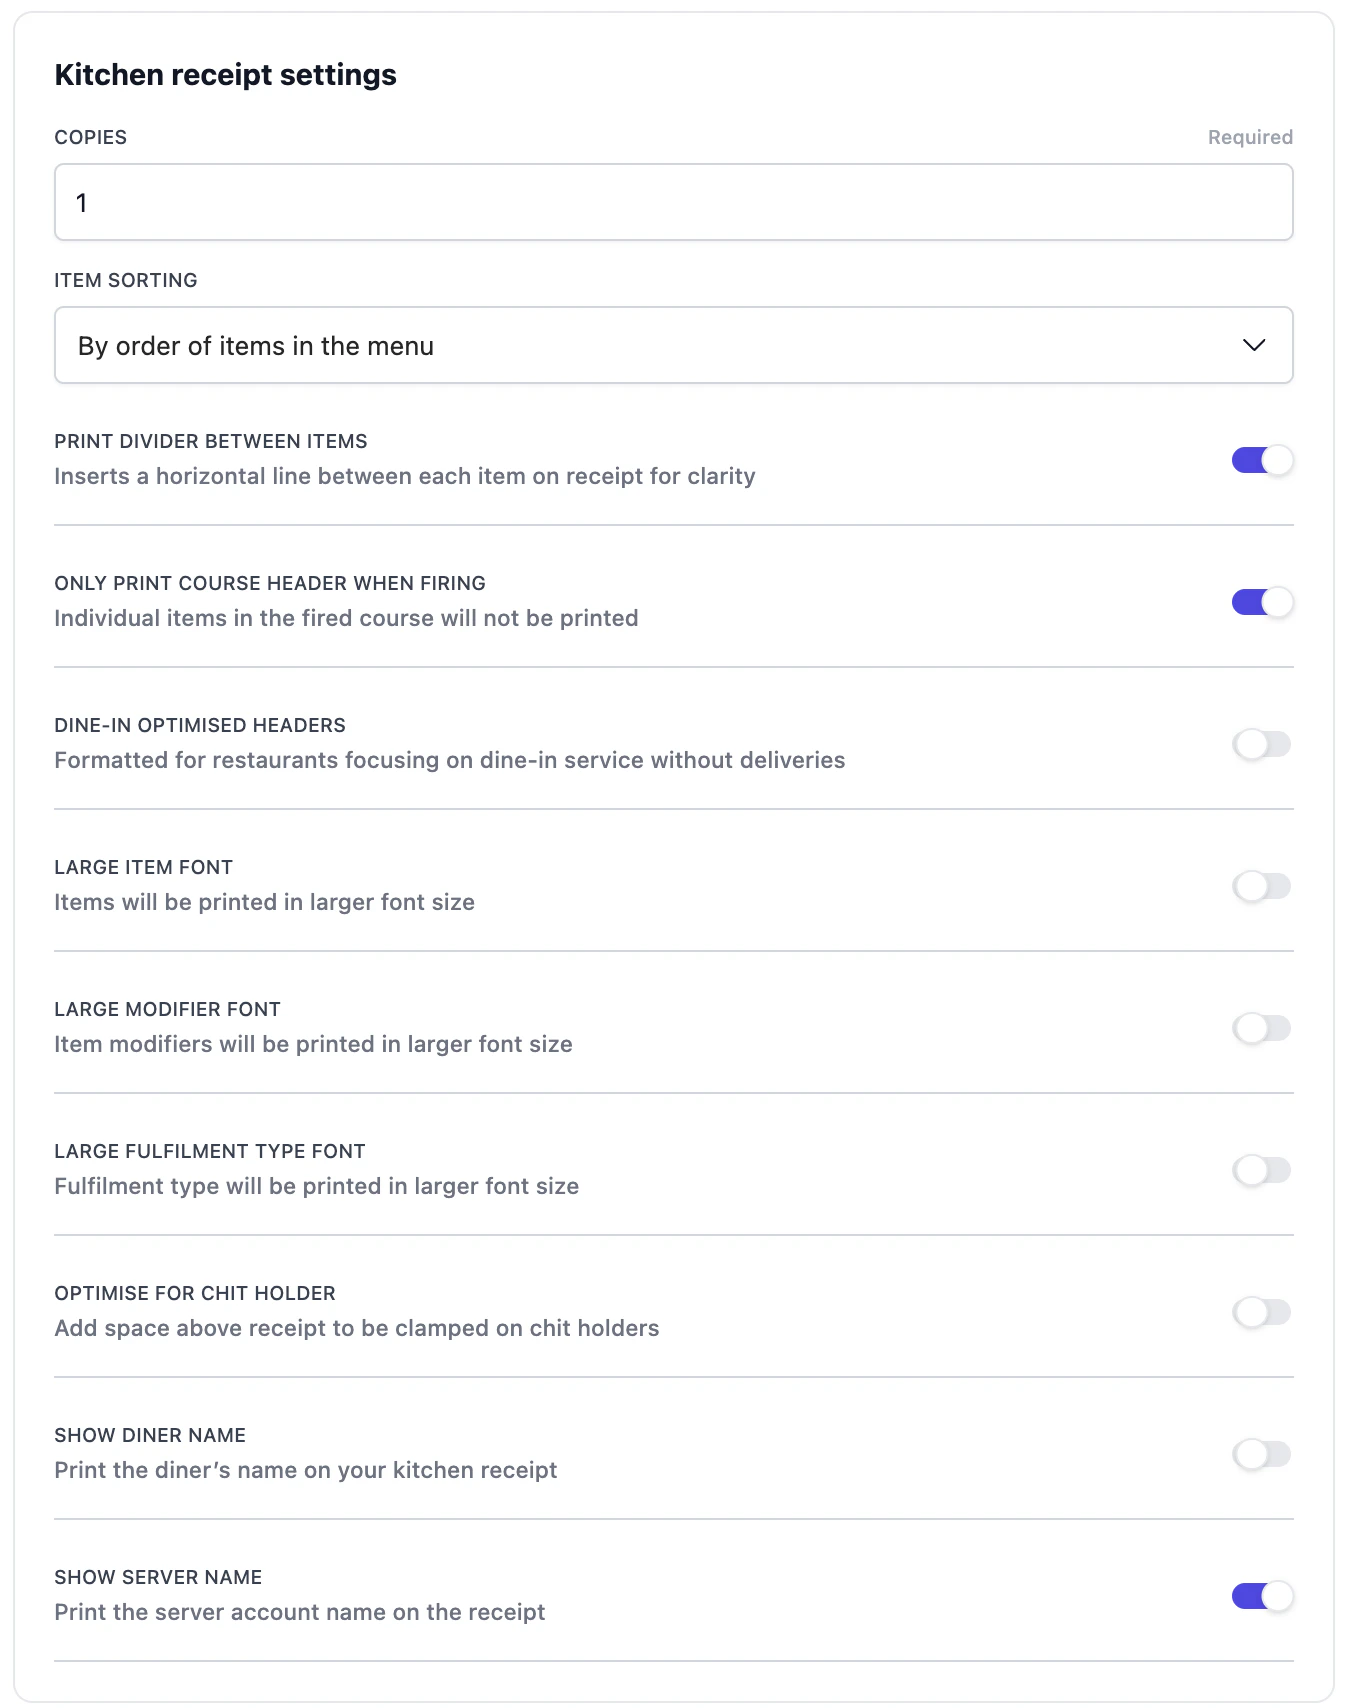
Kitchen receipt settings panel.
- Only print course header when firing: for course-fired service, prints just the header line for the course rather than every item again.
- Dine-in optimised headers: strips delivery-only fields for restaurants without takeaway.
- Optimise for chit holder: adds space at the top so the slip can be clamped without obscuring text.
- Larger item / modifier / fulfilment type font: easier to read at speed.
- Add line between tagging group: when sorting by printing tags is selected, this option adds a line between each tagging group.
ITEM DOCKET. Individual dockets for each item triggered.
ITEM DOCKET. Individual dockets for each item triggered.
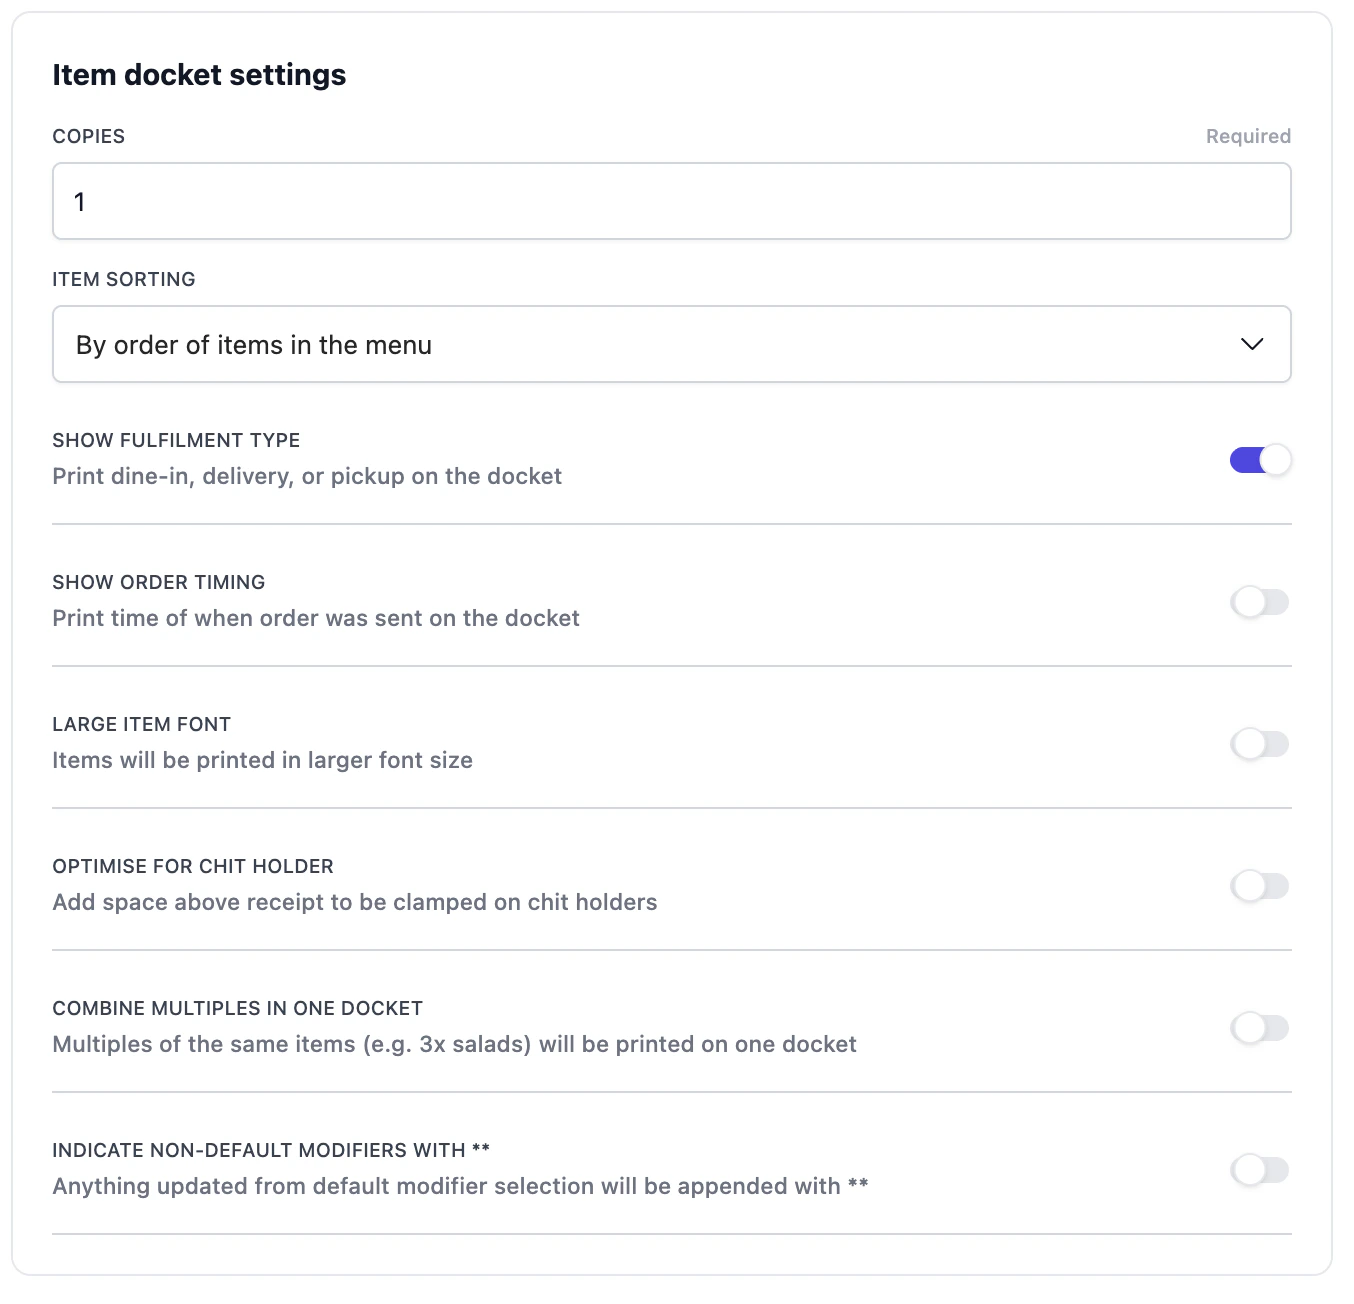
Item docket settings panel.
- Combine multiples in one docket: three of the same drink print on one slip instead of three.
- Indicate non-default modifiers with
**: flags any modifier the diner changed from the default, so prep staff can spot customisations at a glance. - Show order timing: prints when the item was fired.
ITEM STICKER LABEL. Individual sticker labels for each item triggered.
ITEM STICKER LABEL. Individual sticker labels for each item triggered.
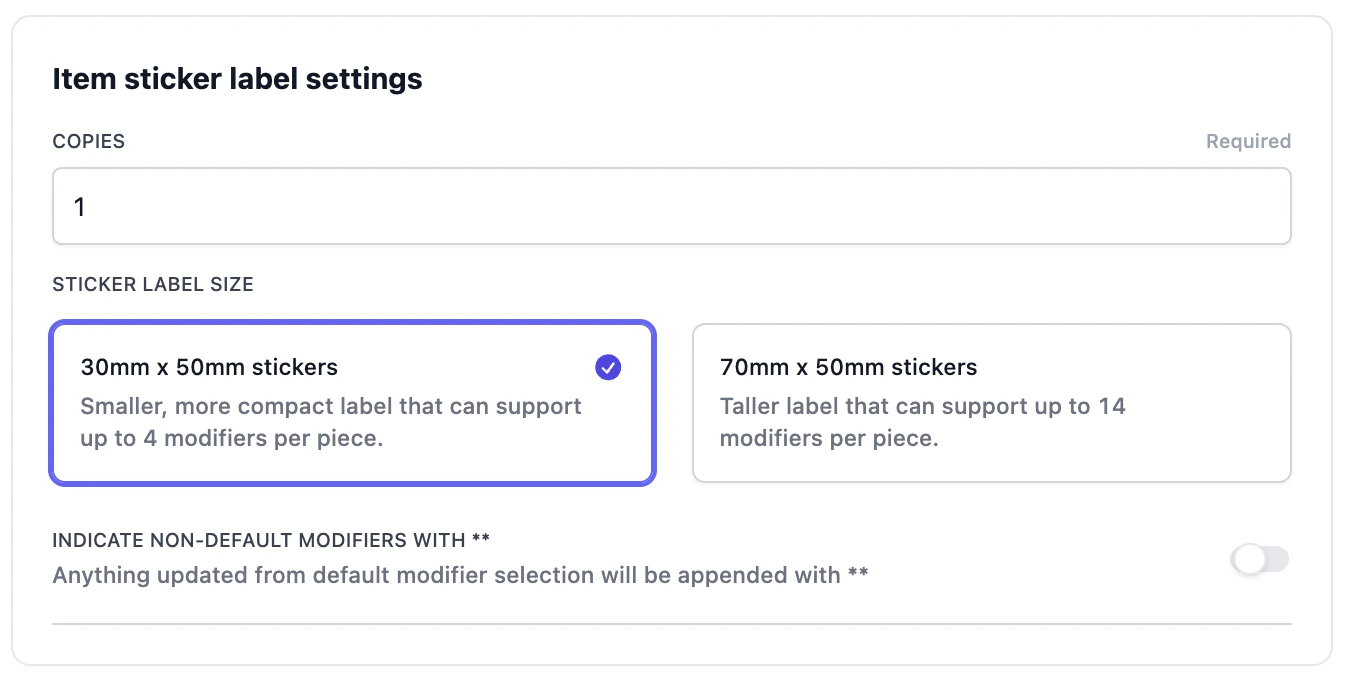
Item sticker label settings panel.
- Sticker label size: 30×50mm (up to 4 modifiers per label) or 70×50mm (up to 14 modifiers).
- Indicate non-default modifiers: same convention as item dockets.
Real-world setups
Four setups that combine several of the features above. Use them as templates if your operation looks similar.Bar station, kitchen station and runner station
Printing tags can be combined when multiple items must show on different places. Two common patterns:- Multiple tags on one printer. A small kitchen with no separate bar can listen for
print_foodANDprint_drinkson a single printer. Everything that needs preparation goes there. - A catch-all “runner” printer. A printer with a blank tag list acts as a complete fallback and prints every item on every order. Useful as a backup at the pass, or while you’re rolling out tags gradually.
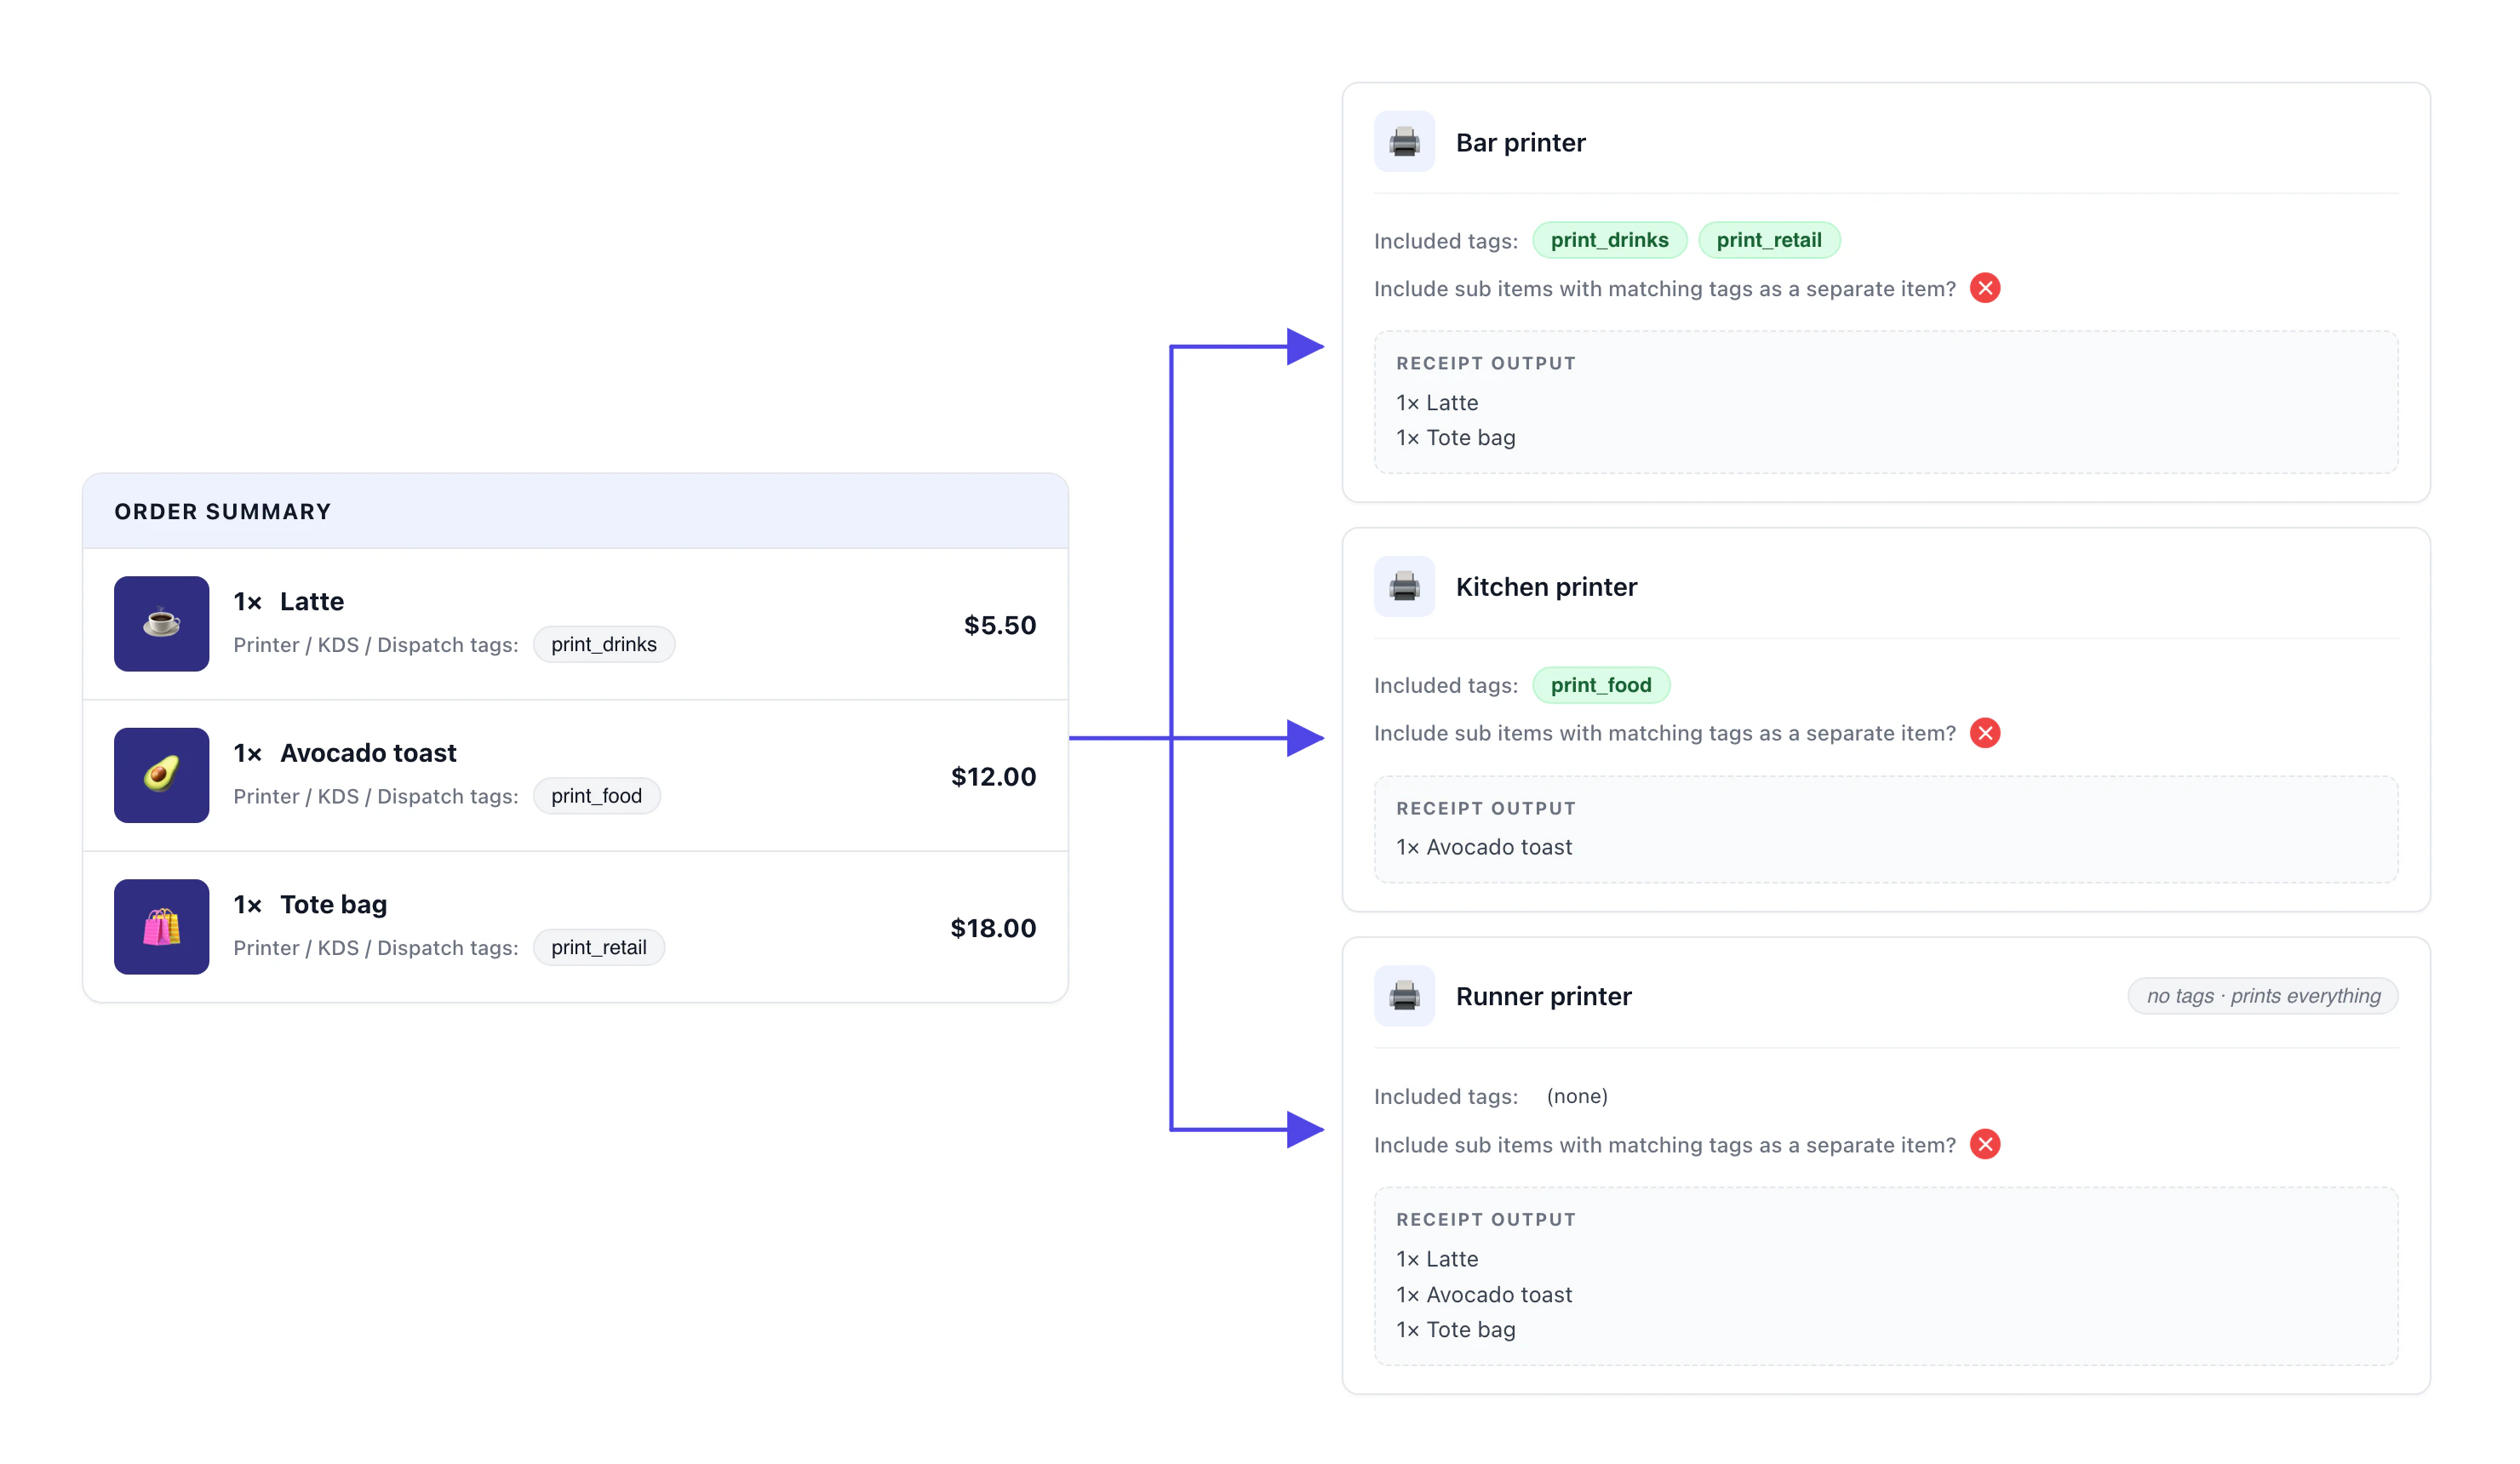
A layered setup: the bar printer listens for both drinks and retail, and a runner printer at the pass prints everything as a backup.
Combining different type of receipts
A restaurant runs a dedicated salad station (printing item dockets for every salad) and a drinks station (printing item sticker labels). Salads and drinks can be ordered standalone or as modifiers inside a main course (for example, a steak with “Add side salad” and “Add iced coffee”). The kitchen handles the hot mains. Salads and drinks should not show on the kitchen ticket because they are prepped elsewhere.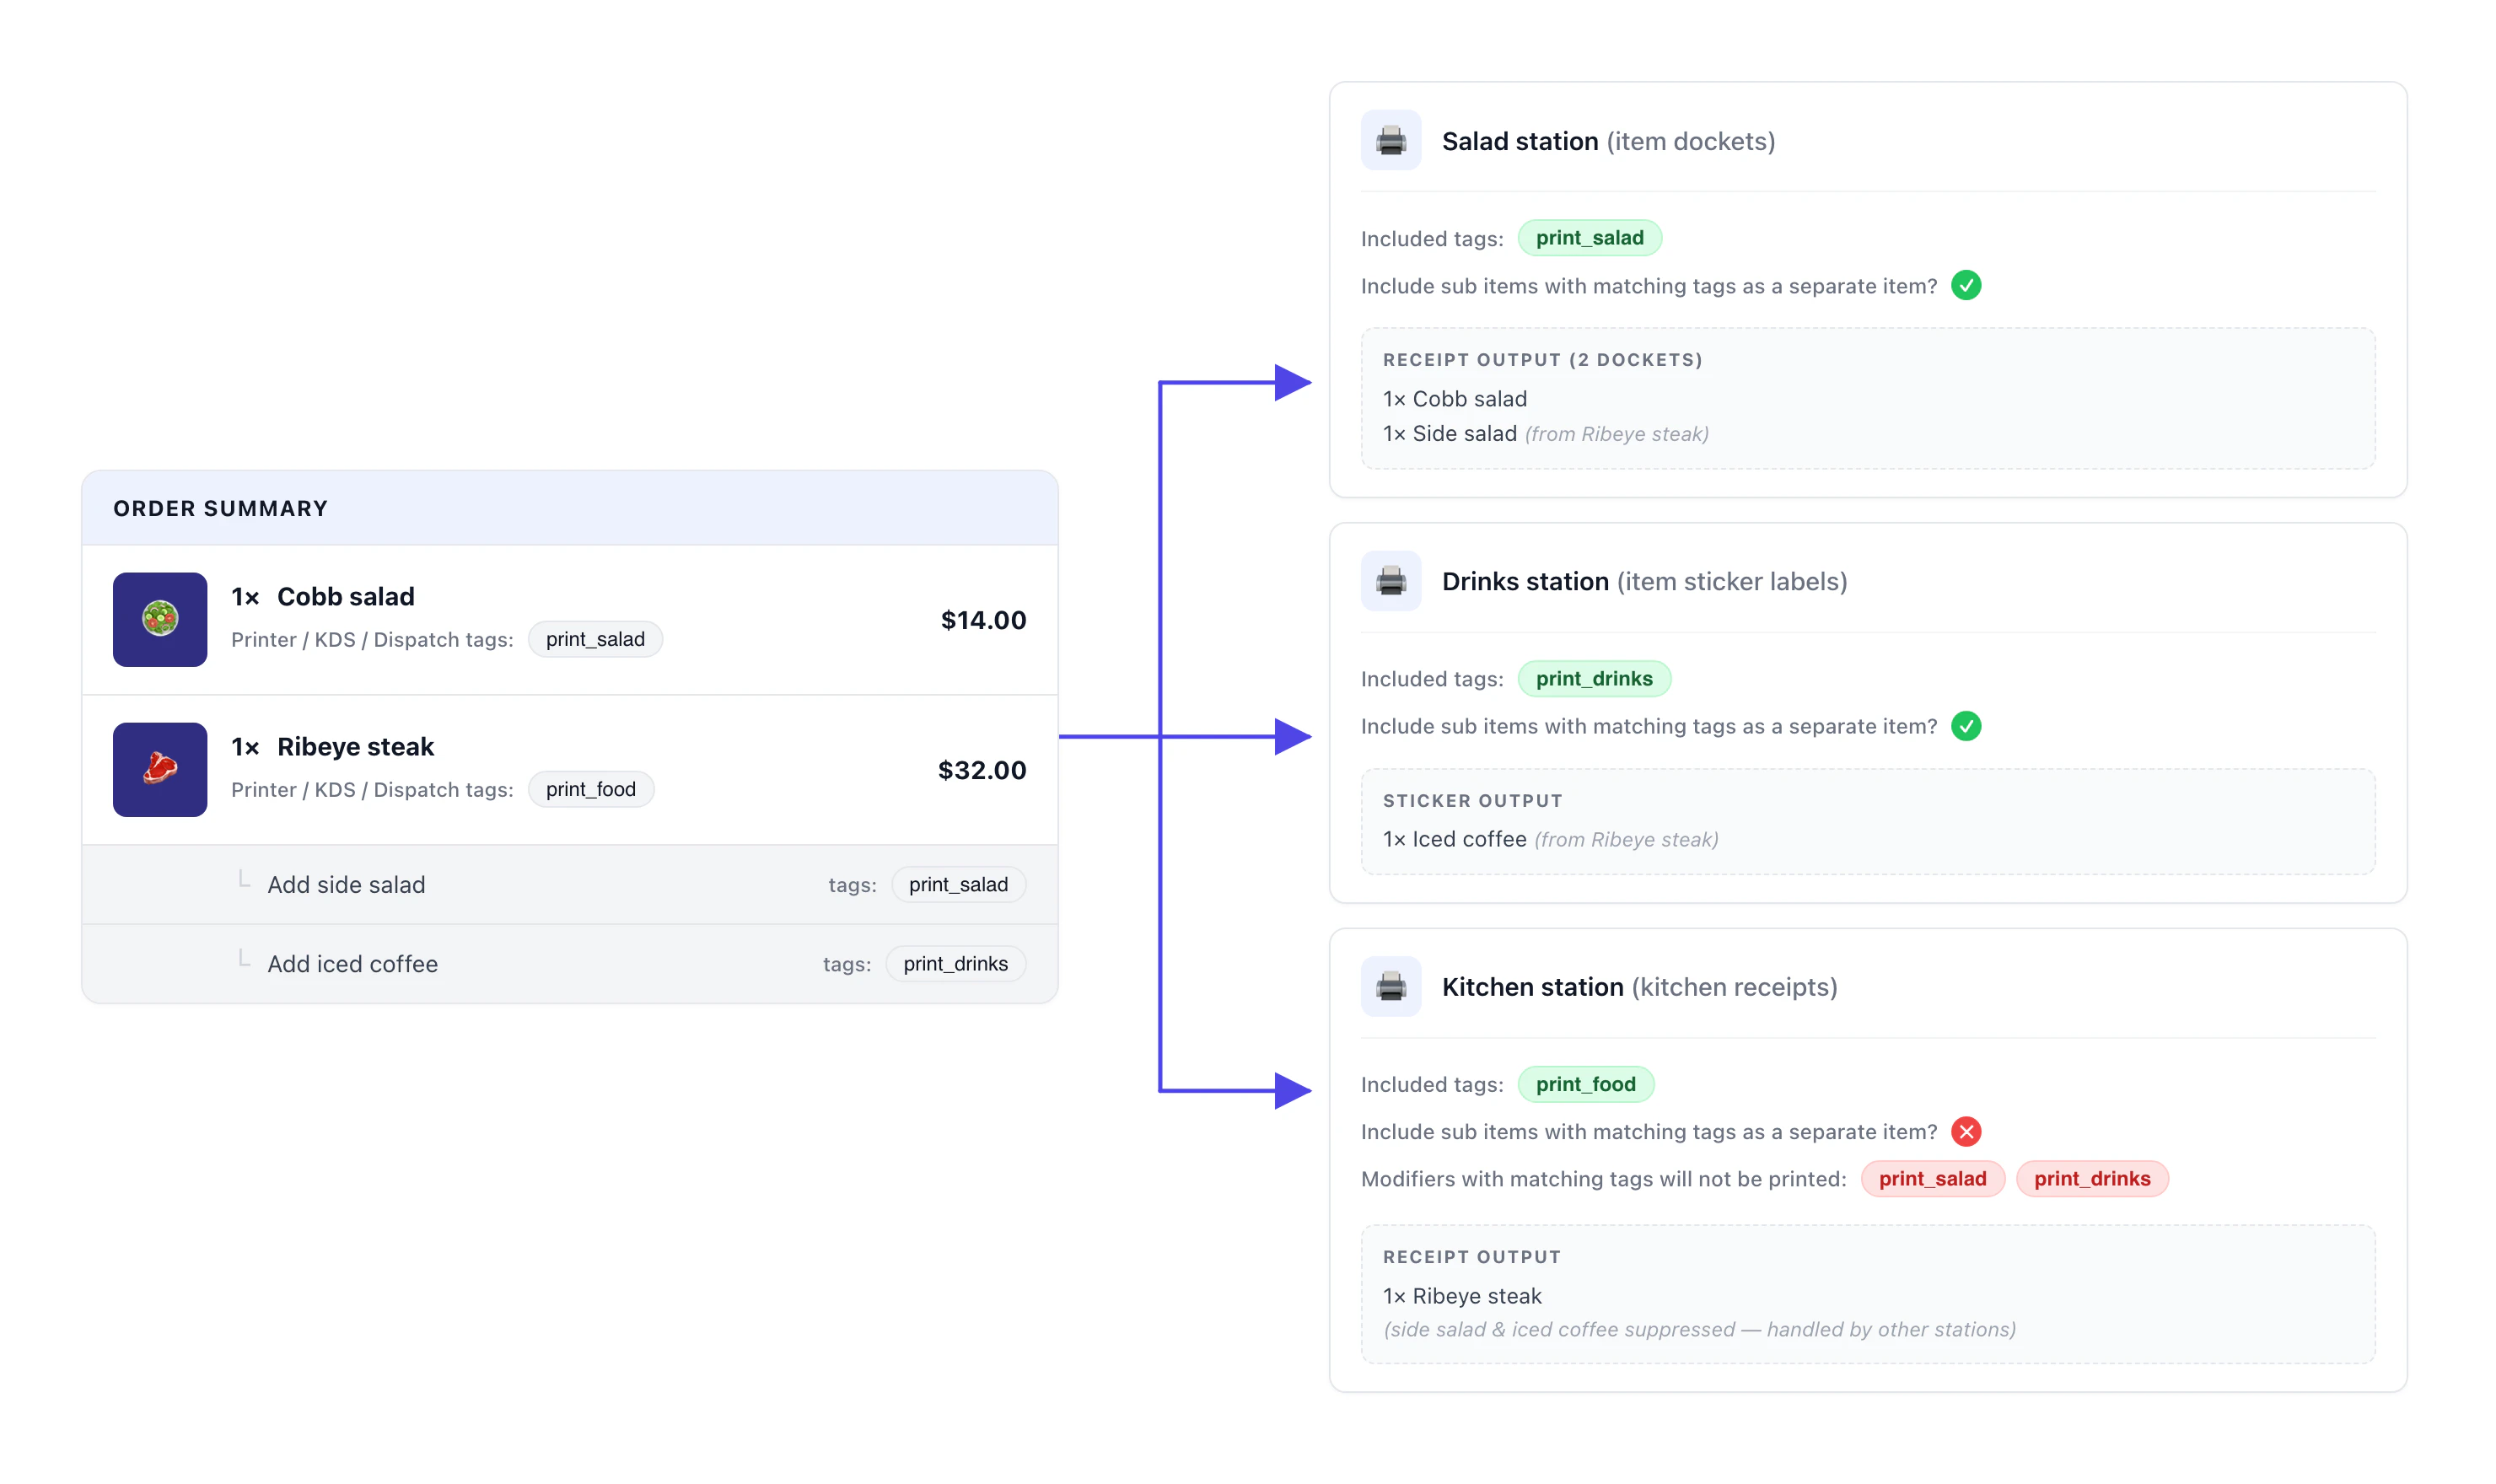
The same steak fires three printers: side salad breaks out to the salad station, iced coffee breaks out to the drinks station, and the kitchen ticket only carries the steak.
print_salad and print_drinks, so those same modifiers do not reprint under the steak on the kitchen ticket. Separate-on-the-station and exclude-from-the-kitchen always travel together.
Cafe with receipts split by fulfilment type
A cafe needs different outputs depending on whether a coffee is being made for takeaway or dine-in. Takeaway orders get a sticker label on the cup plus a delivery receipt attached to the bag. Dine-in orders need only a kitchen receipt for the barista. The two receipt formats run on the same physical bar-side receipt printer.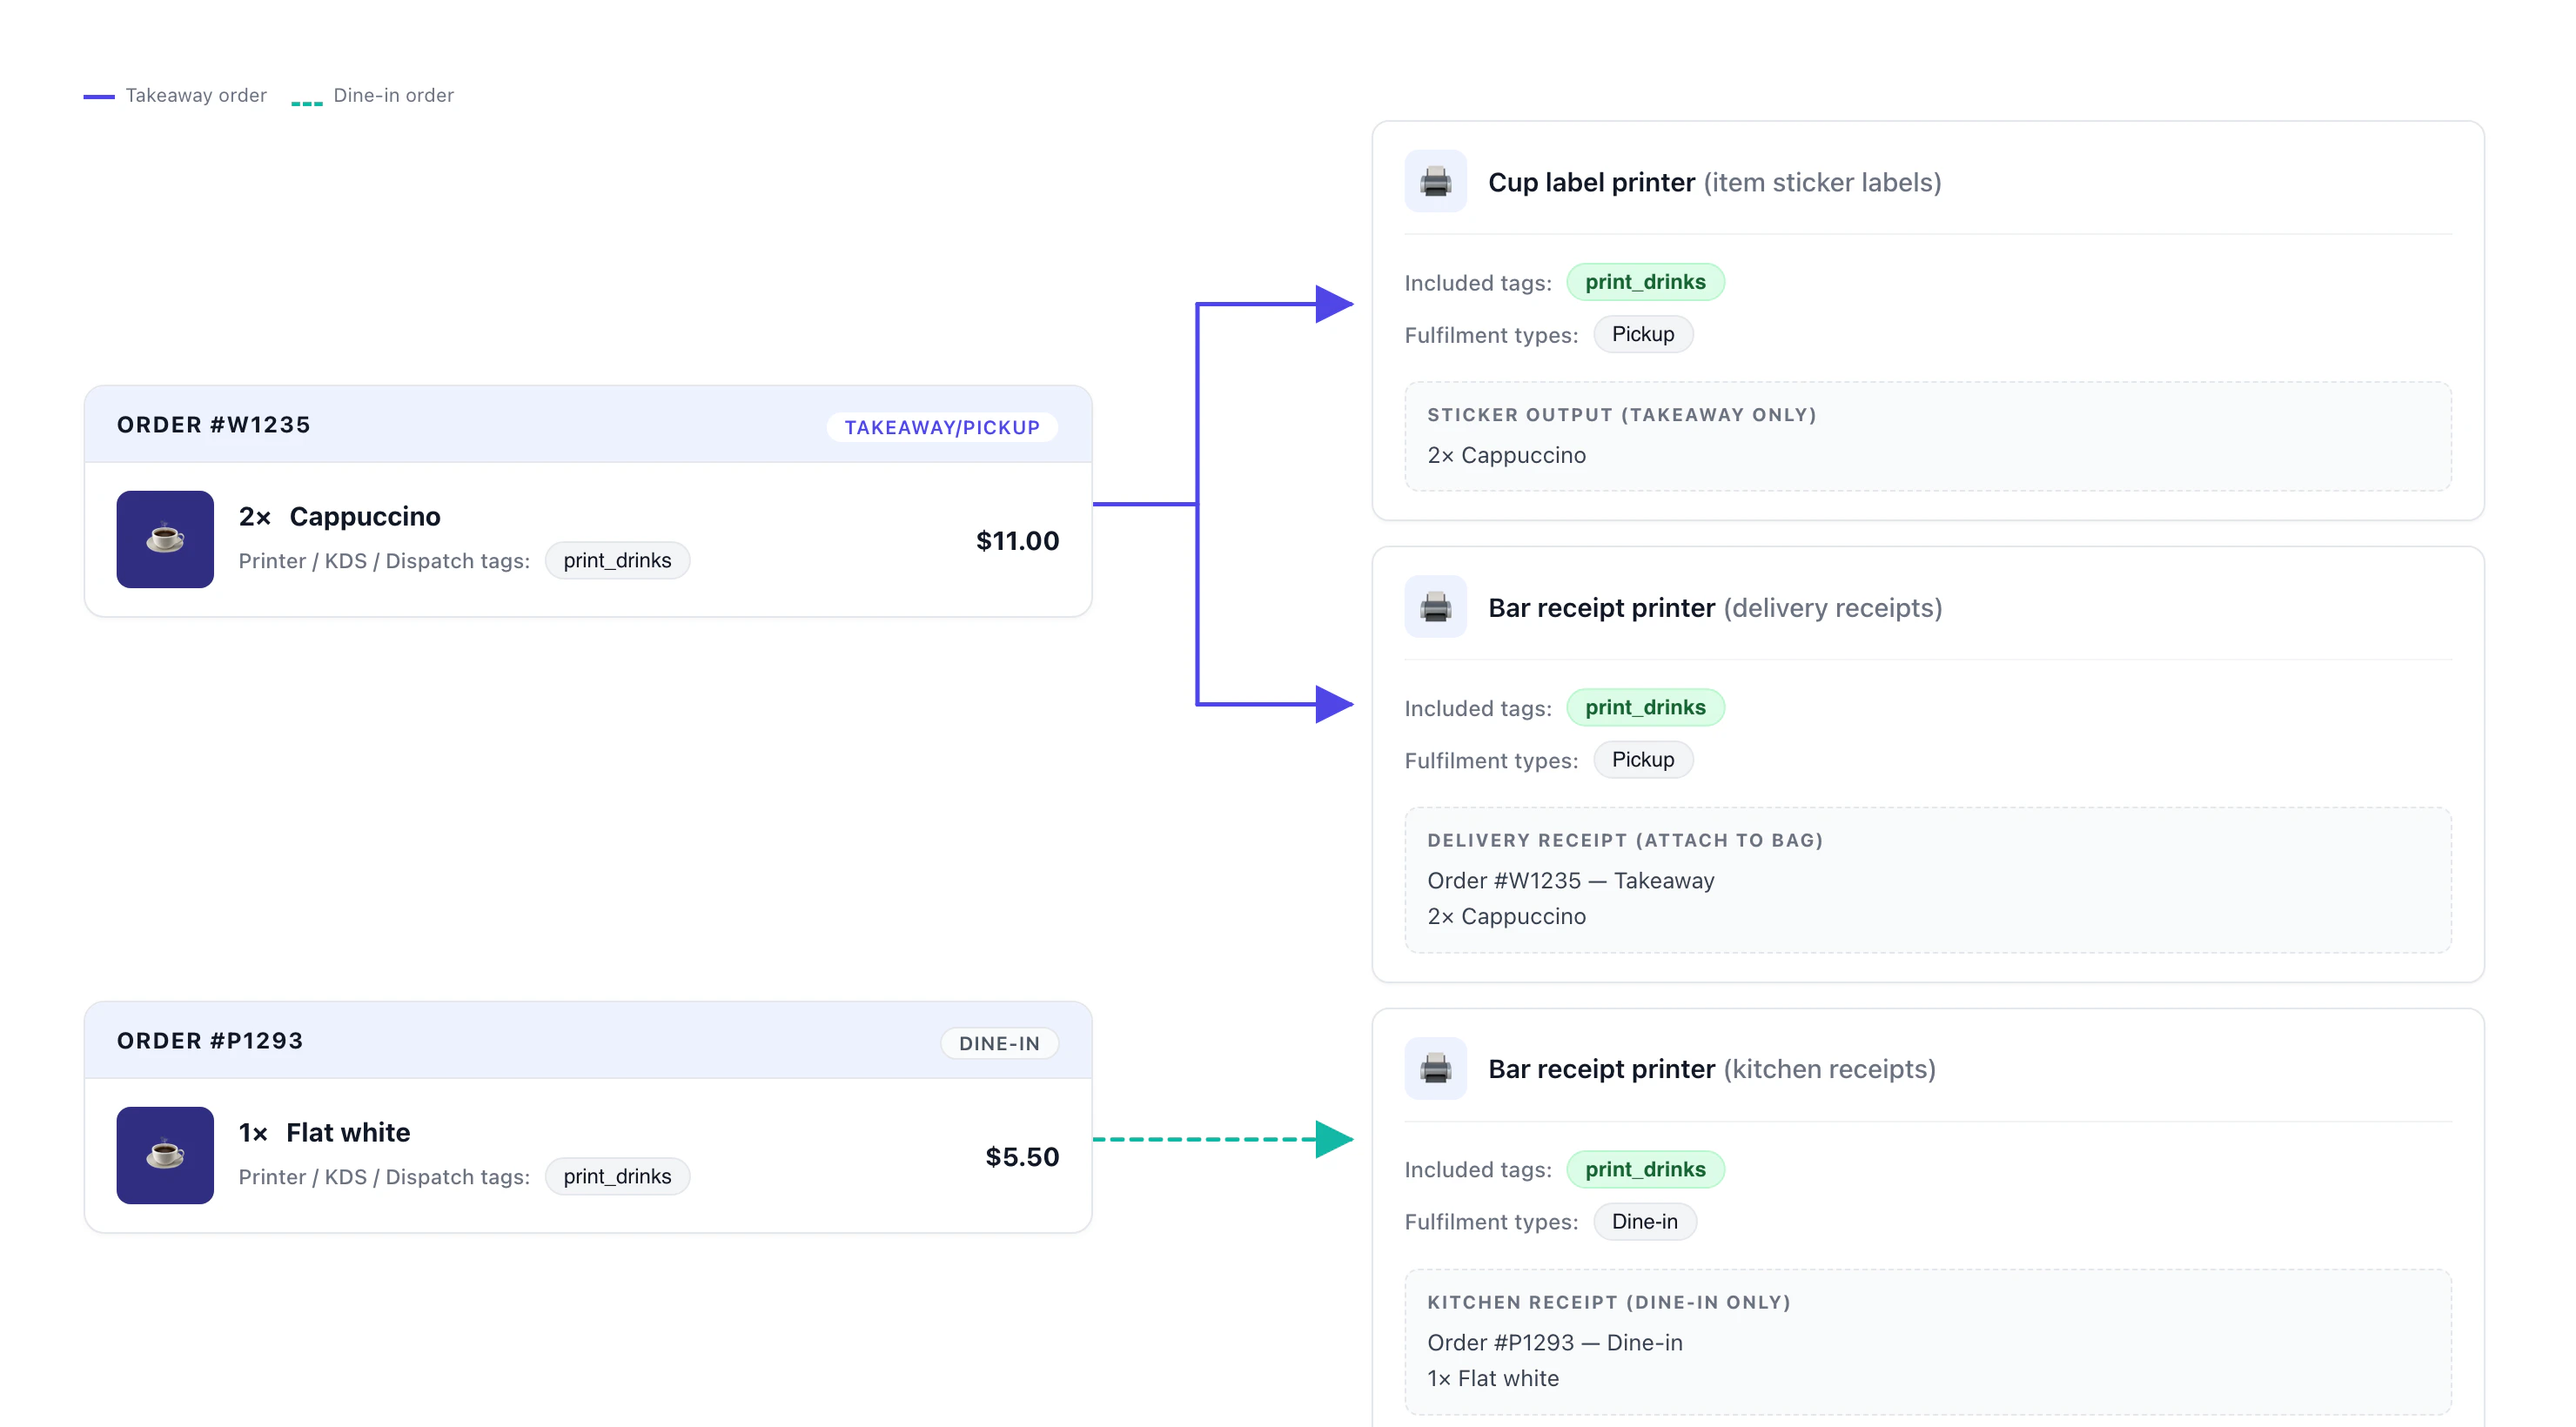
Same drinks tag, two different outputs depending on fulfilment type. The takeaway order fires the cup sticker plus a delivery receipt; the dine-in order fires the kitchen receipt on the same hardware.
Fine-dining restaurant with a 5-course menu
A fine-dining restaurant sells a 5-course menu where each course is a modifier under one parent product. The kitchen needs every course to print as its own top-level line on the kitchen ticket, in course order. The diner’s customer receipt should show only the parent (“1× Degustation menu”), with none of the courses underneath.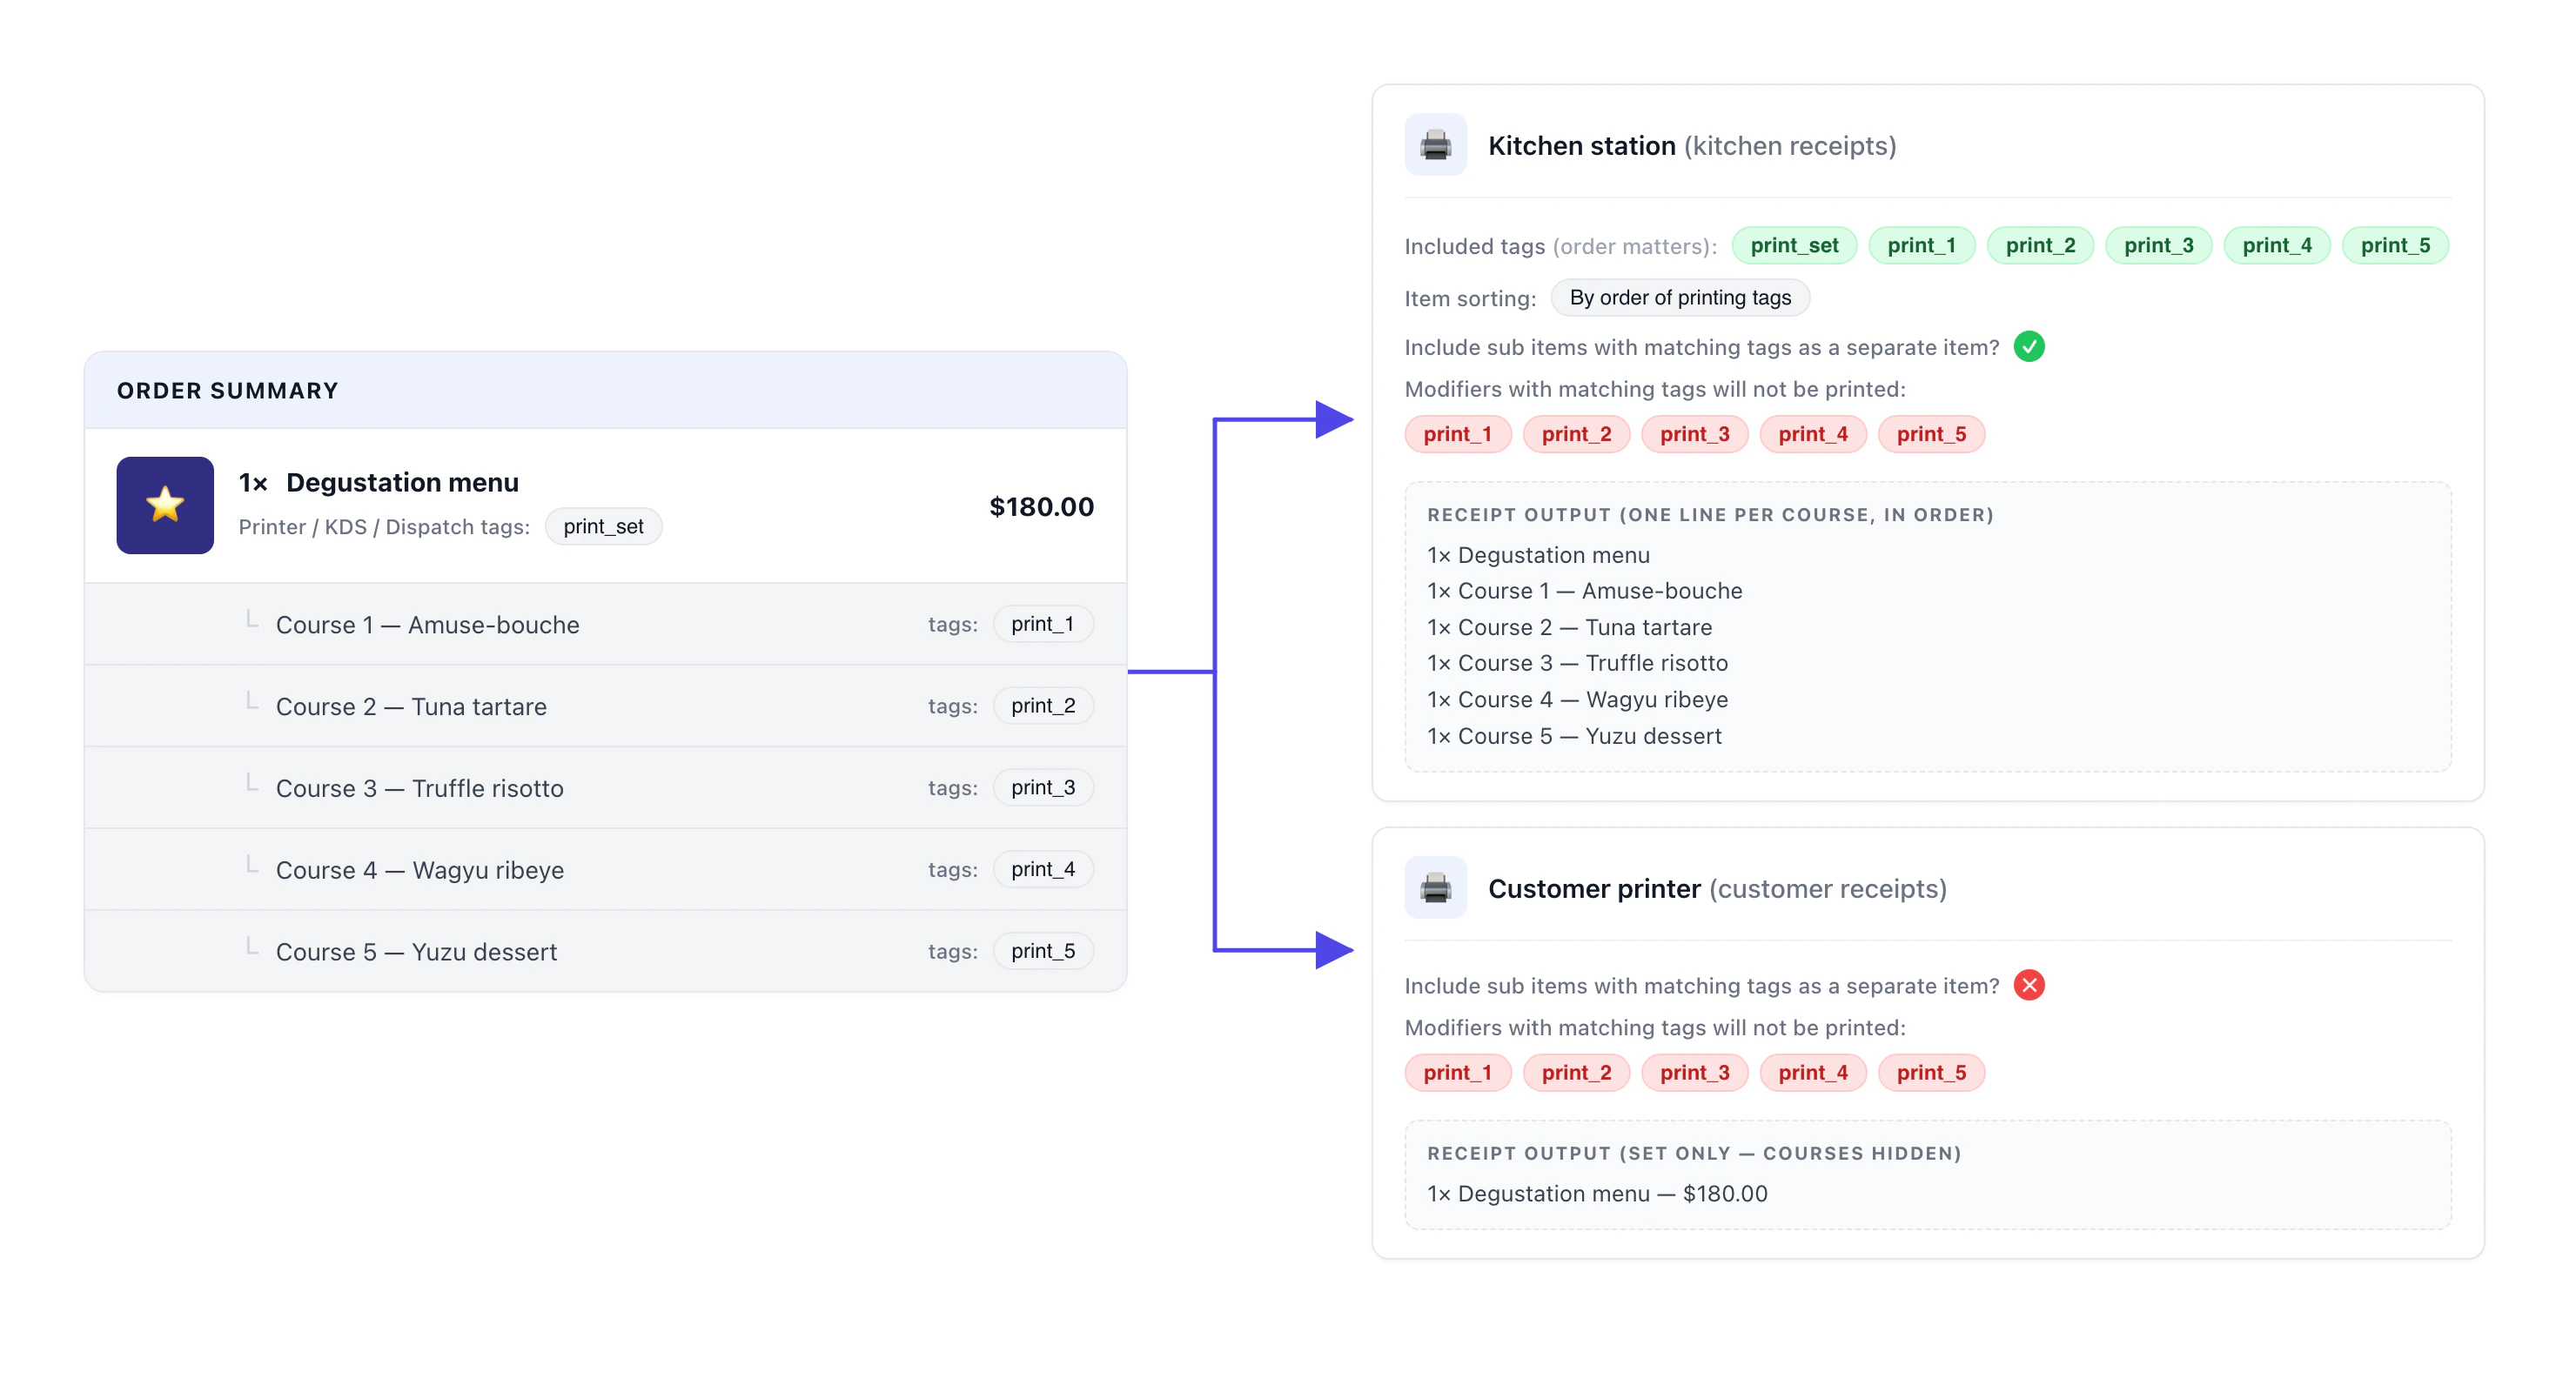
One Degustation menu order with 5 course modifiers. The kitchen receipt prints six lines in tag order (set first, then courses 1–5). The customer receipt shows just the parent line.
- Include sub items as a separate item is on, so each course modifier promotes to its own top-level line.
- Exclude tagged modifiers lists the same course tags — that strips them from being printed nested under the parent, so each course appears exactly once.
- Item sorting is set to By order of printing tags, which means the order of the tag list in the printer config is the order they print in.
print_setfirst, thenprint_1 → print_5in sequence.
Behaviours to know
A few behaviours catch people out. Review these before going live.Exclude mode flips the safety net
Exclude mode flips the safety net
Troubleshooting
After setup, a working printer should:- Show a green status dot in Printers & receipts.
- Output immediately on a test print.
- Receive only the items whose tags match in a live test order.
- Show the full order on the customer receipt; only matching items on station printers.
Printer is online but doesn't print orders
Printer is online but doesn't print orders
- Confirm at least one receipt type is enabled in Receipts to be printed. A printer with no enabled receipts has nothing to output.
- Check the tag list. In Include mode, the products you expect to print must carry at least one of the printer’s tags.
- Check Print on POS checkout and Print on Online checkout. If the channel the order came from is toggled off, the printer won’t fire.
- Check Fulfilment types. If you set this and the test order’s type isn’t in the list, nothing prints.
- Send a test print from the printer’s row in Printers & receipts. If the test slip prints, the connection is fine and the issue is routing.
- Power-cycle the printer.
Wrong items printing on a station printer
Wrong items printing on a station printer
- Open the product and check its tags. If it carries the printer’s tag, it will print there.
- If you’re using Exclude tagged products, check the tag list. Exclude mode prints anything not tagged, so any new untagged product starts printing automatically.
- Check Separate modifiers. If it’s on, any modifier carrying a matching tag prints as its own line on this printer.
Items printing twice (modifier + product tagged with the same tag)
Items printing twice (modifier + product tagged with the same tag)
- If you don’t need the modifier to appear separately, remove the tag from the modifier. Untagged modifiers ride with their parent automatically.
- If you need the modifier to print separately (typical for course-fired or station-routed modifiers), add that tag to Exclude tagged modifiers on this printer so the modifier doesn’t also reprint under the parent. The Degustation menu example uses this pattern.
Customer receipt prints incomplete
Customer receipt prints incomplete
Modifiers printing where they shouldn't
Modifiers printing where they shouldn't
- To stop a tagged modifier from appearing as its own line on the wrong printer, turn Separate modifiers off on that printer, or remove the tag from the modifier.
- To strip a noisy modifier from a station printer (for example, kitchen modifiers showing up on the bar), add that modifier’s tag to Exclude tagged modifiers.
Area filter not working
Area filter not working
- Confirm the order is dine-in with a table assigned. Pickup and delivery orders bypass the Area filter.
- Confirm the table is assigned to one of the printer’s listed areas.
- If the printer is set as a station’s primary printer, the Area filter is intentionally bypassed for that printer.
Still stuck
Still stuck
- Your outlet name.
- The printer name.
- A screenshot of the printer’s Products to be printed panel.
- The order ID that misprinted (if any).
Next steps
- Connect Atlas printer to WiFi — if you’re setting up a new device.
- Create menus — for adding products and tagging them.