Who is this article for?Restaurant operators who use Atlas POS and take reservations through OpenTable.

What this does

Your OpenTable reservations appear on Atlas POS automatically. There is no need to re-enter bookings by hand. When a guest is seated on OpenTable, Atlas opens a cart on the matching table. The cart includes the party size and any reservation notes. The guest’s name is recorded on the reservation. Order data also flows back to OpenTable. When staff hold or fire items to the kitchen, OpenTable shows the order as an open ticket. When the bill is paid, OpenTable receives the final total and payment details. This builds spend history on your OpenTable guest profiles. You can see what each guest ordered and spent on past visits.

When to use this

Use this integration if you take reservations on OpenTable and run service on Atlas POS. It removes the manual step of opening a cart when guests arrive.

Before you start

You request the connection from your OpenTable account. The Atlas team completes the setup and enables the integration — the settings are not visible in your Atlas dashboard. The integration is part of Atlas Connect — your account manager will confirm pricing with you.
Table names in Atlas must match your OpenTable floor plan exactly. “Table 5” and “table 5” do not match. Check this before going live, or carts will not open automatically.

Steps

1

Request the connection from OpenTable

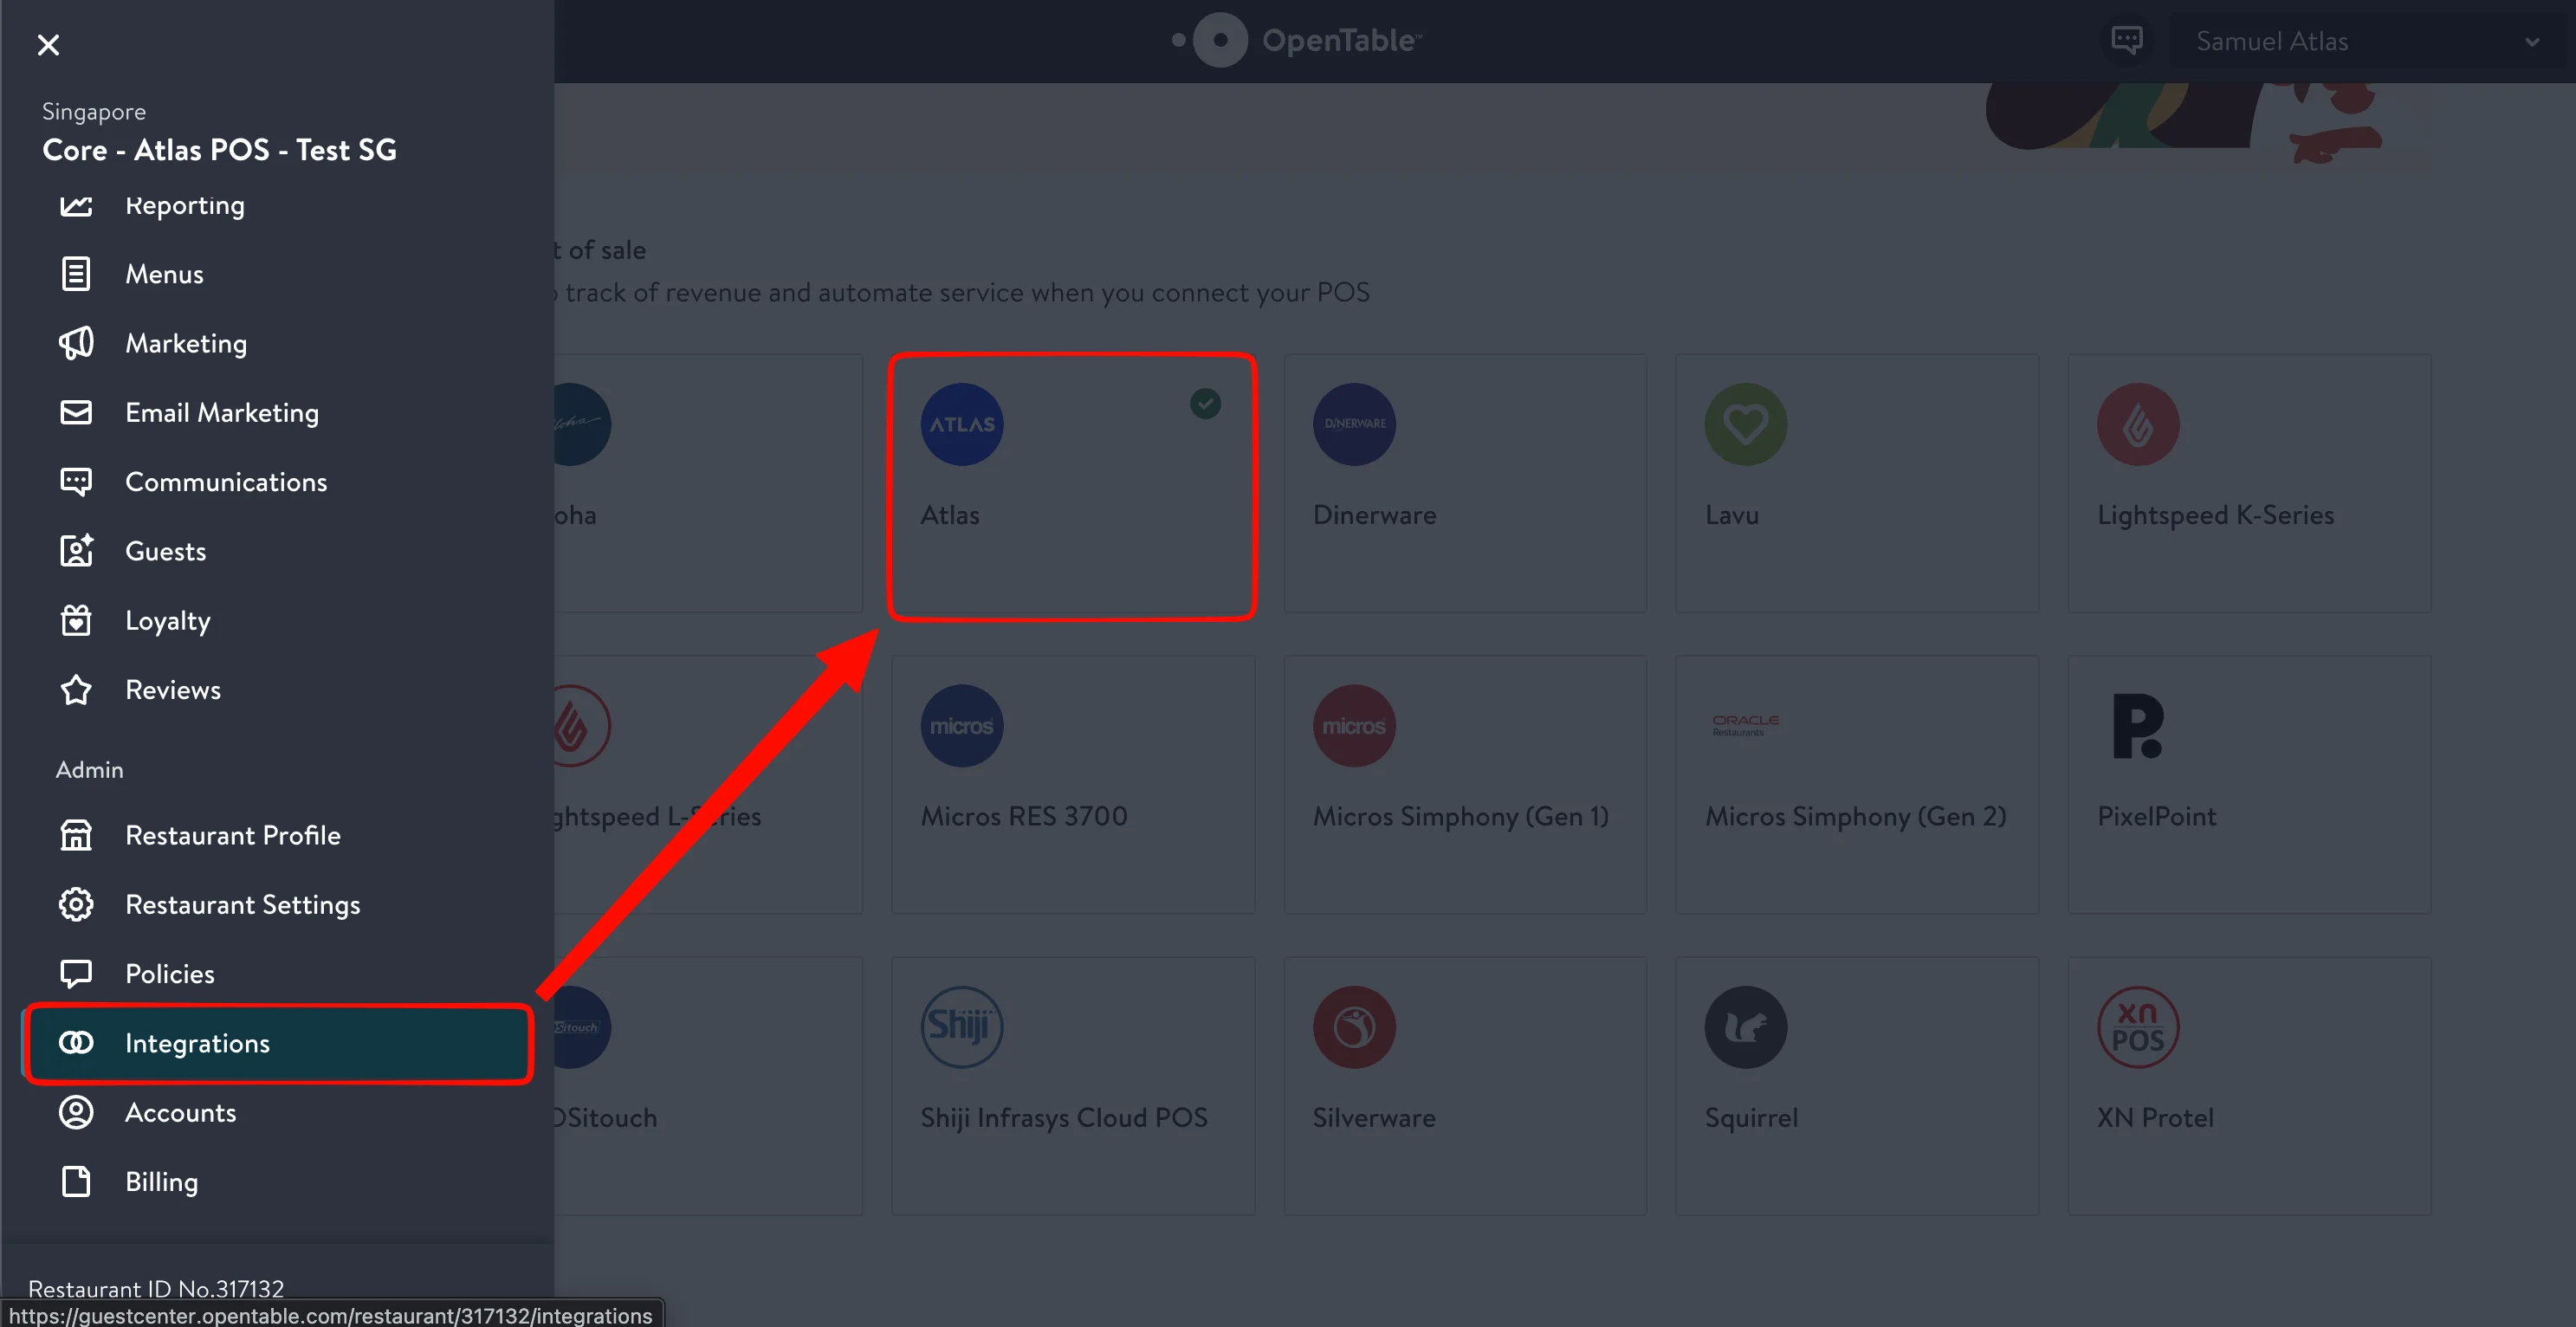
Log in to your OpenTable account. Open the menu and click Integrations, under Admin.Find Atlas in the point-of-sale list and click it. Fill in the short form and submit it.
OpenTable Integrations page showing the Atlas point-of-sale tile and the Integrations menu item under Admin

The Atlas tile on OpenTable's Integrations page

2

Match your table names

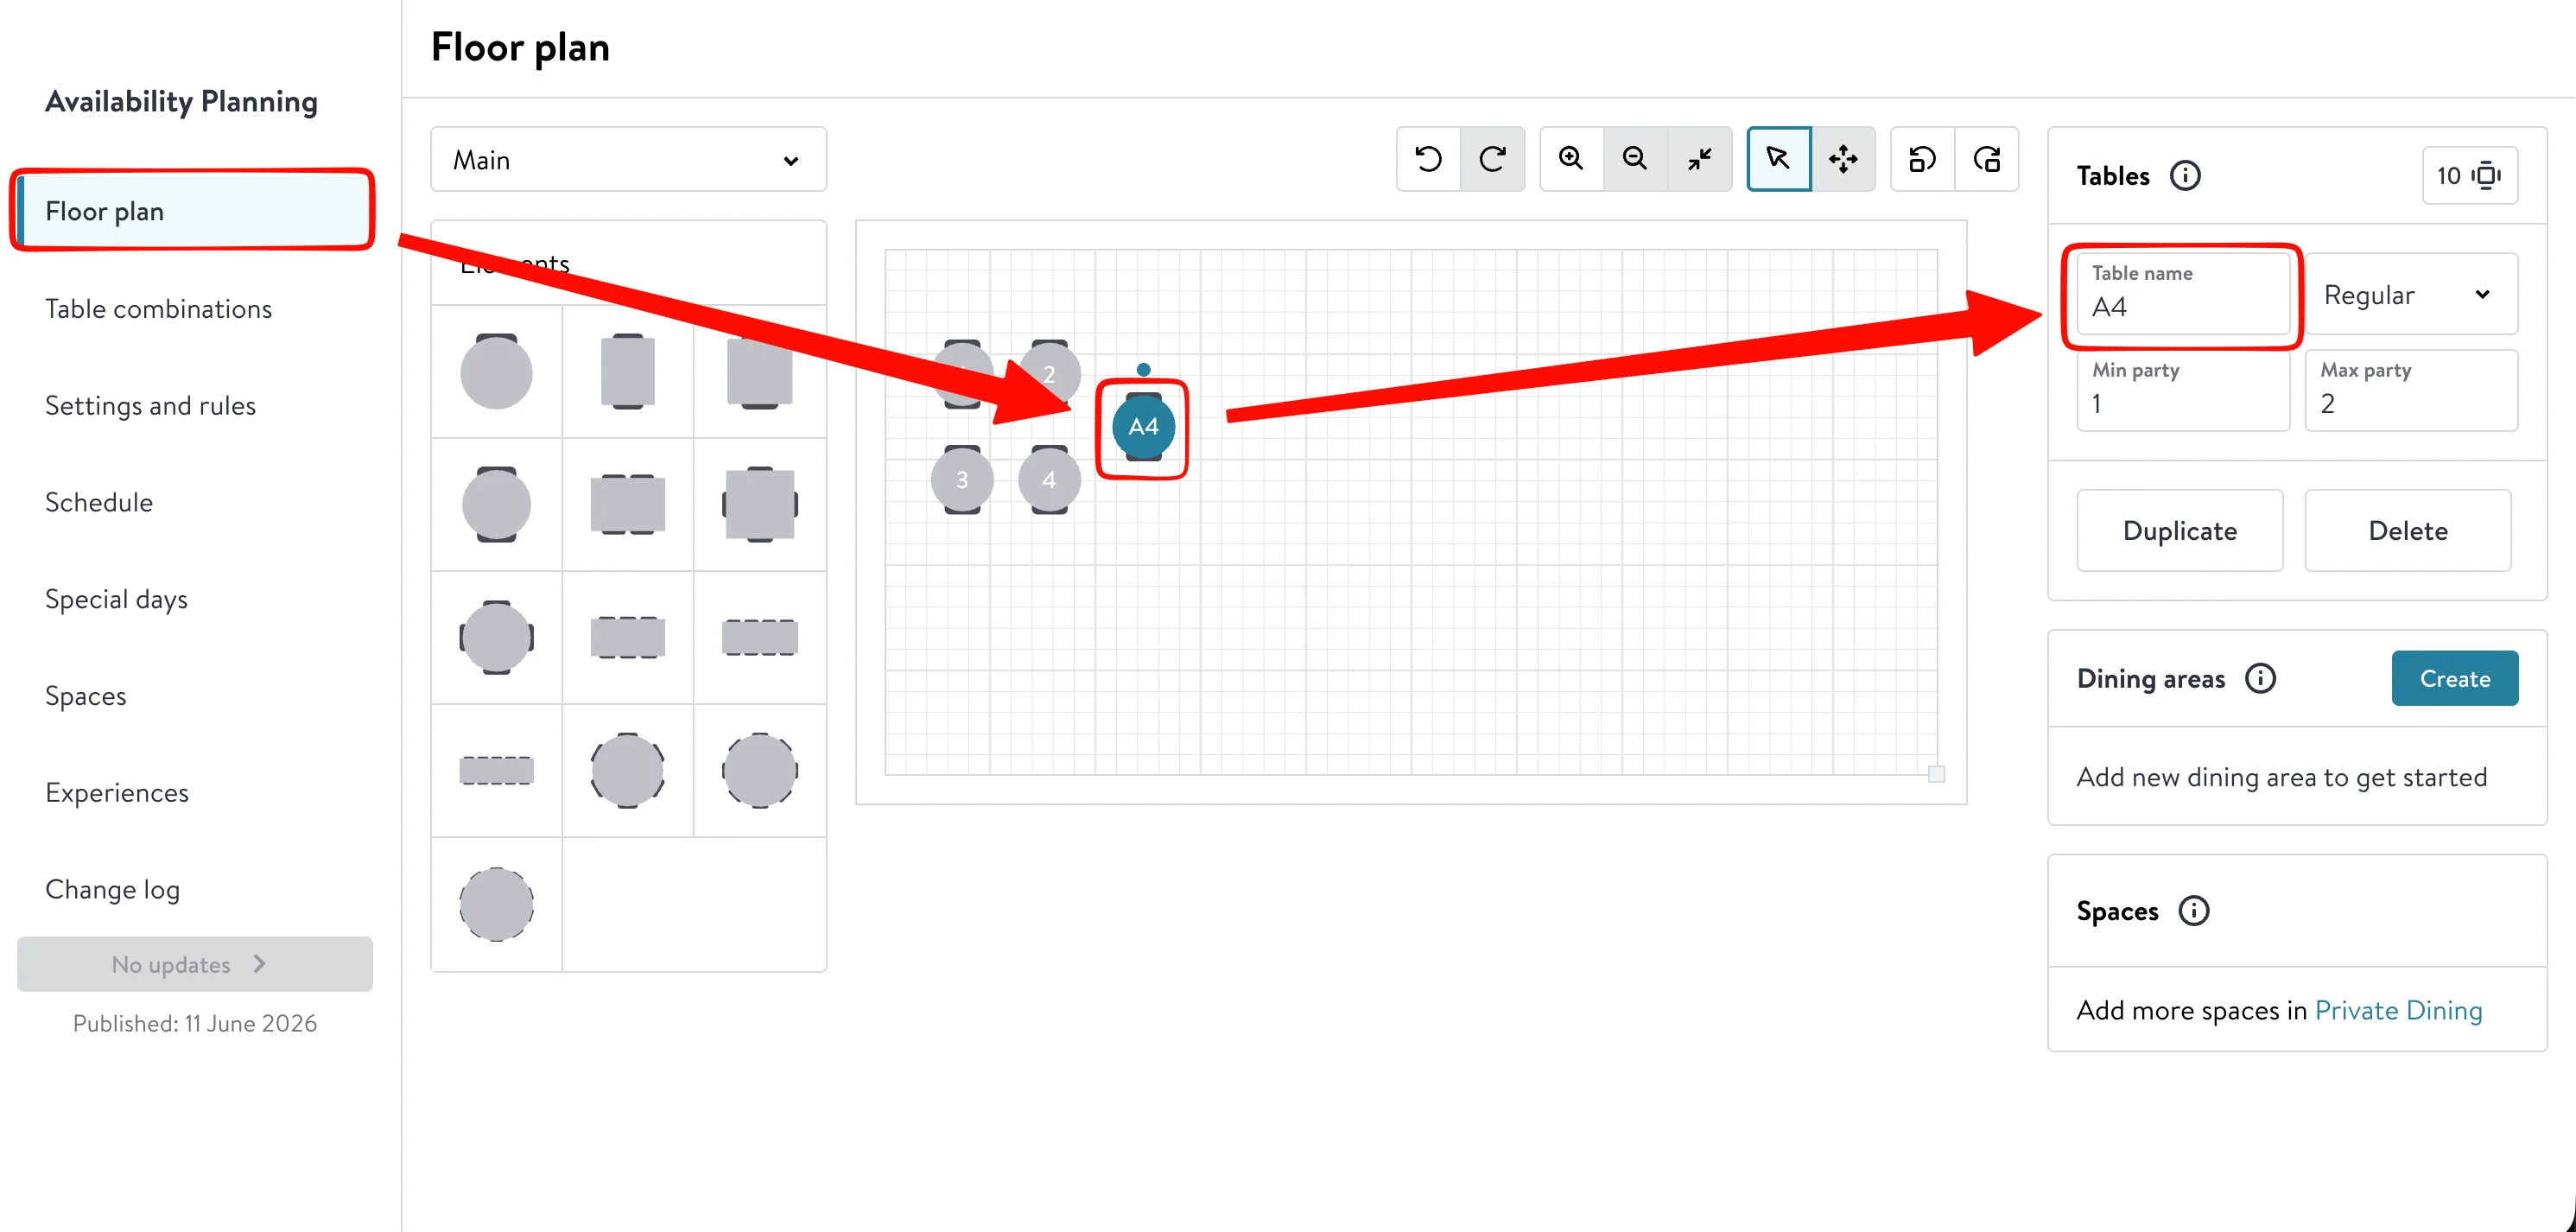
Open your table layout on Atlas POS and compare each table name against your OpenTable floor plan. The names must match exactly, including capitalisation and spaces.Rename tables in Atlas to match OpenTable where they differ. For example, if OpenTable uses “A4”, the Atlas table must also be named “A4”.In OpenTable, table names are set in Availability Planning under Floor plan. Click a table to see its name.
OpenTable Floor plan editor with a table selected and its Table name field highlighted

Table names on OpenTable's Floor plan page
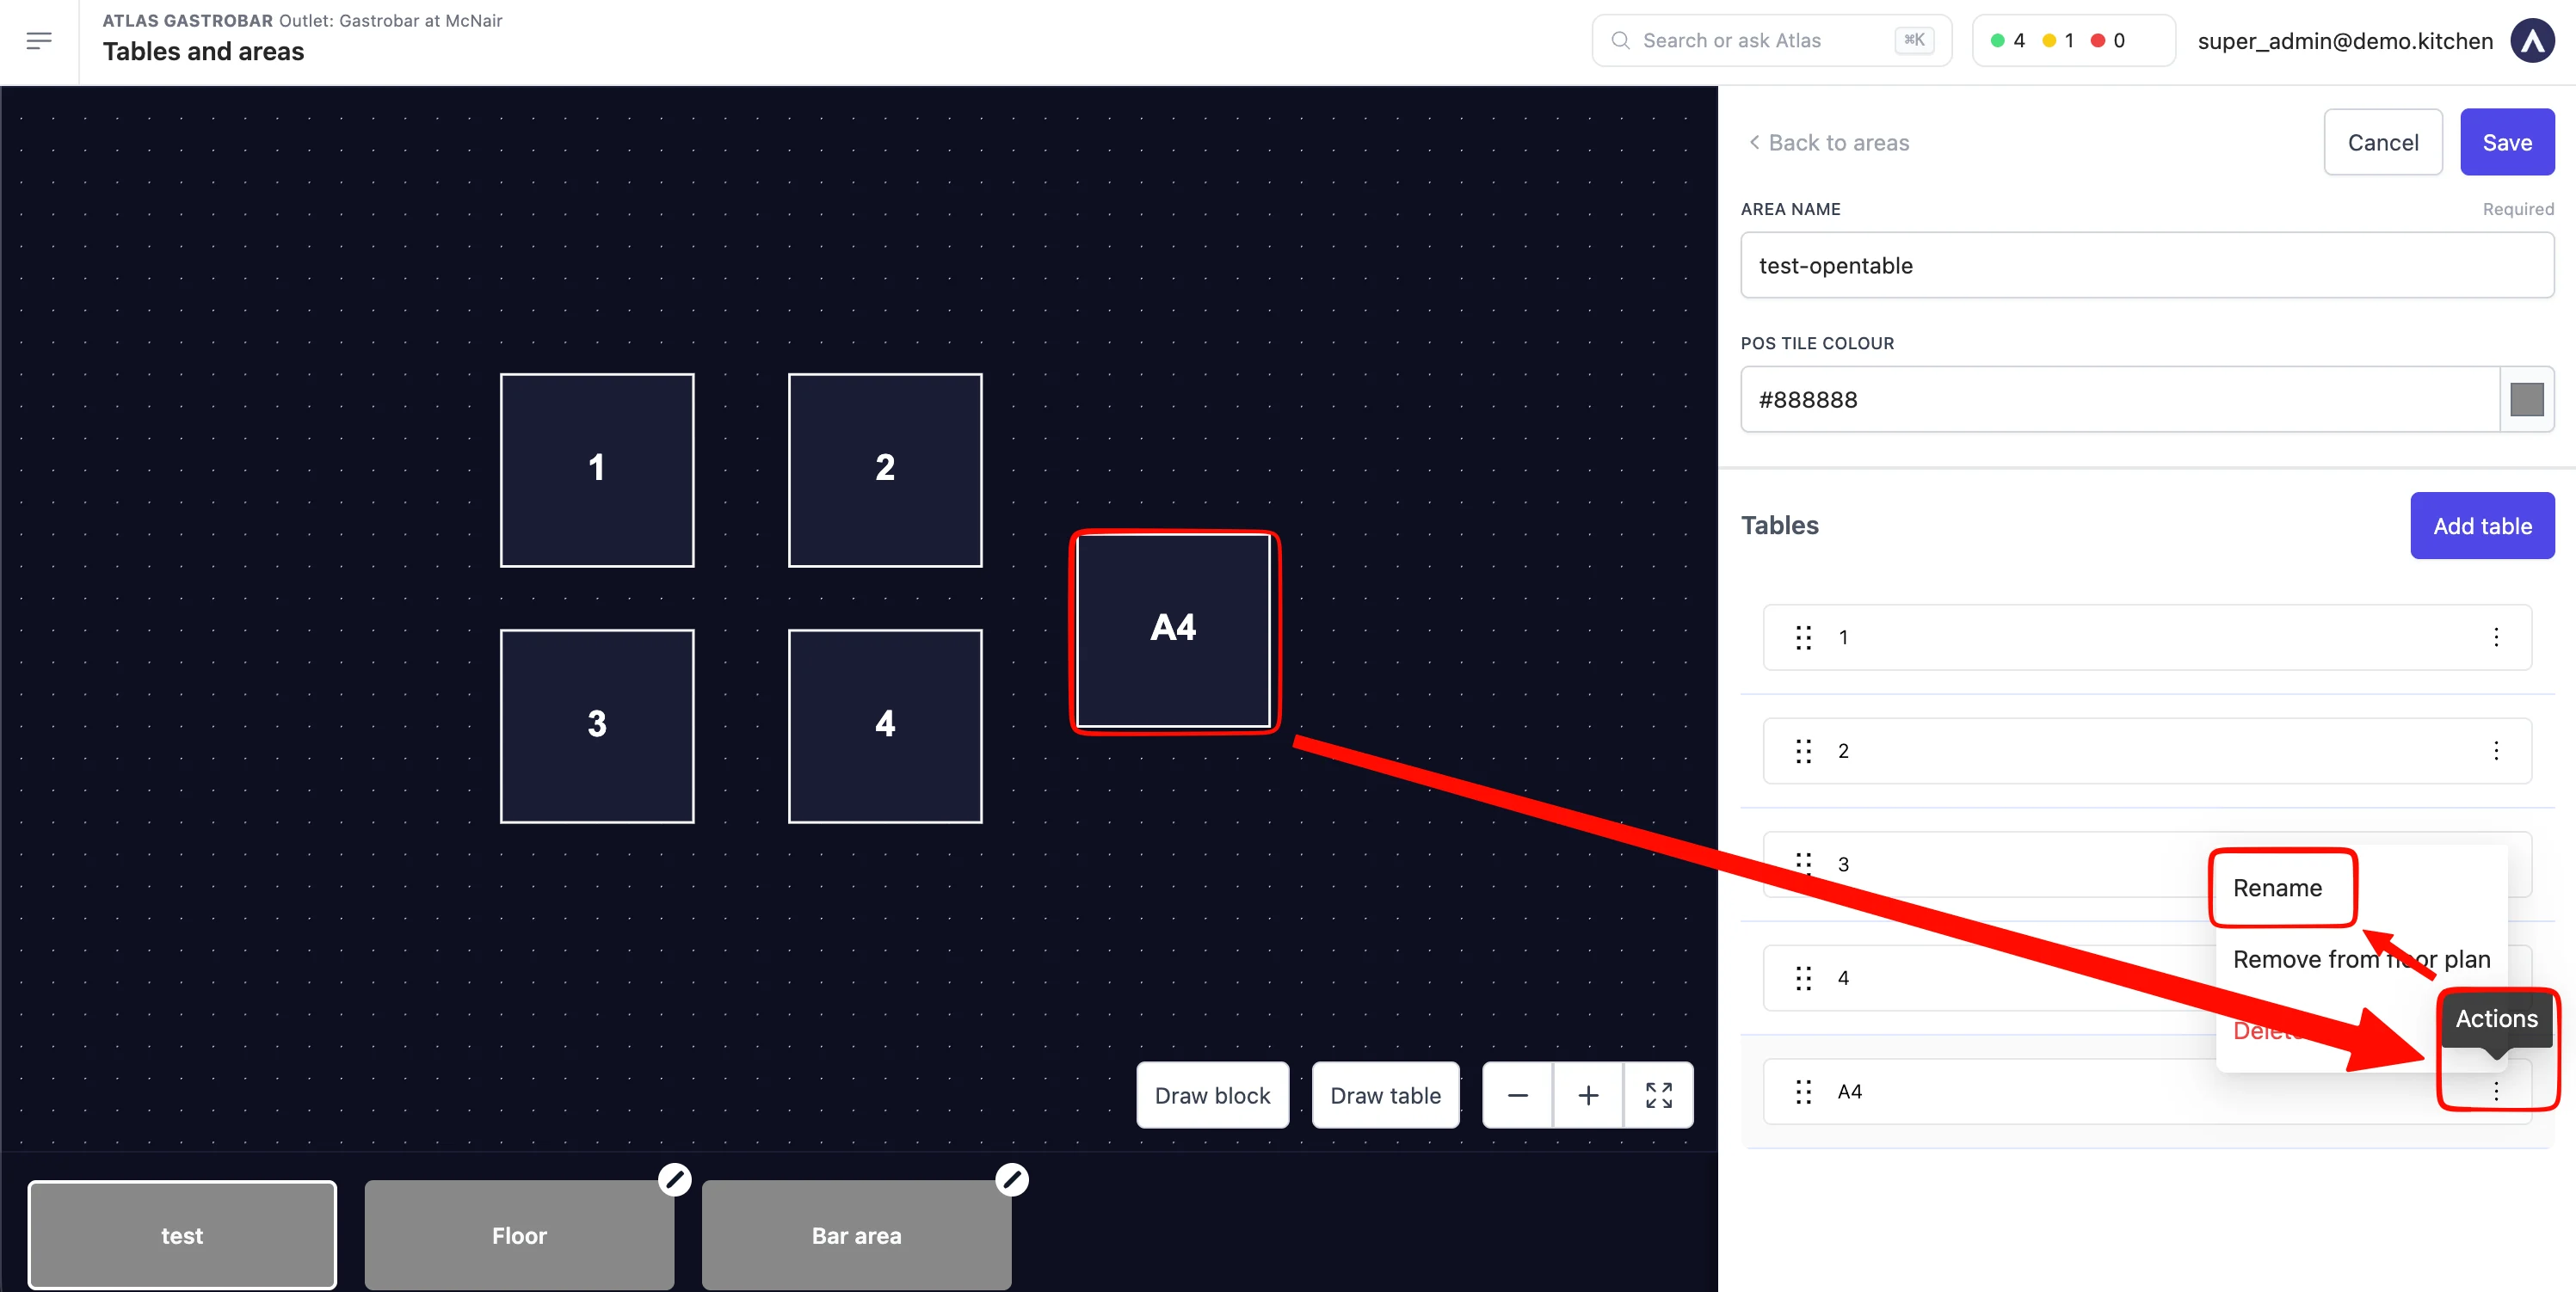
In Atlas, open Tables and areas for your outlet. Click the table, then click its three-dot menu and click Rename.
Atlas Tables and areas page with table A4 selected and the Rename action highlighted in the table's actions menu

Renaming a table on the Tables and areas page in Atlas

3

Atlas contacts you to go live

OpenTable tells Atlas about your request. The Atlas team completes the setup and contacts you to agree a go-live date.Have your table names matched before the go-live date. To pause or stop the integration later, contact Atlas support. Pausing also tells OpenTable your POS is offline.

What should happen

  • New, updated, and cancelled OpenTable reservations appear on Atlas within a few seconds.
  • When a guest is seated on OpenTable, a cart opens on the matching Atlas table. The cart shows the party size and reservation notes.
  • When staff hold or fire items to the kitchen, the order appears in OpenTable as an open ticket.
  • When the bill is paid, OpenTable shows the final total and payment.
Atlas sends order and pricing updates to OpenTable straight away, but OpenTable can take up to two minutes to display them because it caches this data on its side. This is normal — the amounts are correct once they appear. If OpenTable is ever unreachable, your POS keeps working normally. Service is never blocked by the integration.

What you’ll see during service

This is the full flow from seating to payment once the integration is live. Each stage shows what staff see on OpenTable, on Atlas POS, or both.
Sync timing. Seating and reservation changes from OpenTable usually reach Atlas POS within a few seconds. Atlas sends order details and pricing to OpenTable straight away, but OpenTable can take up to two minutes to display them because it caches this data on its side. The amounts are correct once they appear — this delay is on OpenTable, not Atlas.

1. A guest is seated on OpenTable

You seat the guest on OpenTable as normal — by seating a booking or adding a walk-in. The steps below show a walk-in. Atlas does the rest automatically in the next stage.
1

Open Front of House

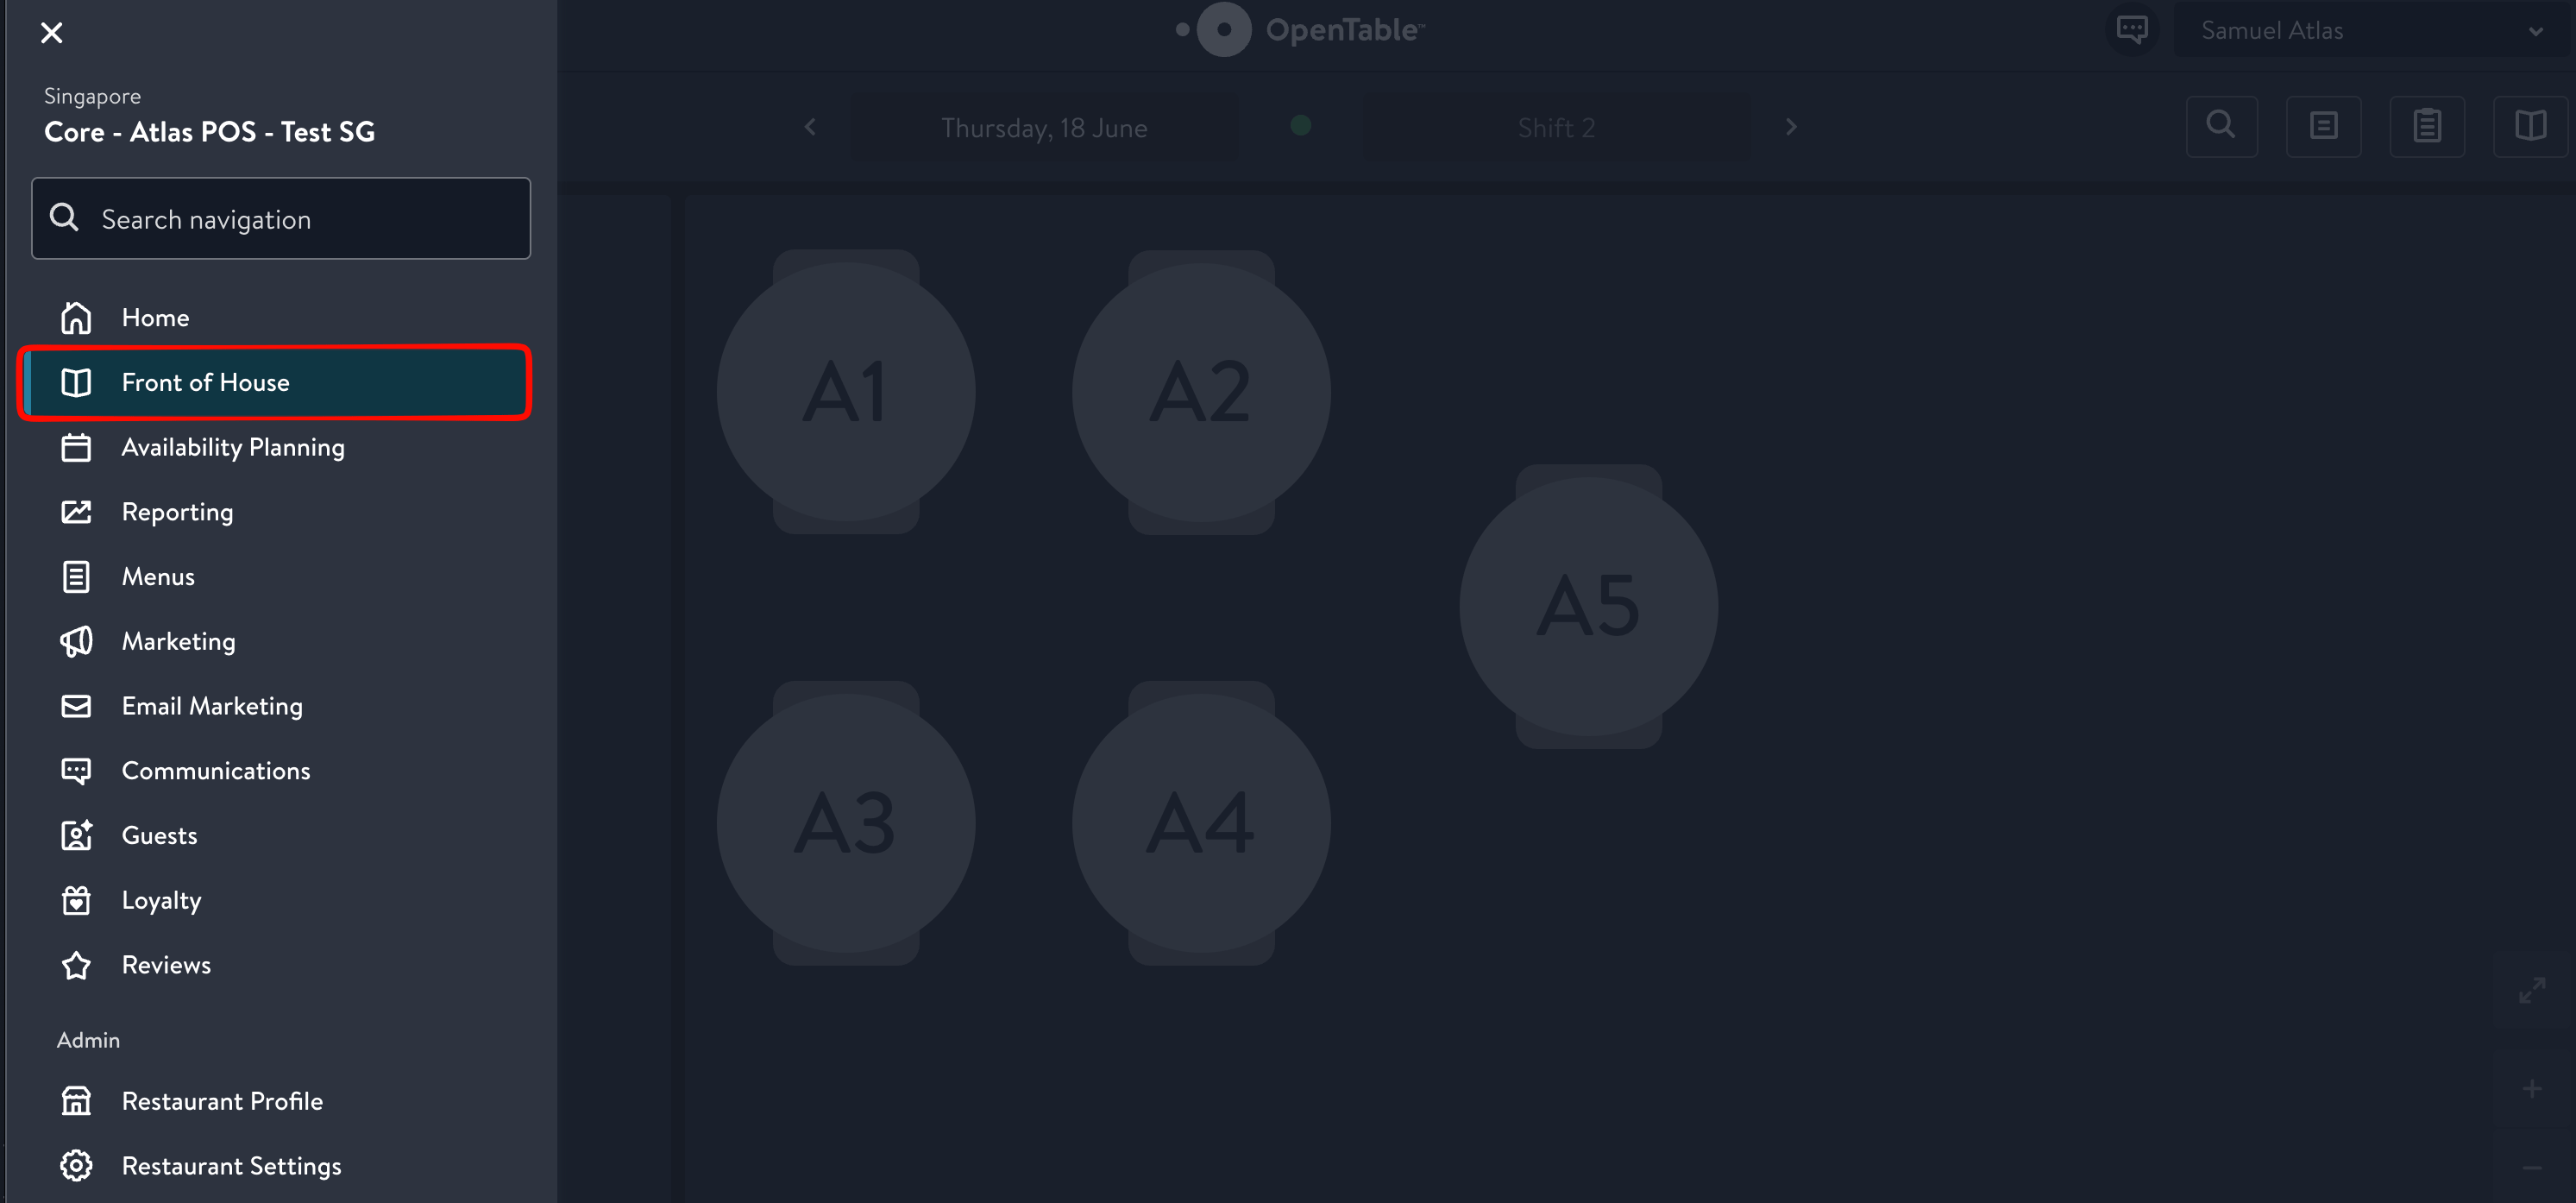
In OpenTable, click Front of House in the left menu. This is your live floor plan for the current shift.
OpenTable left navigation with Front of House highlighted, showing the floor plan with tables A1 to A5

Front of House on OpenTable

2

Add a walk-in

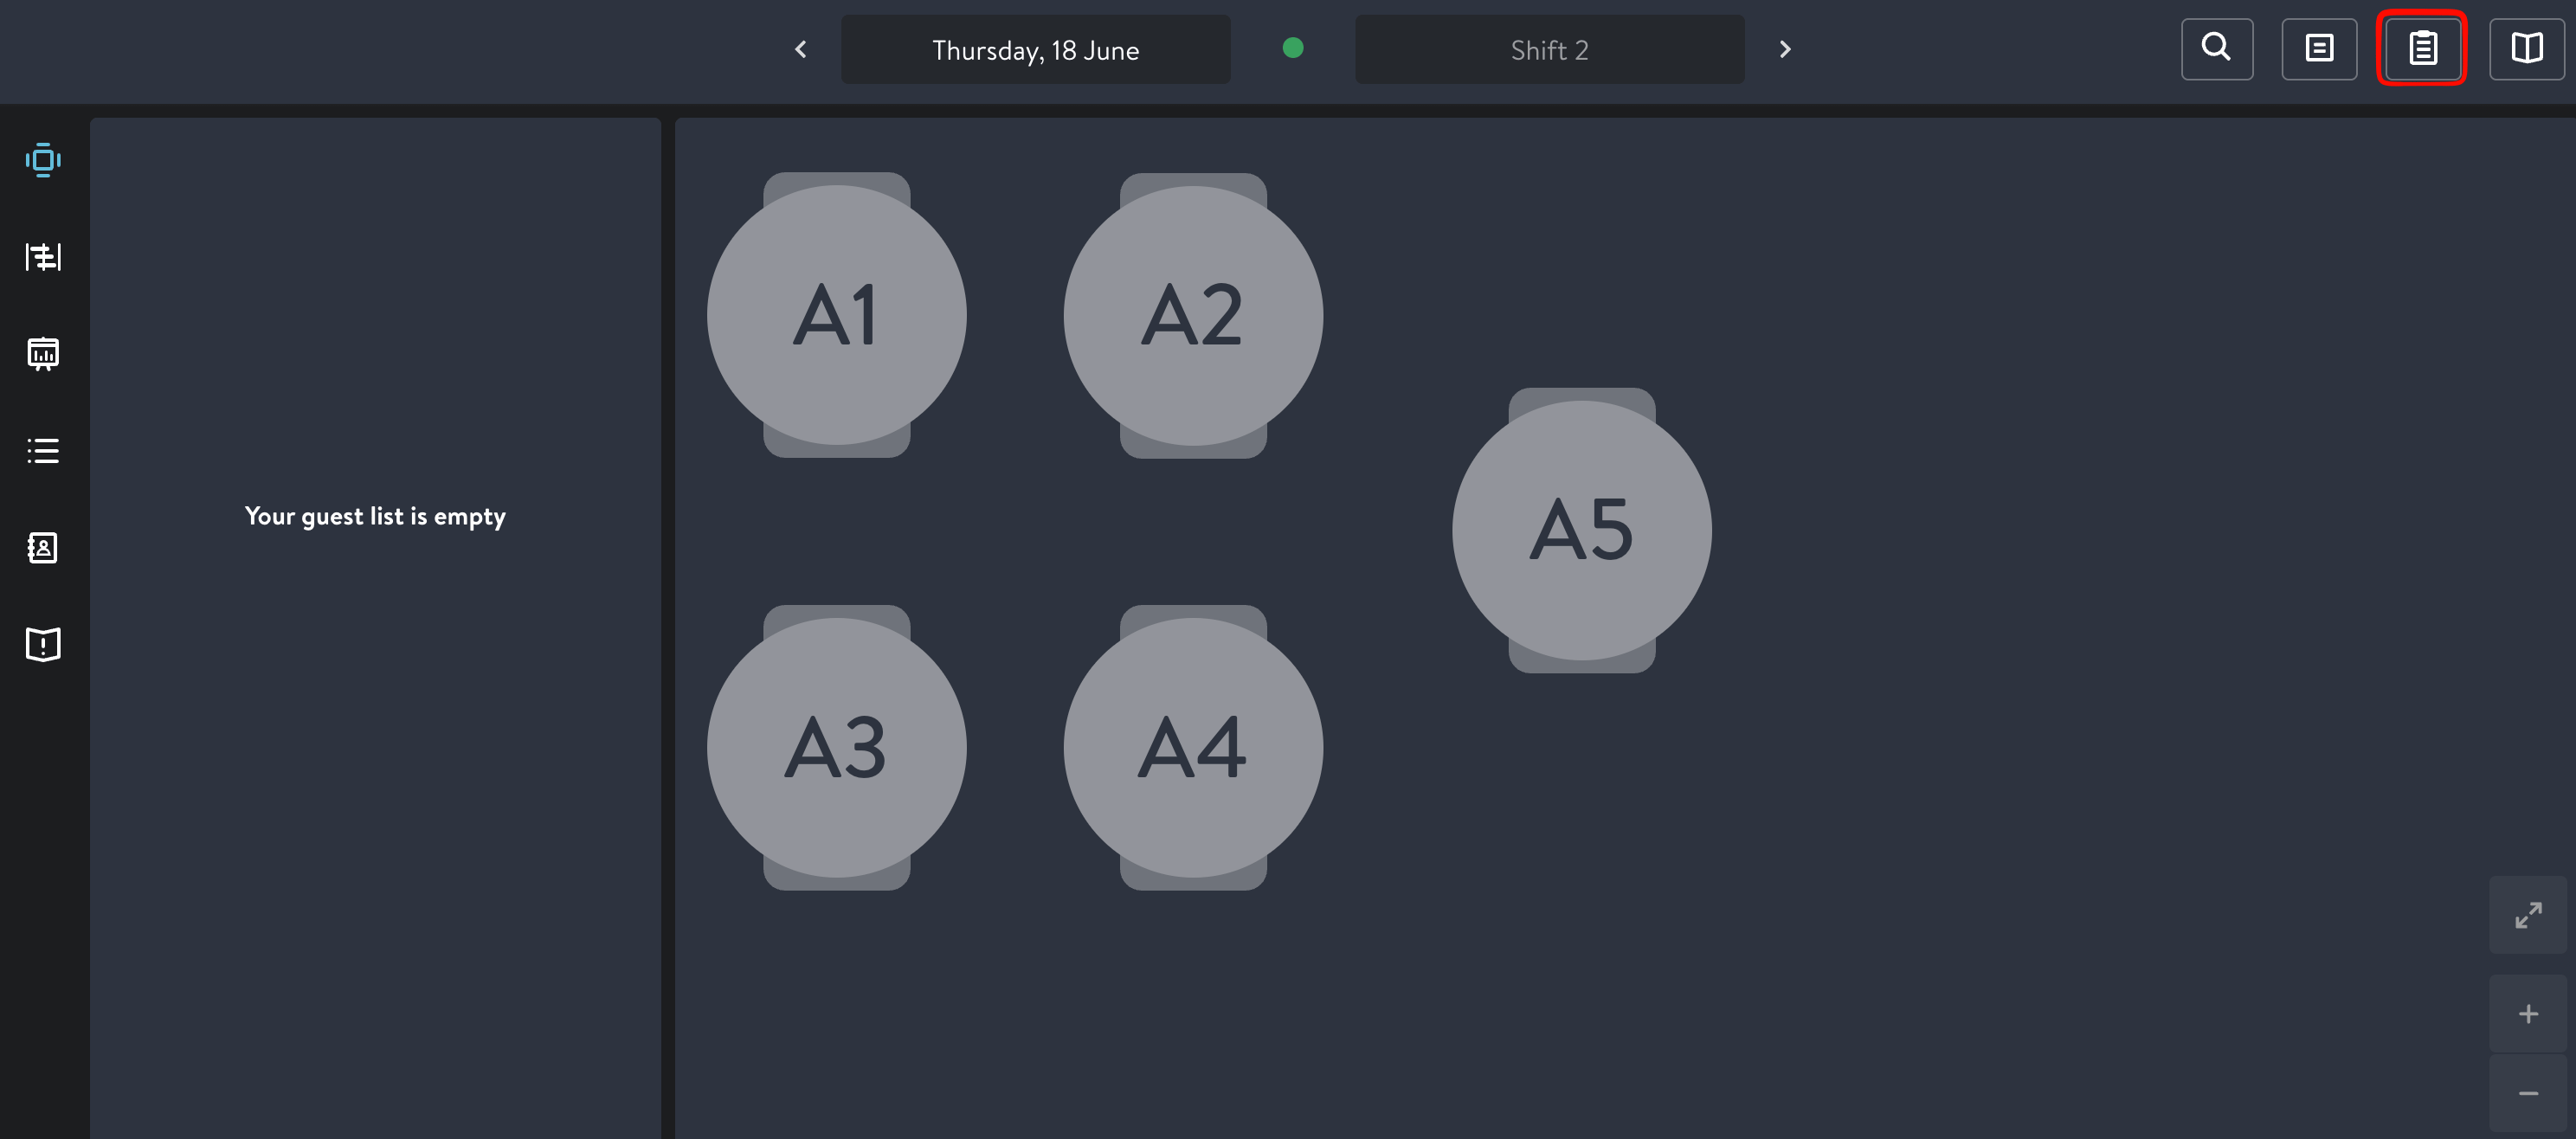
Click the walk-in icon in the top right.
OpenTable Front of House with the add walk-in icon highlighted in the top right and an empty guest list

The add walk-in icon on OpenTable

3

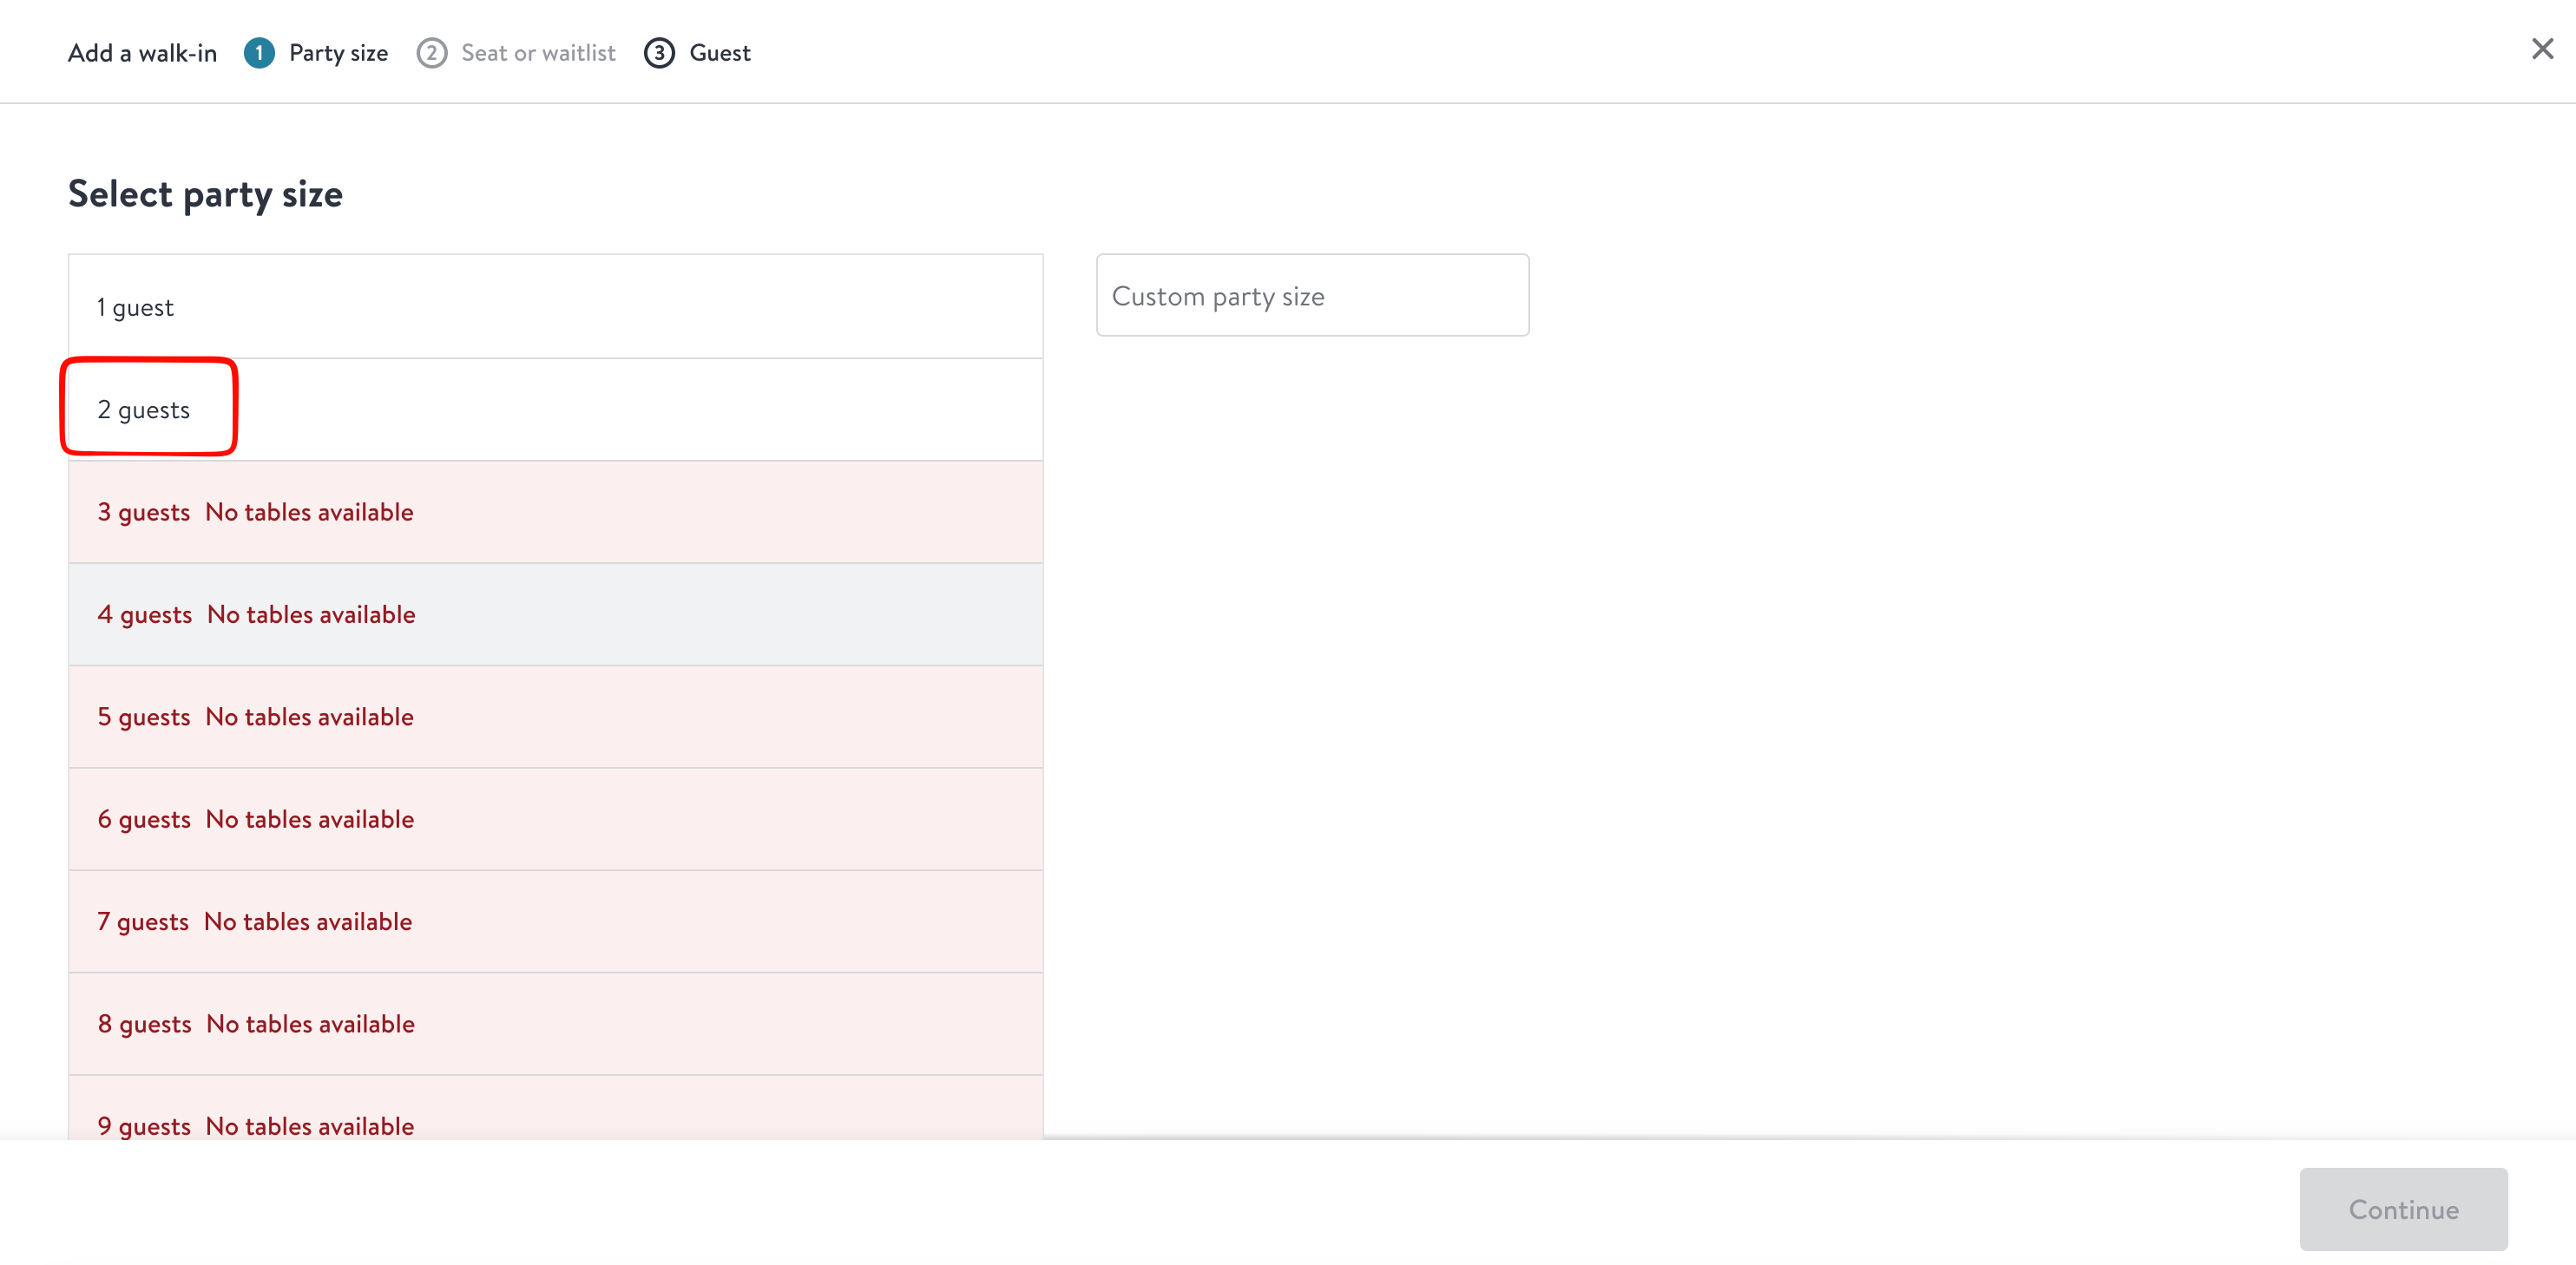
Select the party size

Choose the number of guests, or enter a custom party size. Click Continue.
OpenTable Add a walk-in dialog with 2 guests selected as the party size

Selecting the party size on OpenTable

4

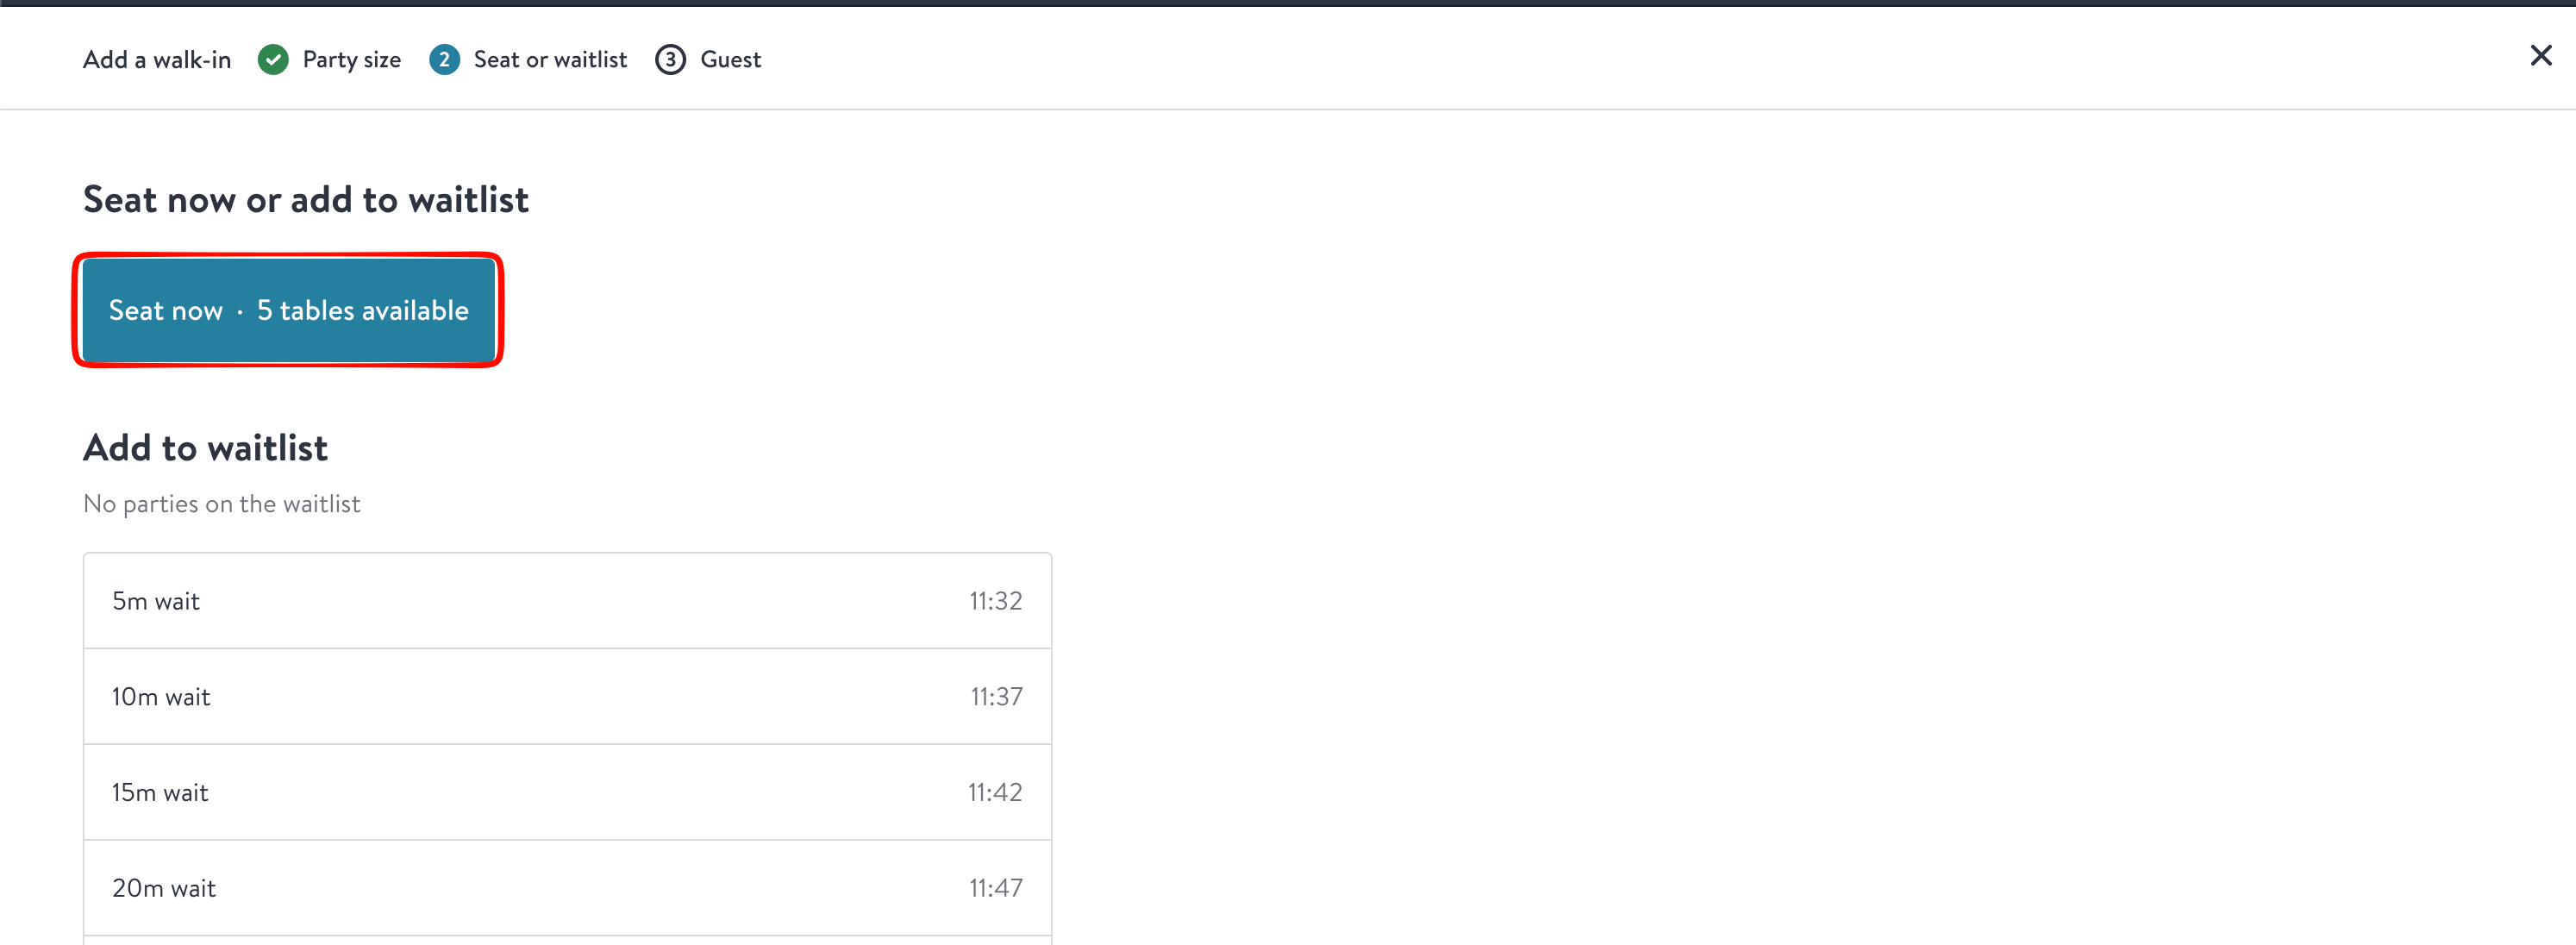
Choose to seat now

Click Seat now. OpenTable shows how many tables are free for that party size.
OpenTable Seat or waitlist step with the Seat now button highlighted, showing 5 tables available

Seating the party now on OpenTable

5

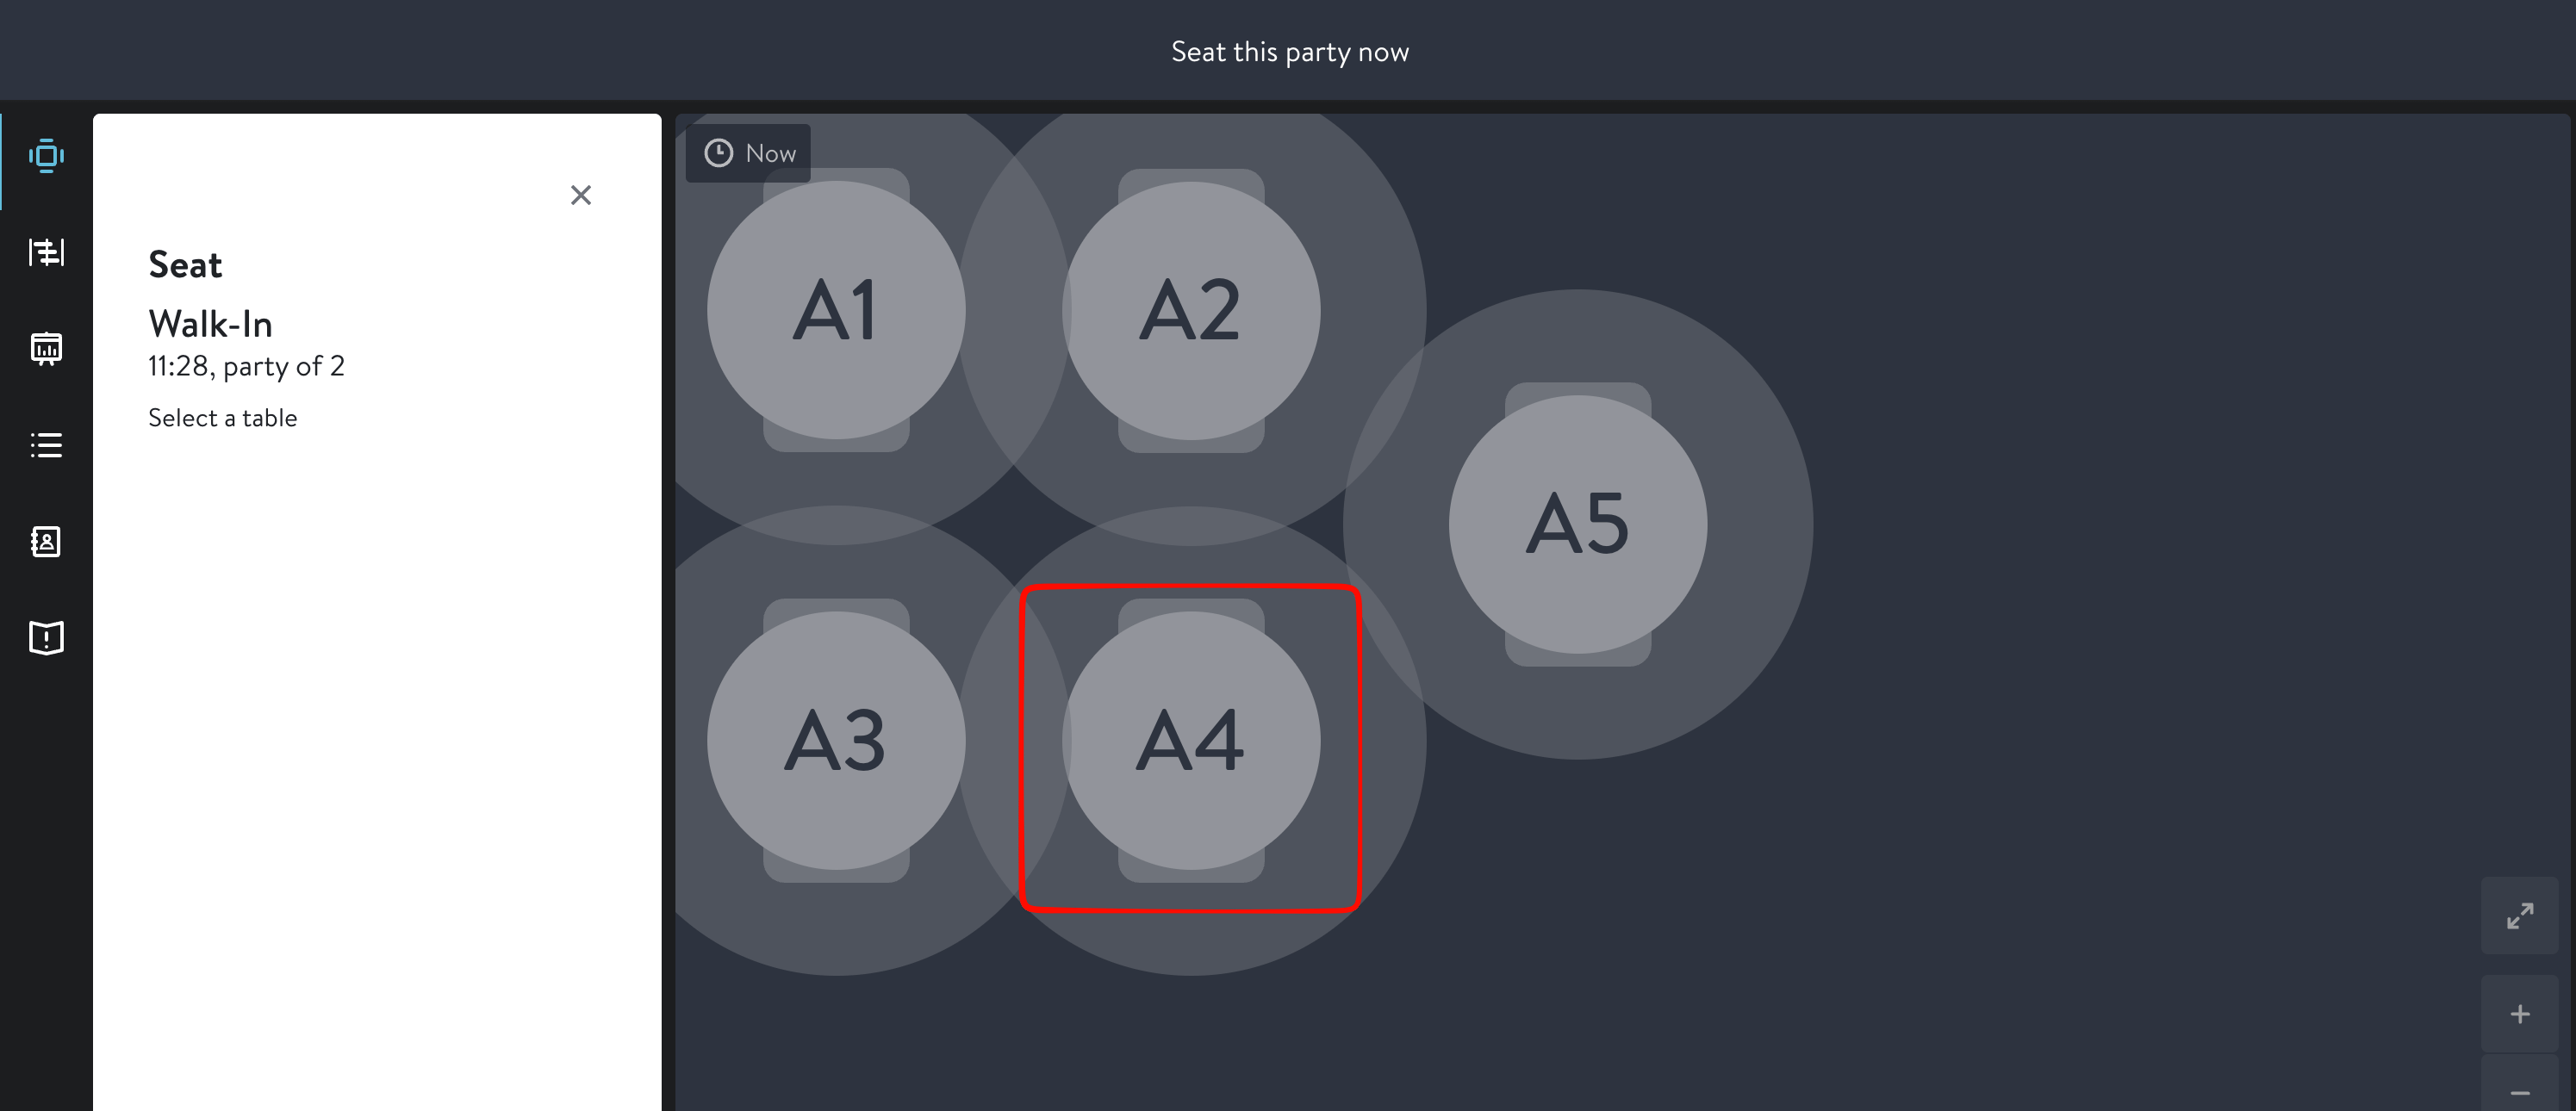
Select a table

Click a free table on the floor plan to seat the party there. Pick the table whose name matches the Atlas table you want the cart to open on — for example, A4.
OpenTable floor plan in seat mode with table A4 highlighted and a Seat Walk-In panel showing party of 2

Selecting a table on OpenTable's floor plan

6

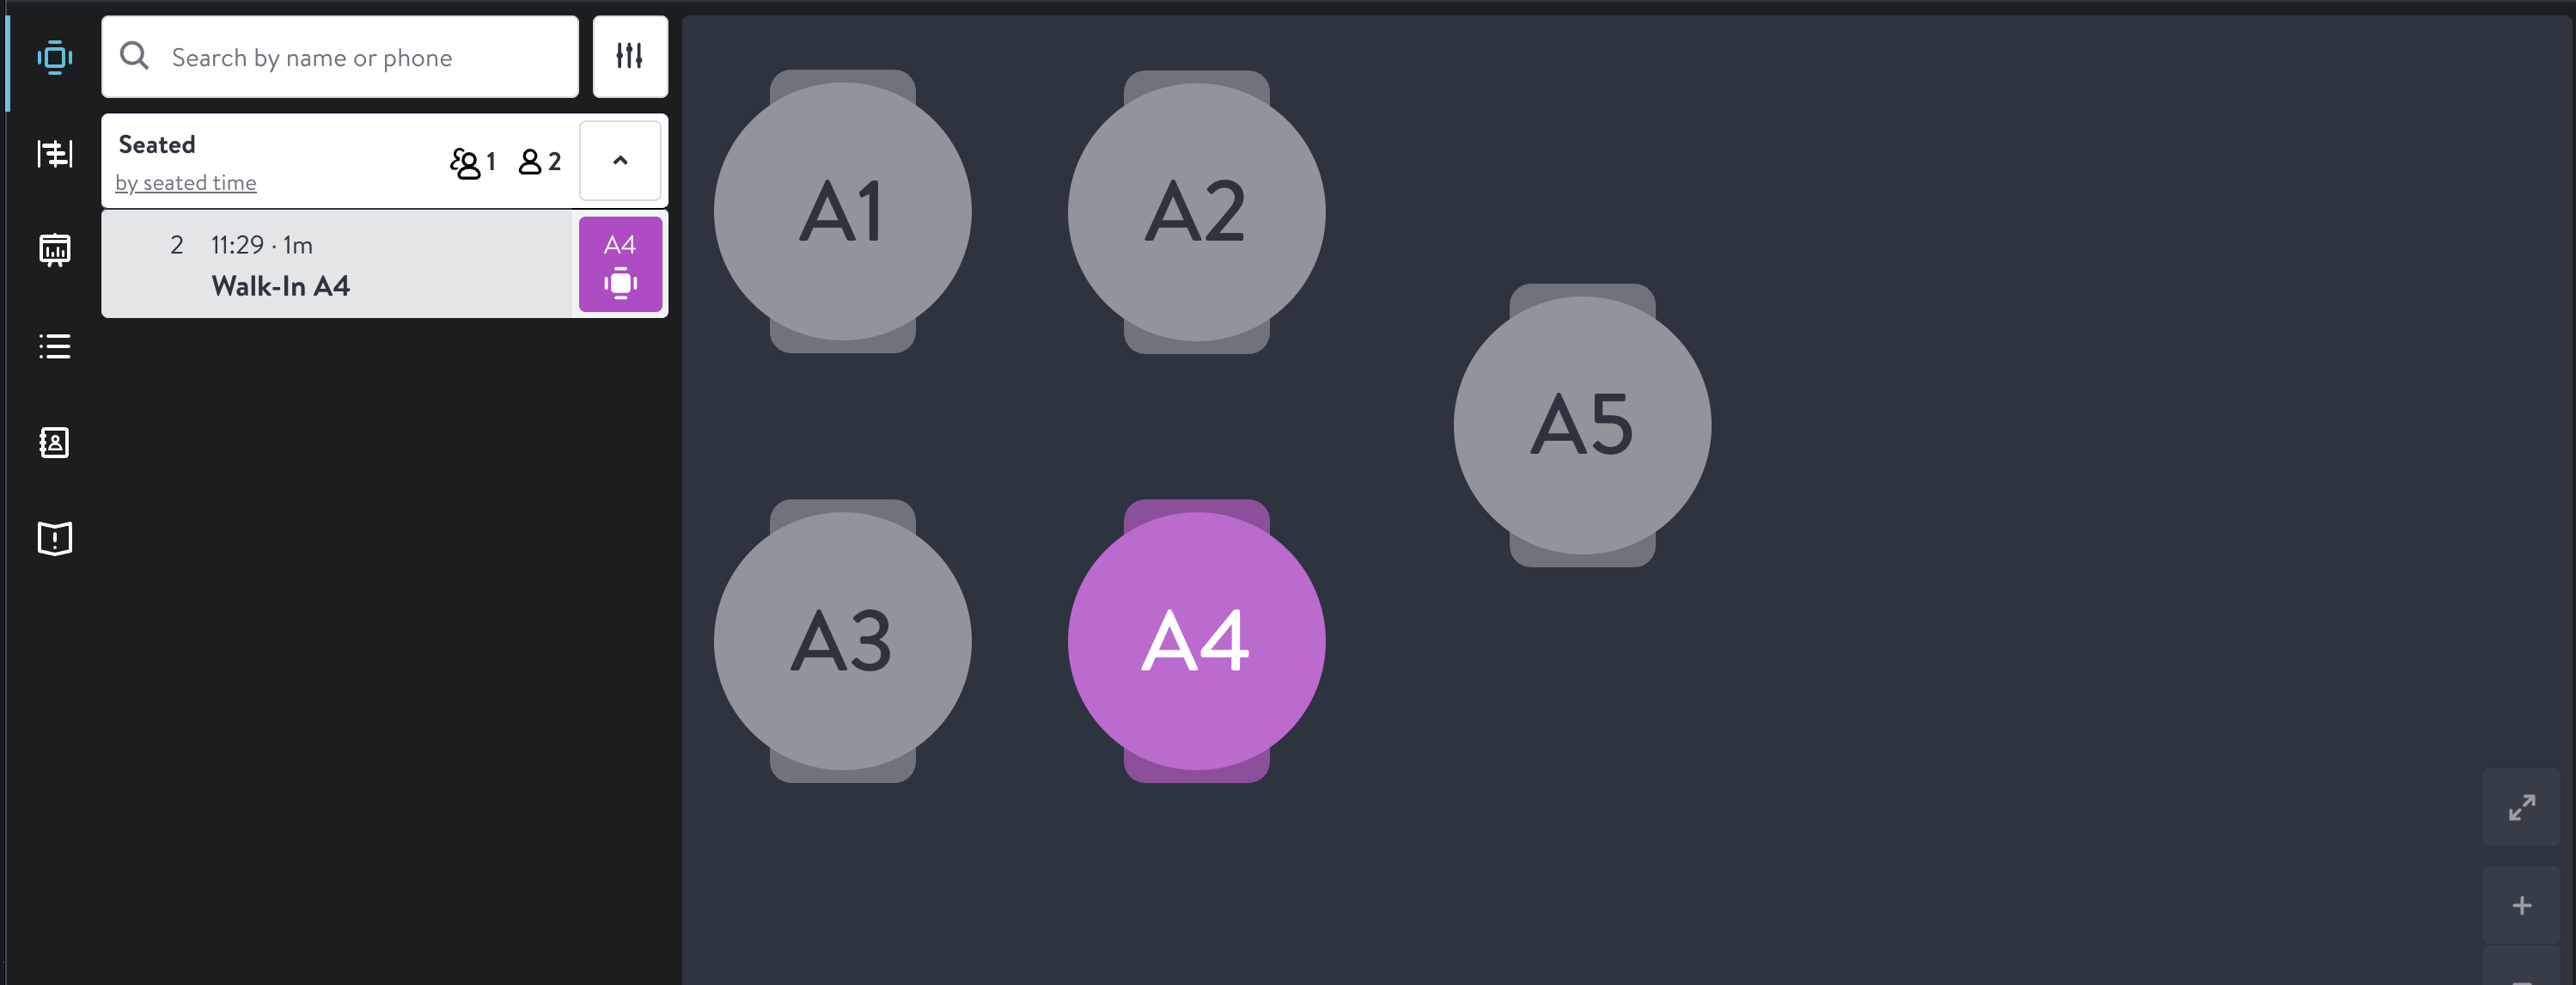
The guest is seated

The table turns to show it is occupied, and the party appears in the Seated list. The guest is now seated on OpenTable.
OpenTable floor plan with table A4 shown as occupied and a Walk-In A4 entry in the Seated list

The seated party on OpenTable

2. Atlas opens a table automatically

You do nothing on Atlas. Within a few seconds, the seating syncs across and Atlas opens a cart on the matching table — here, table A4 to match the table you seated on OpenTable. The table shows the party size and a timer since seating. It is marked No orders until staff add items.
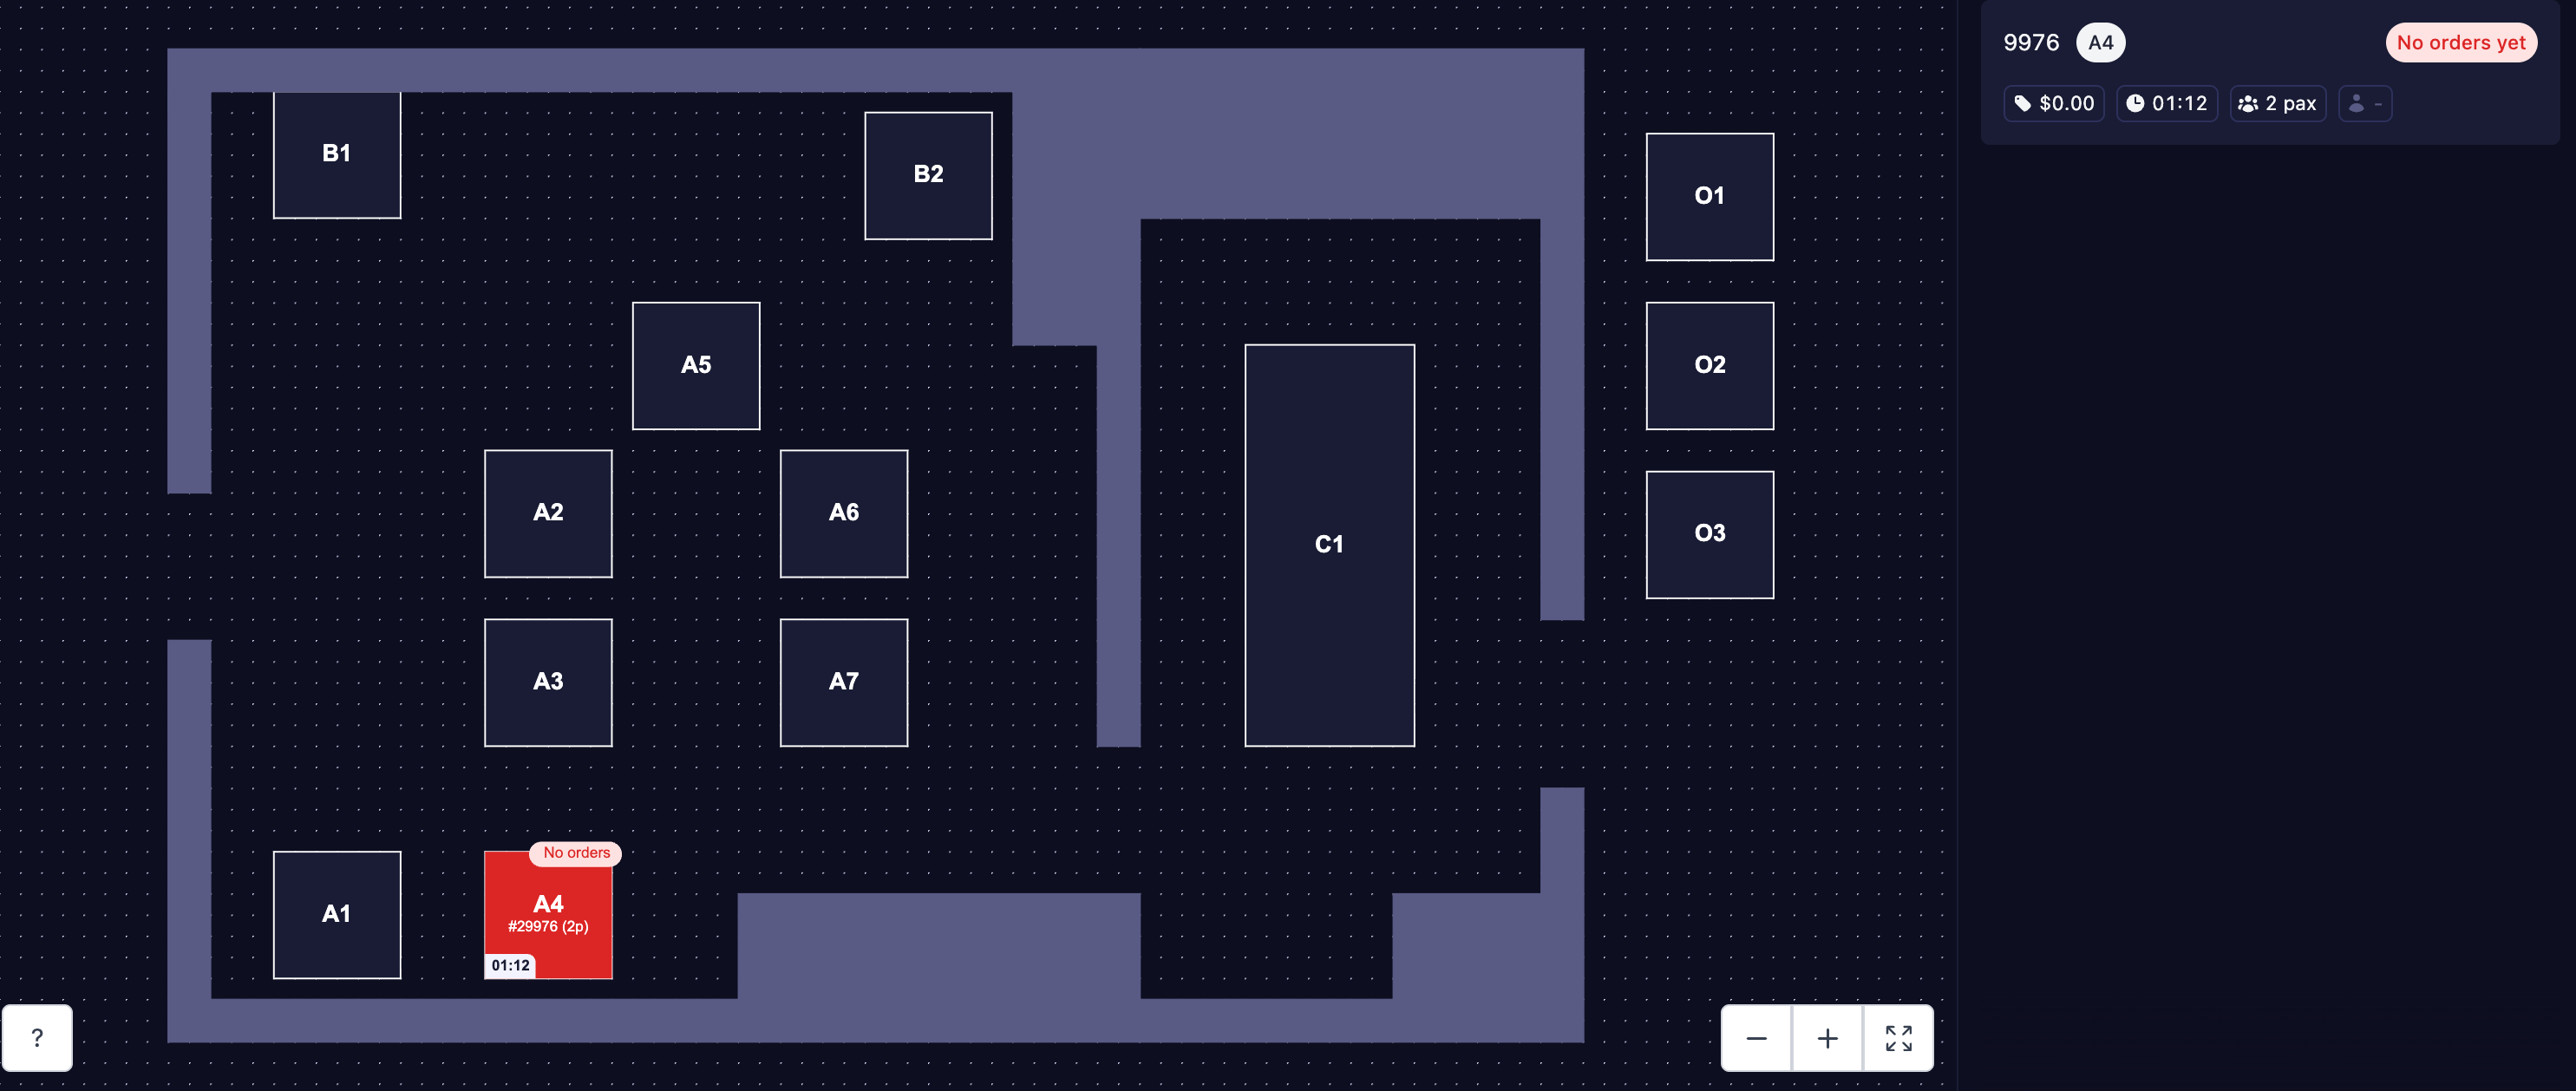
Atlas POS floor plan with table A4 highlighted in red, labelled No orders, party of 2, with the seated cart details shown in the panel on the right

The table opened automatically on Atlas POS

3. Staff take the order on Atlas

Take the order on Atlas as usual. Add items to the table, then tap Hold/fire to hold or fire them to the kitchen. Firing items is what sends the order to OpenTable.
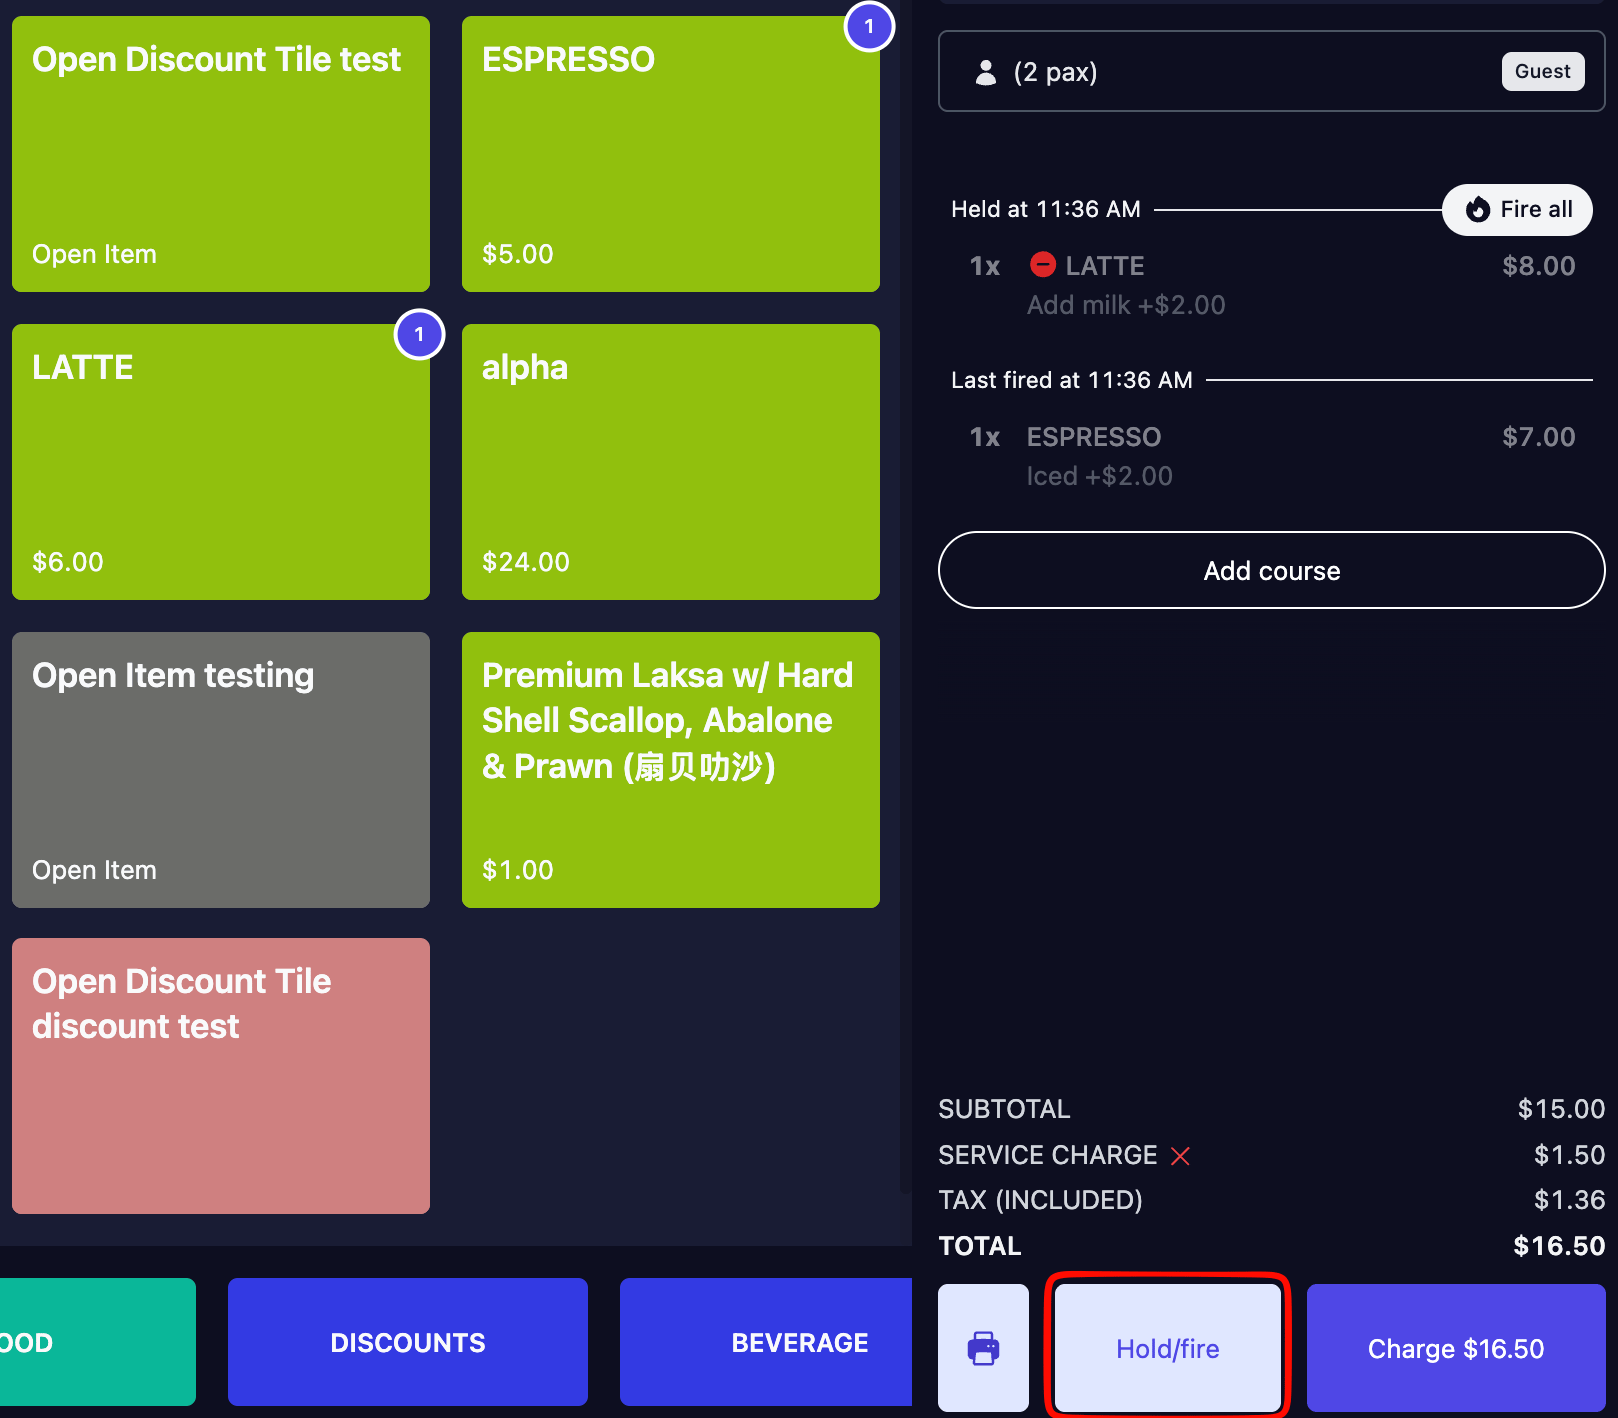
Atlas POS order screen for table A4 with a held latte and a fired espresso, the order total, and the Hold/fire button highlighted

Taking the order and firing items on Atlas POS

4. The order syncs to OpenTable

The order flows back to OpenTable on its own. The table total updates on the OpenTable floor plan, so front-of-house staff can see the table is now spending. Atlas sends this straight away, but OpenTable can take up to two minutes to display it because it caches this data on its side.
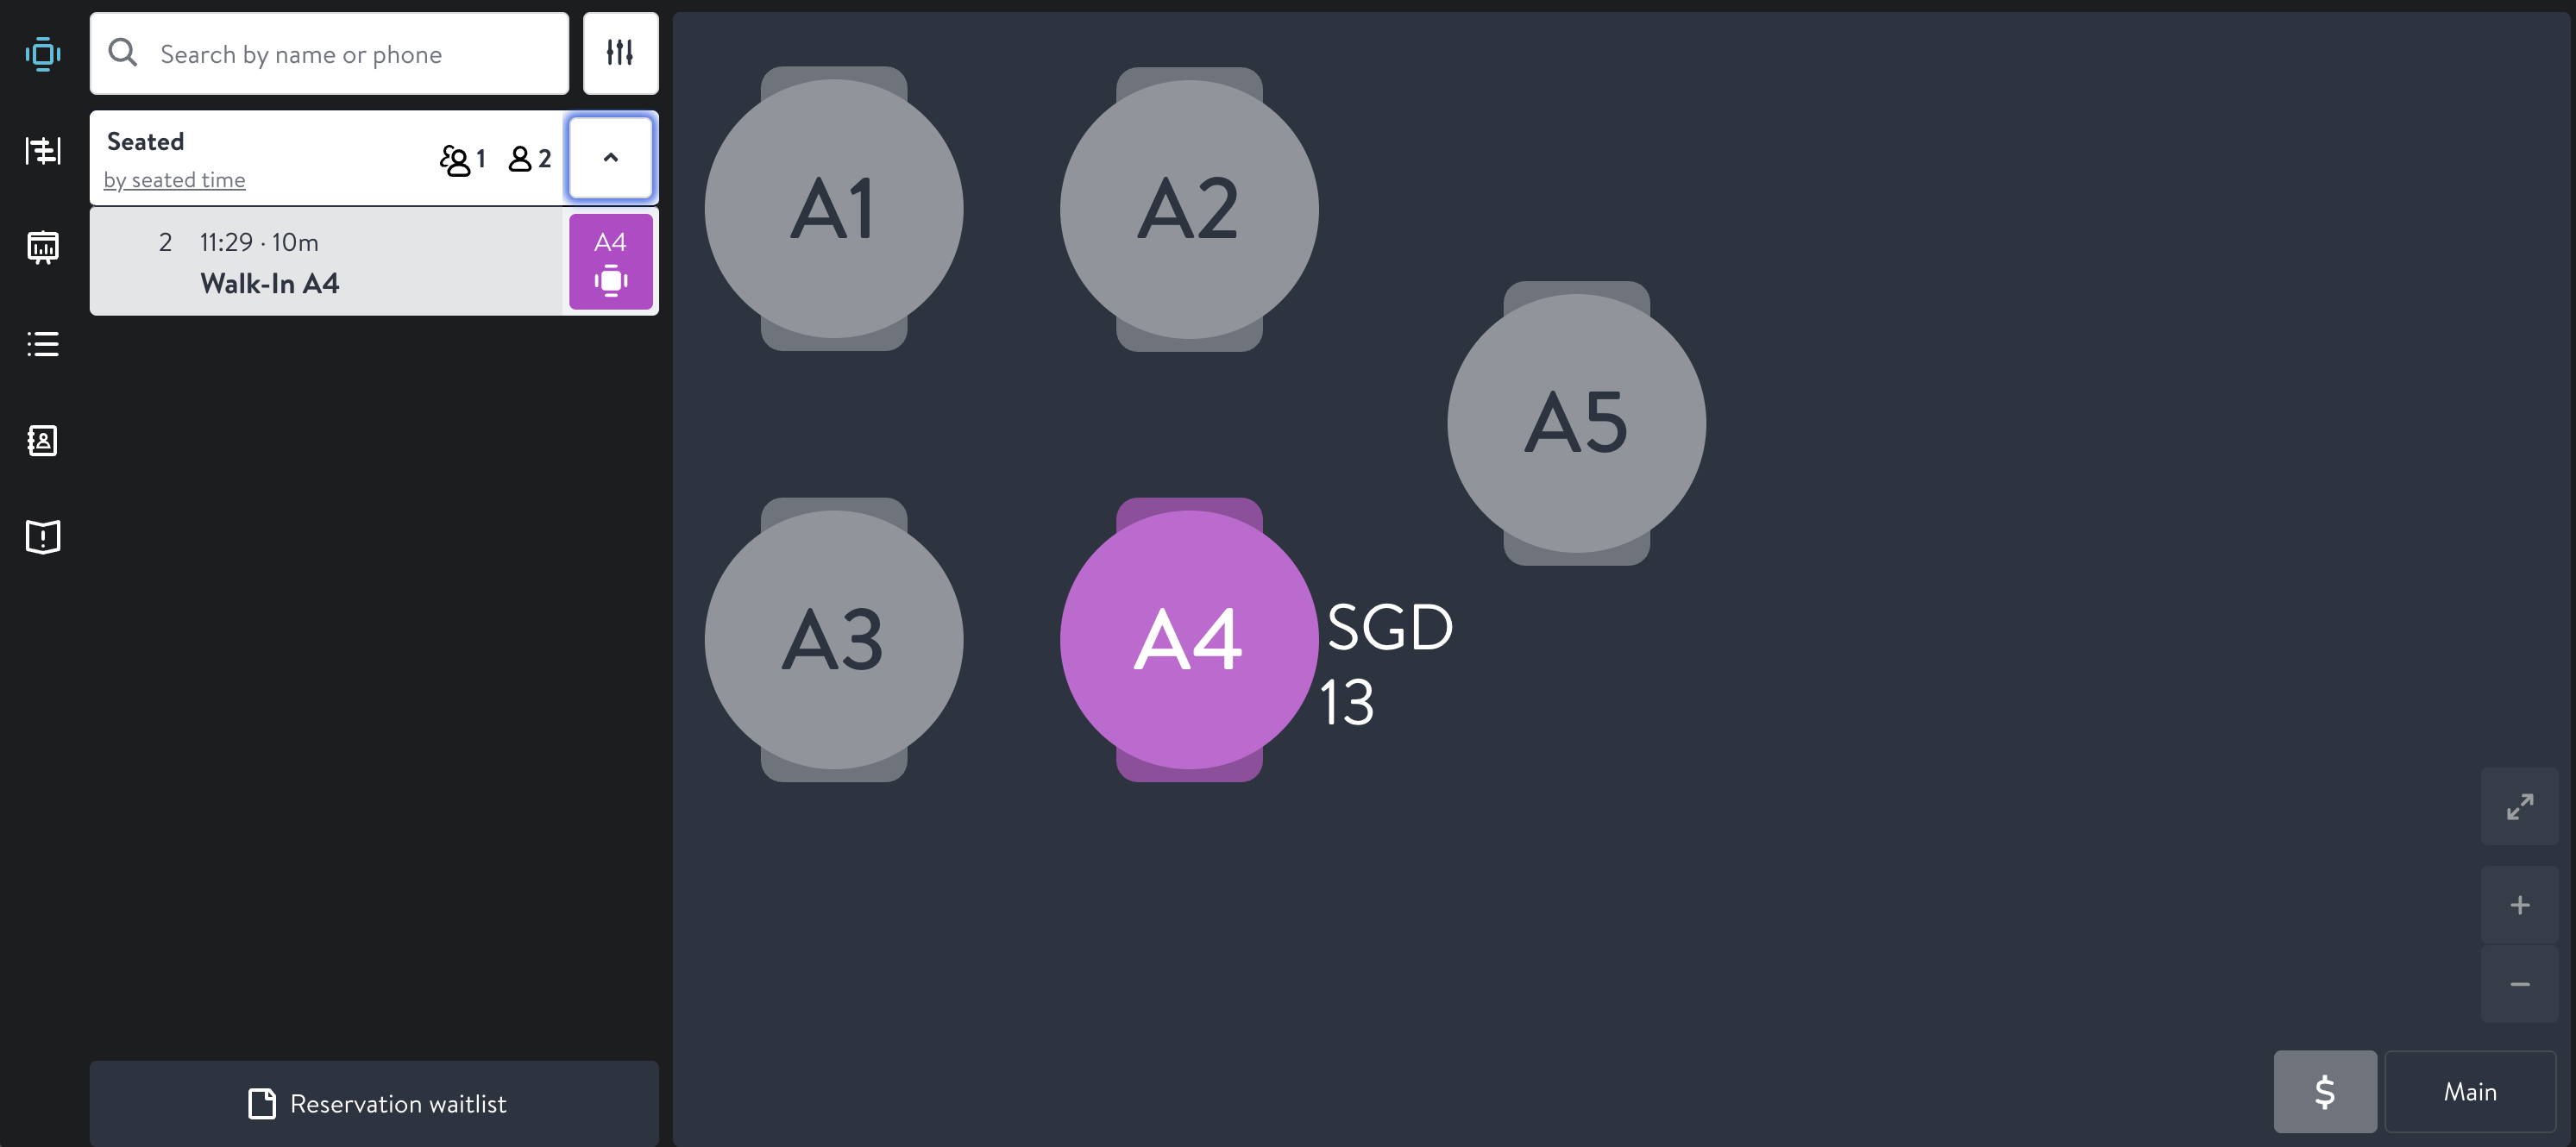
OpenTable floor plan with table A4 highlighted and its running total shown next to it

The table total updating on OpenTable

Open the table on OpenTable to see the full order. Each item, modifier, and the bill total match Atlas exactly.
OpenTable check details for Walk-In A4 listing a latte and an espresso with modifiers, subtotal, service charge, tax, and total matching Atlas

The full order details on OpenTable

5. The bill is paid on Atlas

Take payment on Atlas as usual. Tap Charge, choose the payment method, and charge the guest.
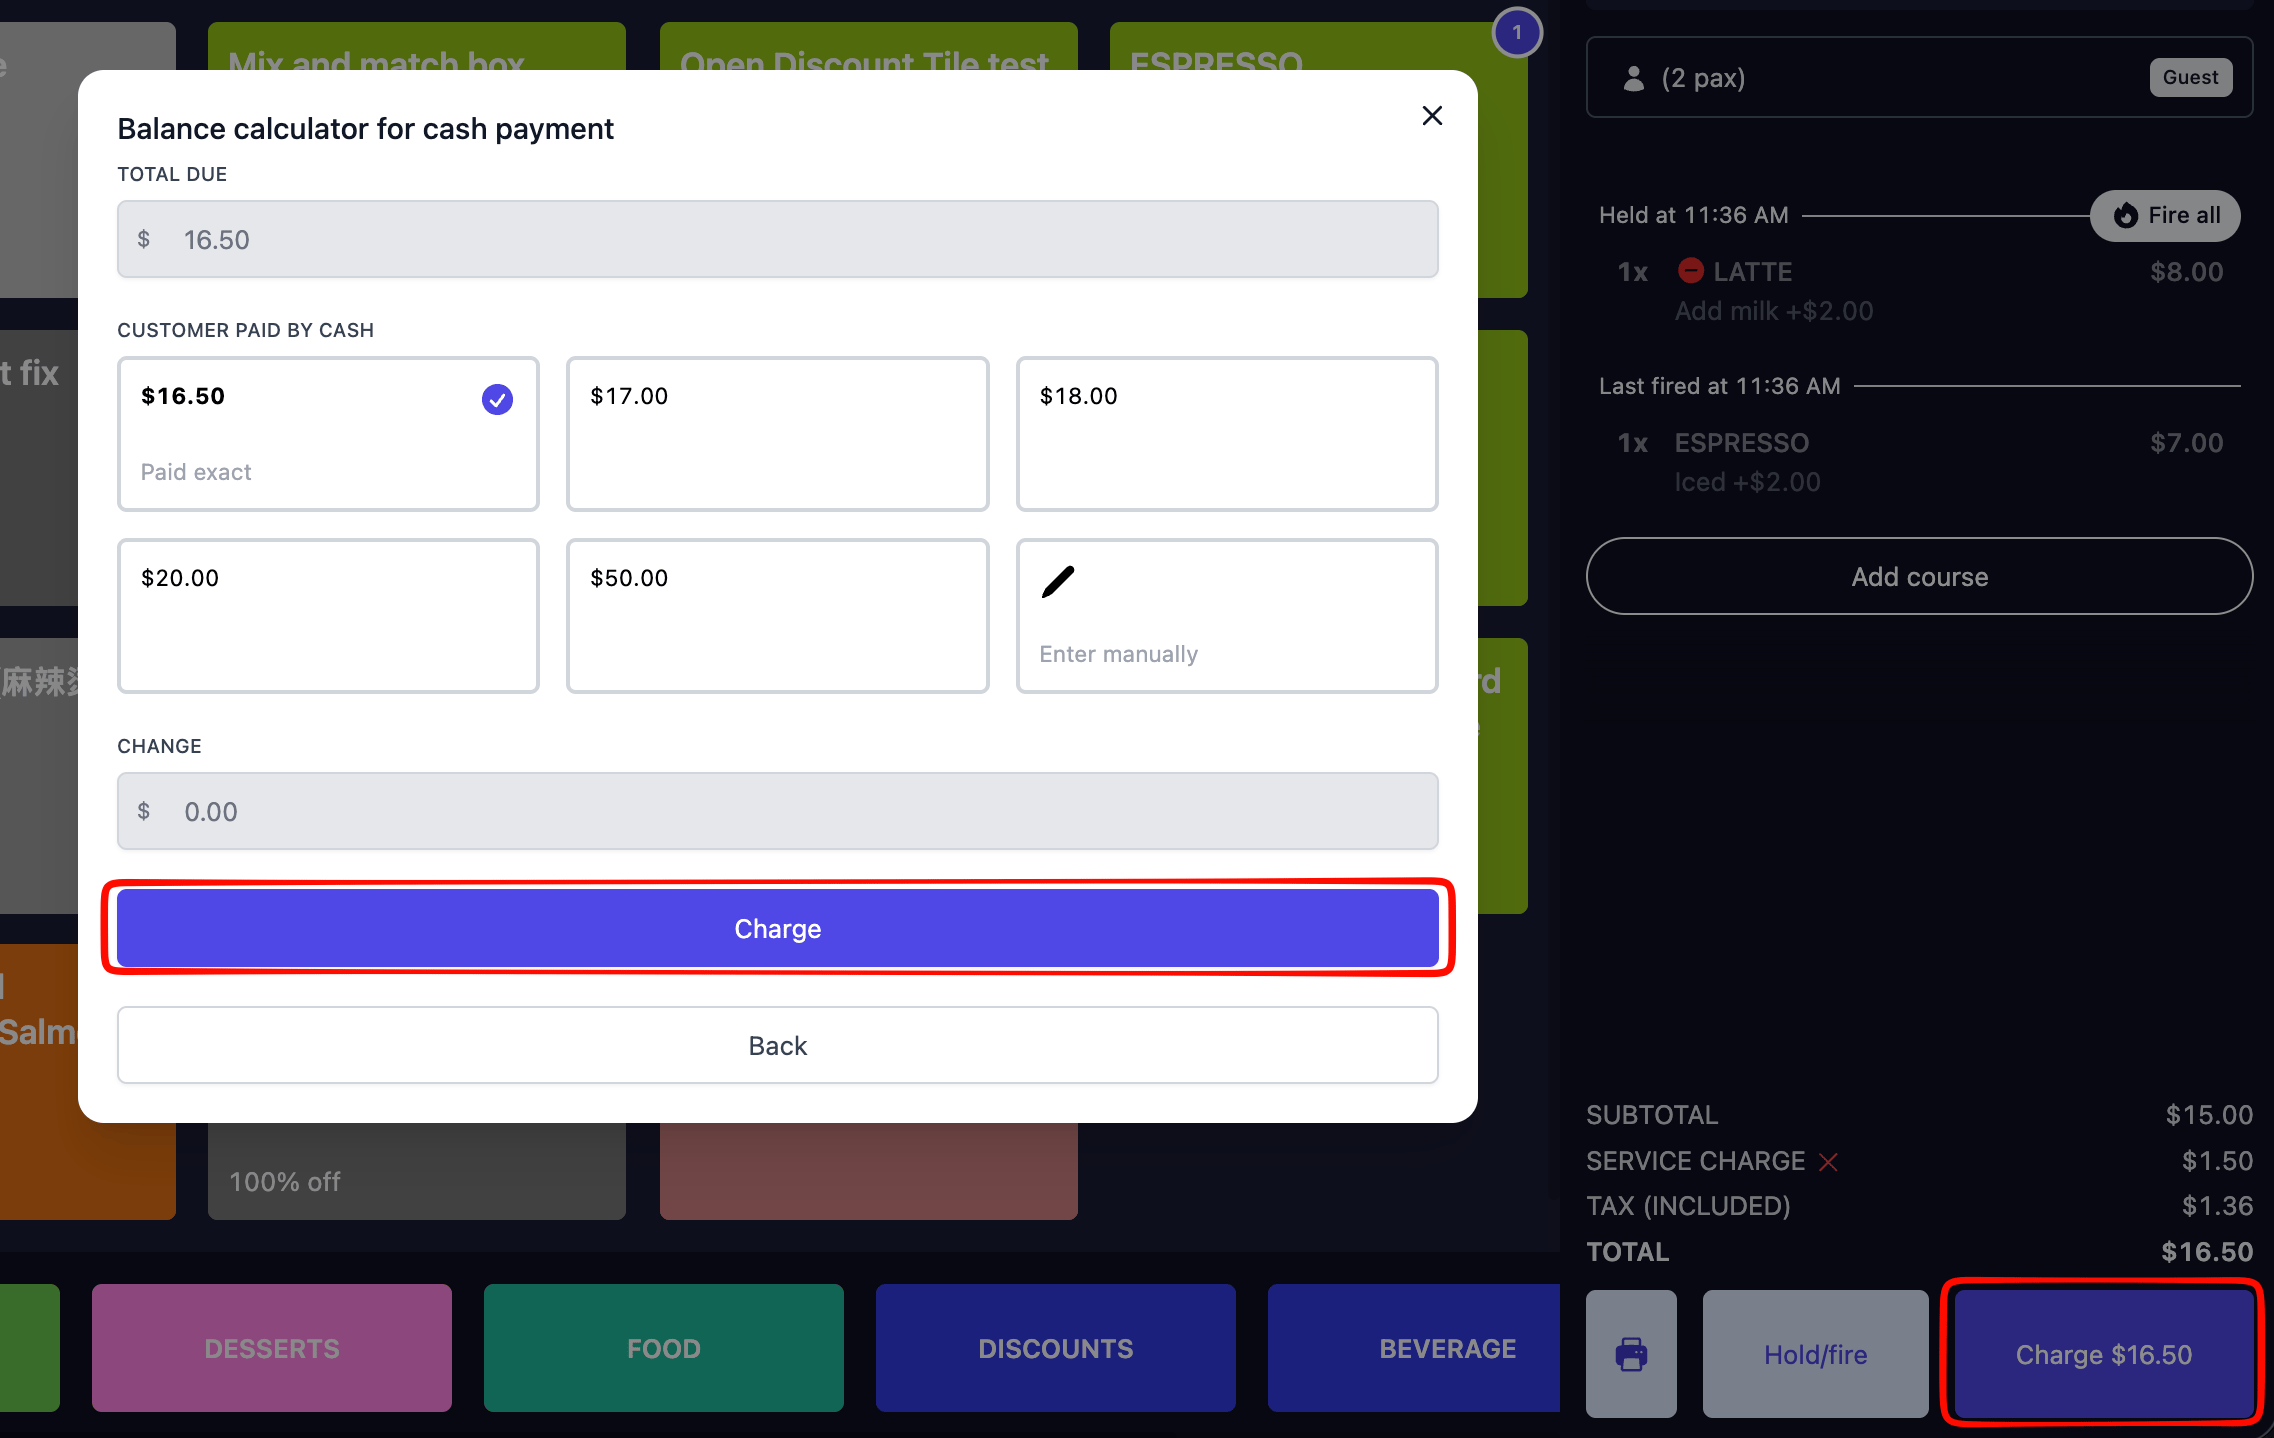
Atlas POS cash payment screen showing the total due of $16.50 and the Charge button highlighted

Charging the guest on Atlas POS

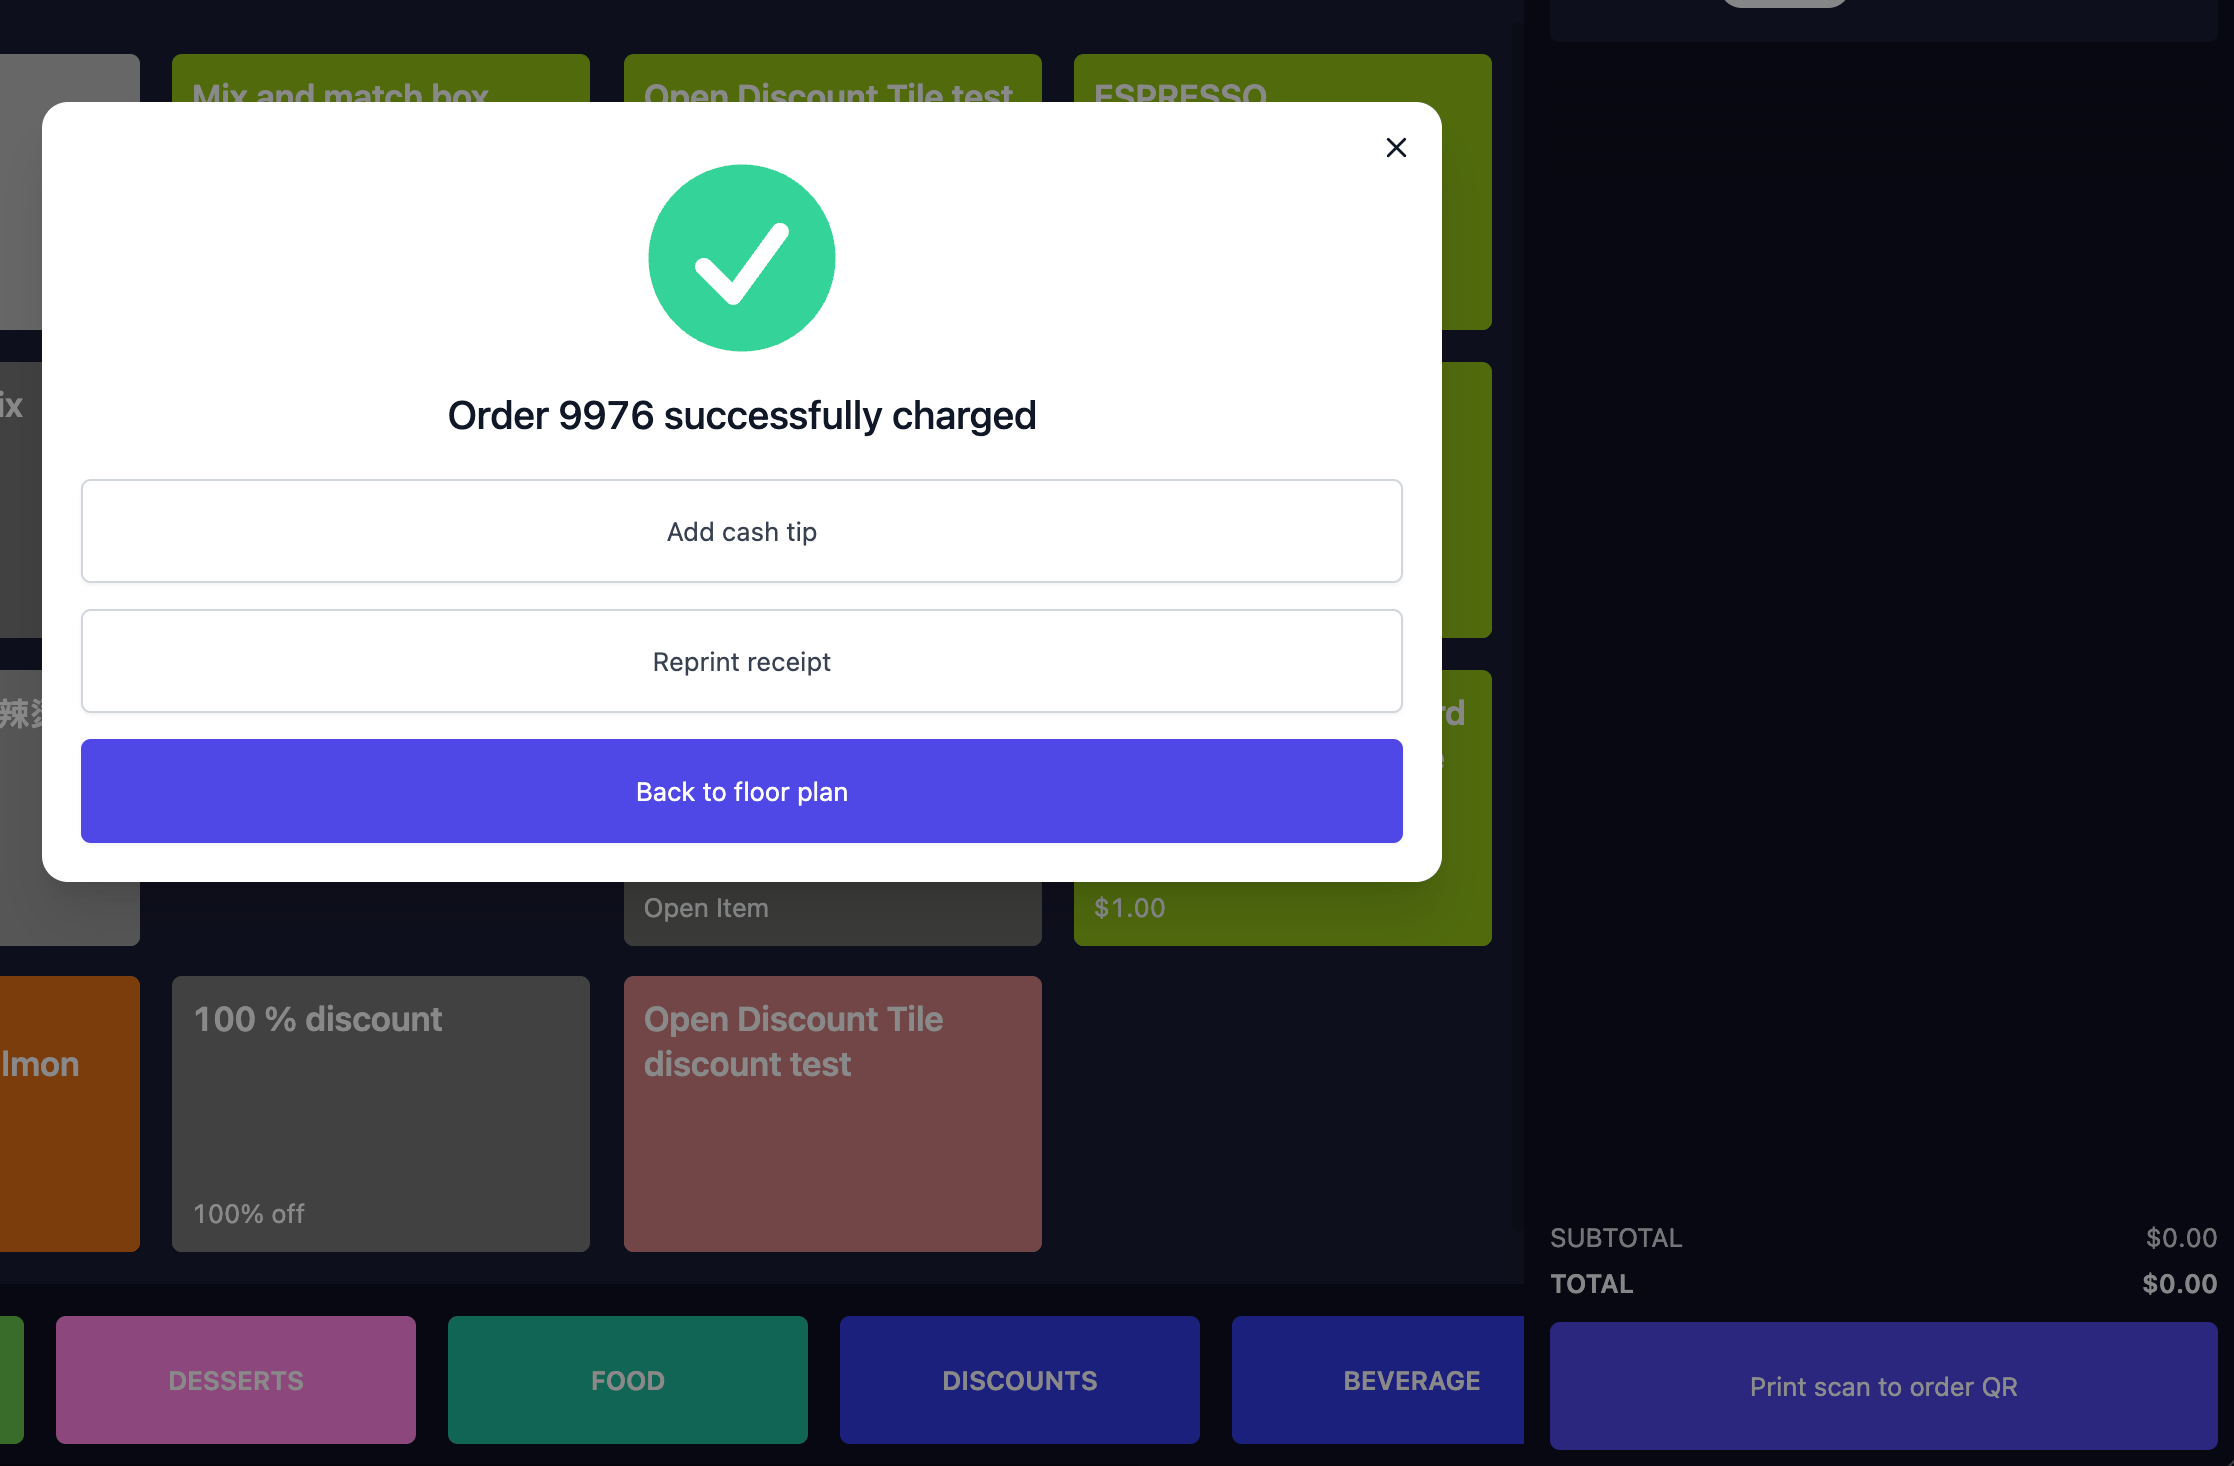
Atlas confirms the order is charged.
Atlas POS confirmation reading Order 9976 successfully charged, with options to add a cash tip, reprint the receipt, or go back to the floor plan

The charged order confirmation on Atlas
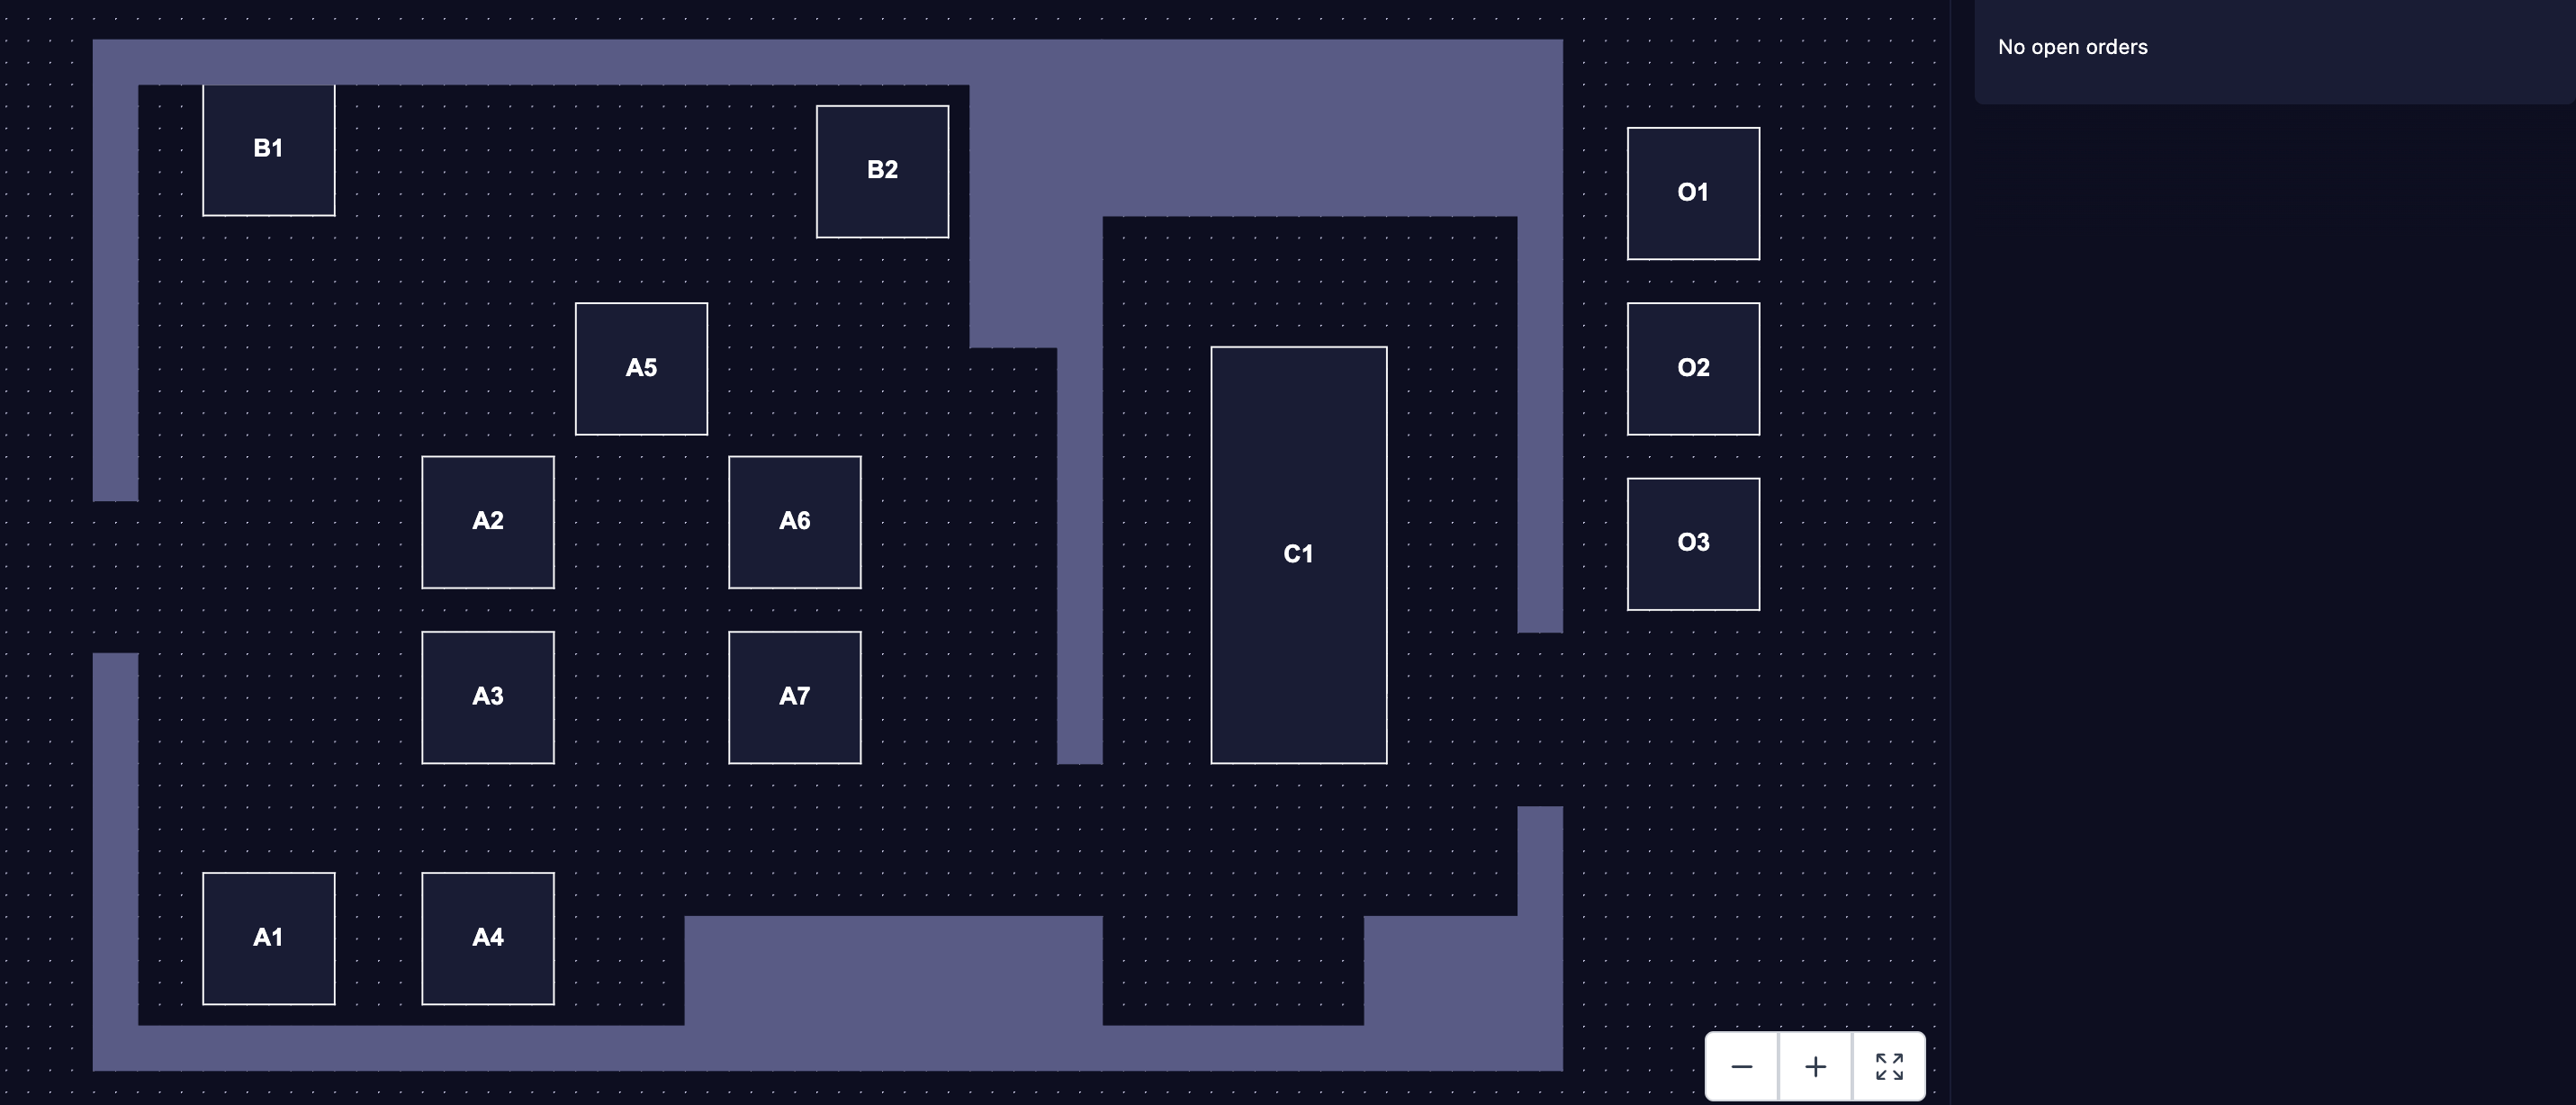
On Atlas, the table is freed and returns to the floor plan with no open orders.
Atlas POS floor plan with table A4 no longer highlighted and the orders panel showing No open orders

The freed table on the Atlas floor plan

6. The table is released on OpenTable

What happens next on OpenTable depends on your auto-finish setting. If auto-finish is on, the payment syncs across and OpenTable finishes the table on its own. The party moves to the Finished list and the table is freed for the next seating.
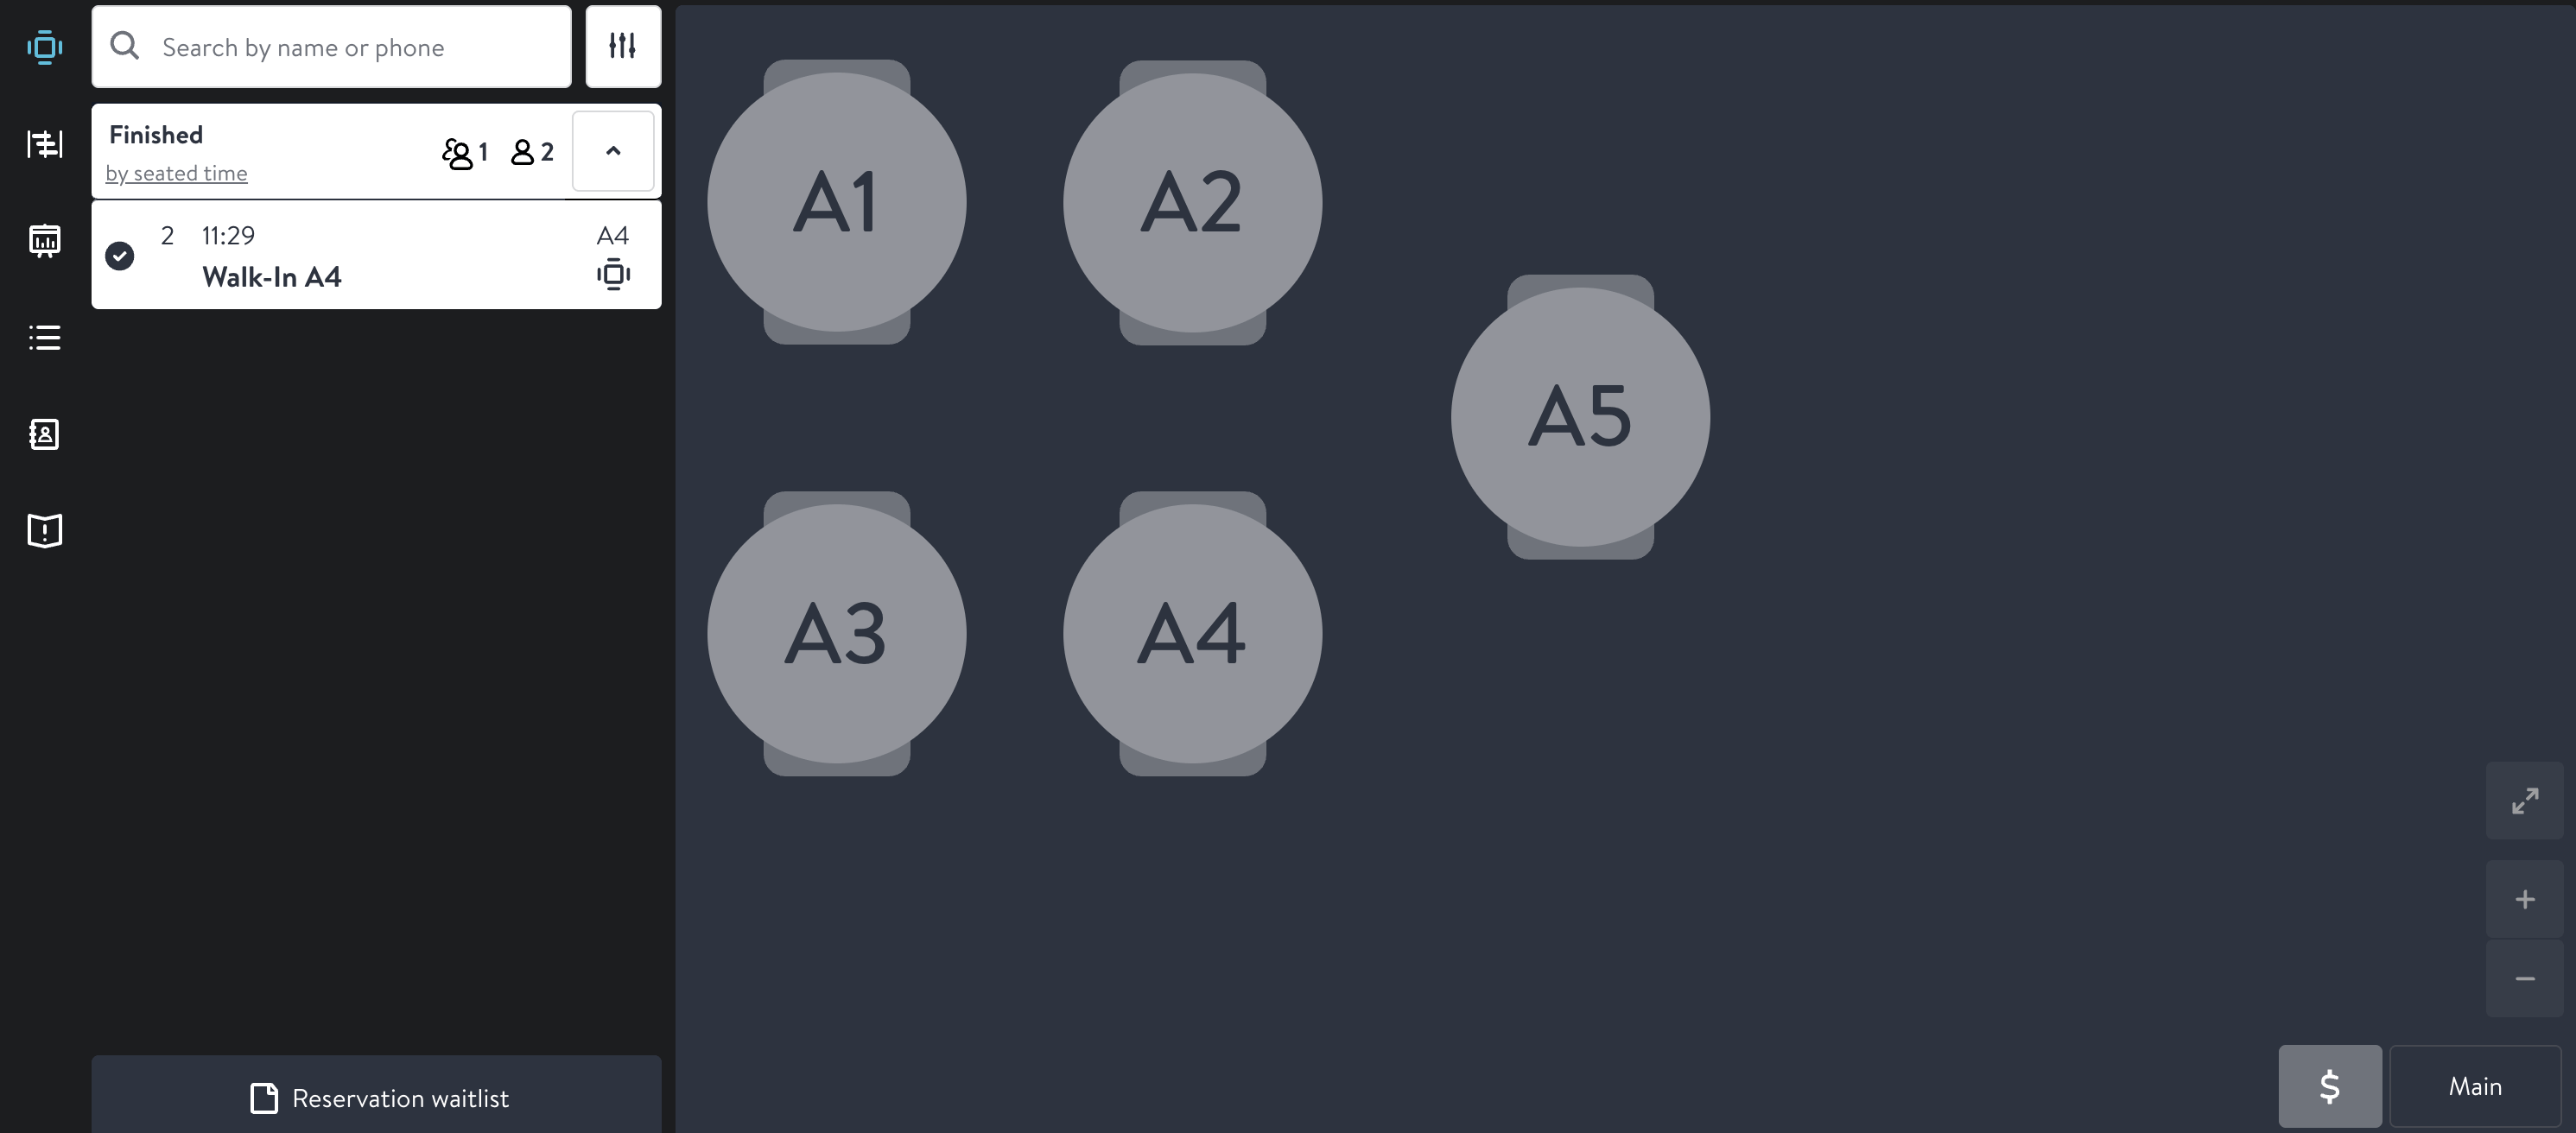
OpenTable Front of House with the Walk-In A4 party moved to the Finished list and the floor plan cleared

The table finished automatically on OpenTable
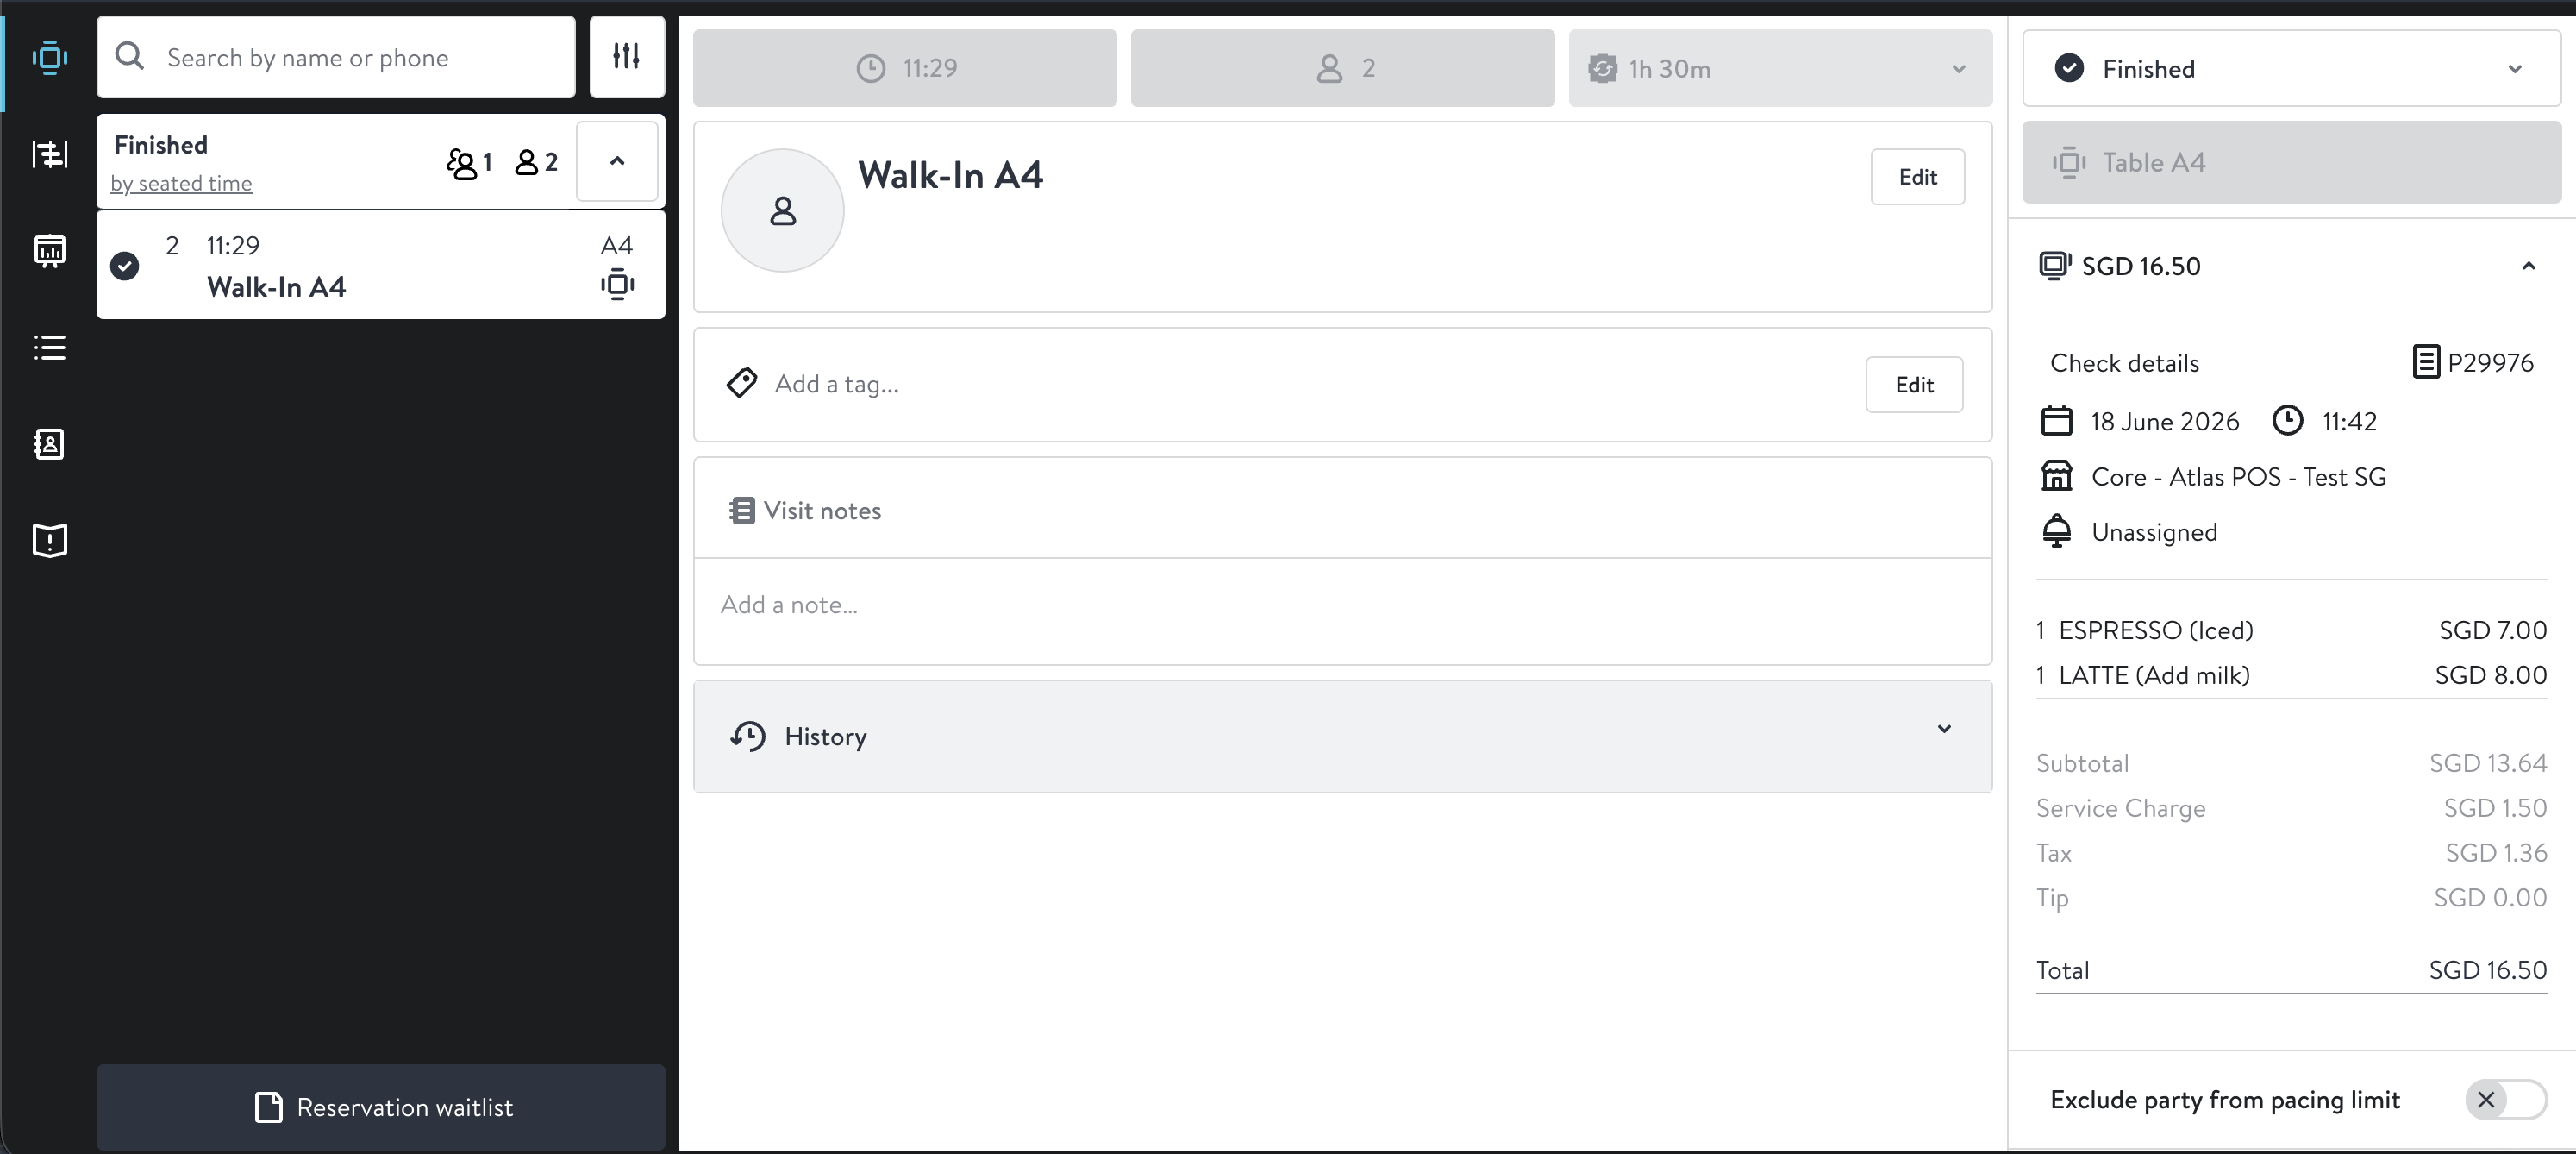
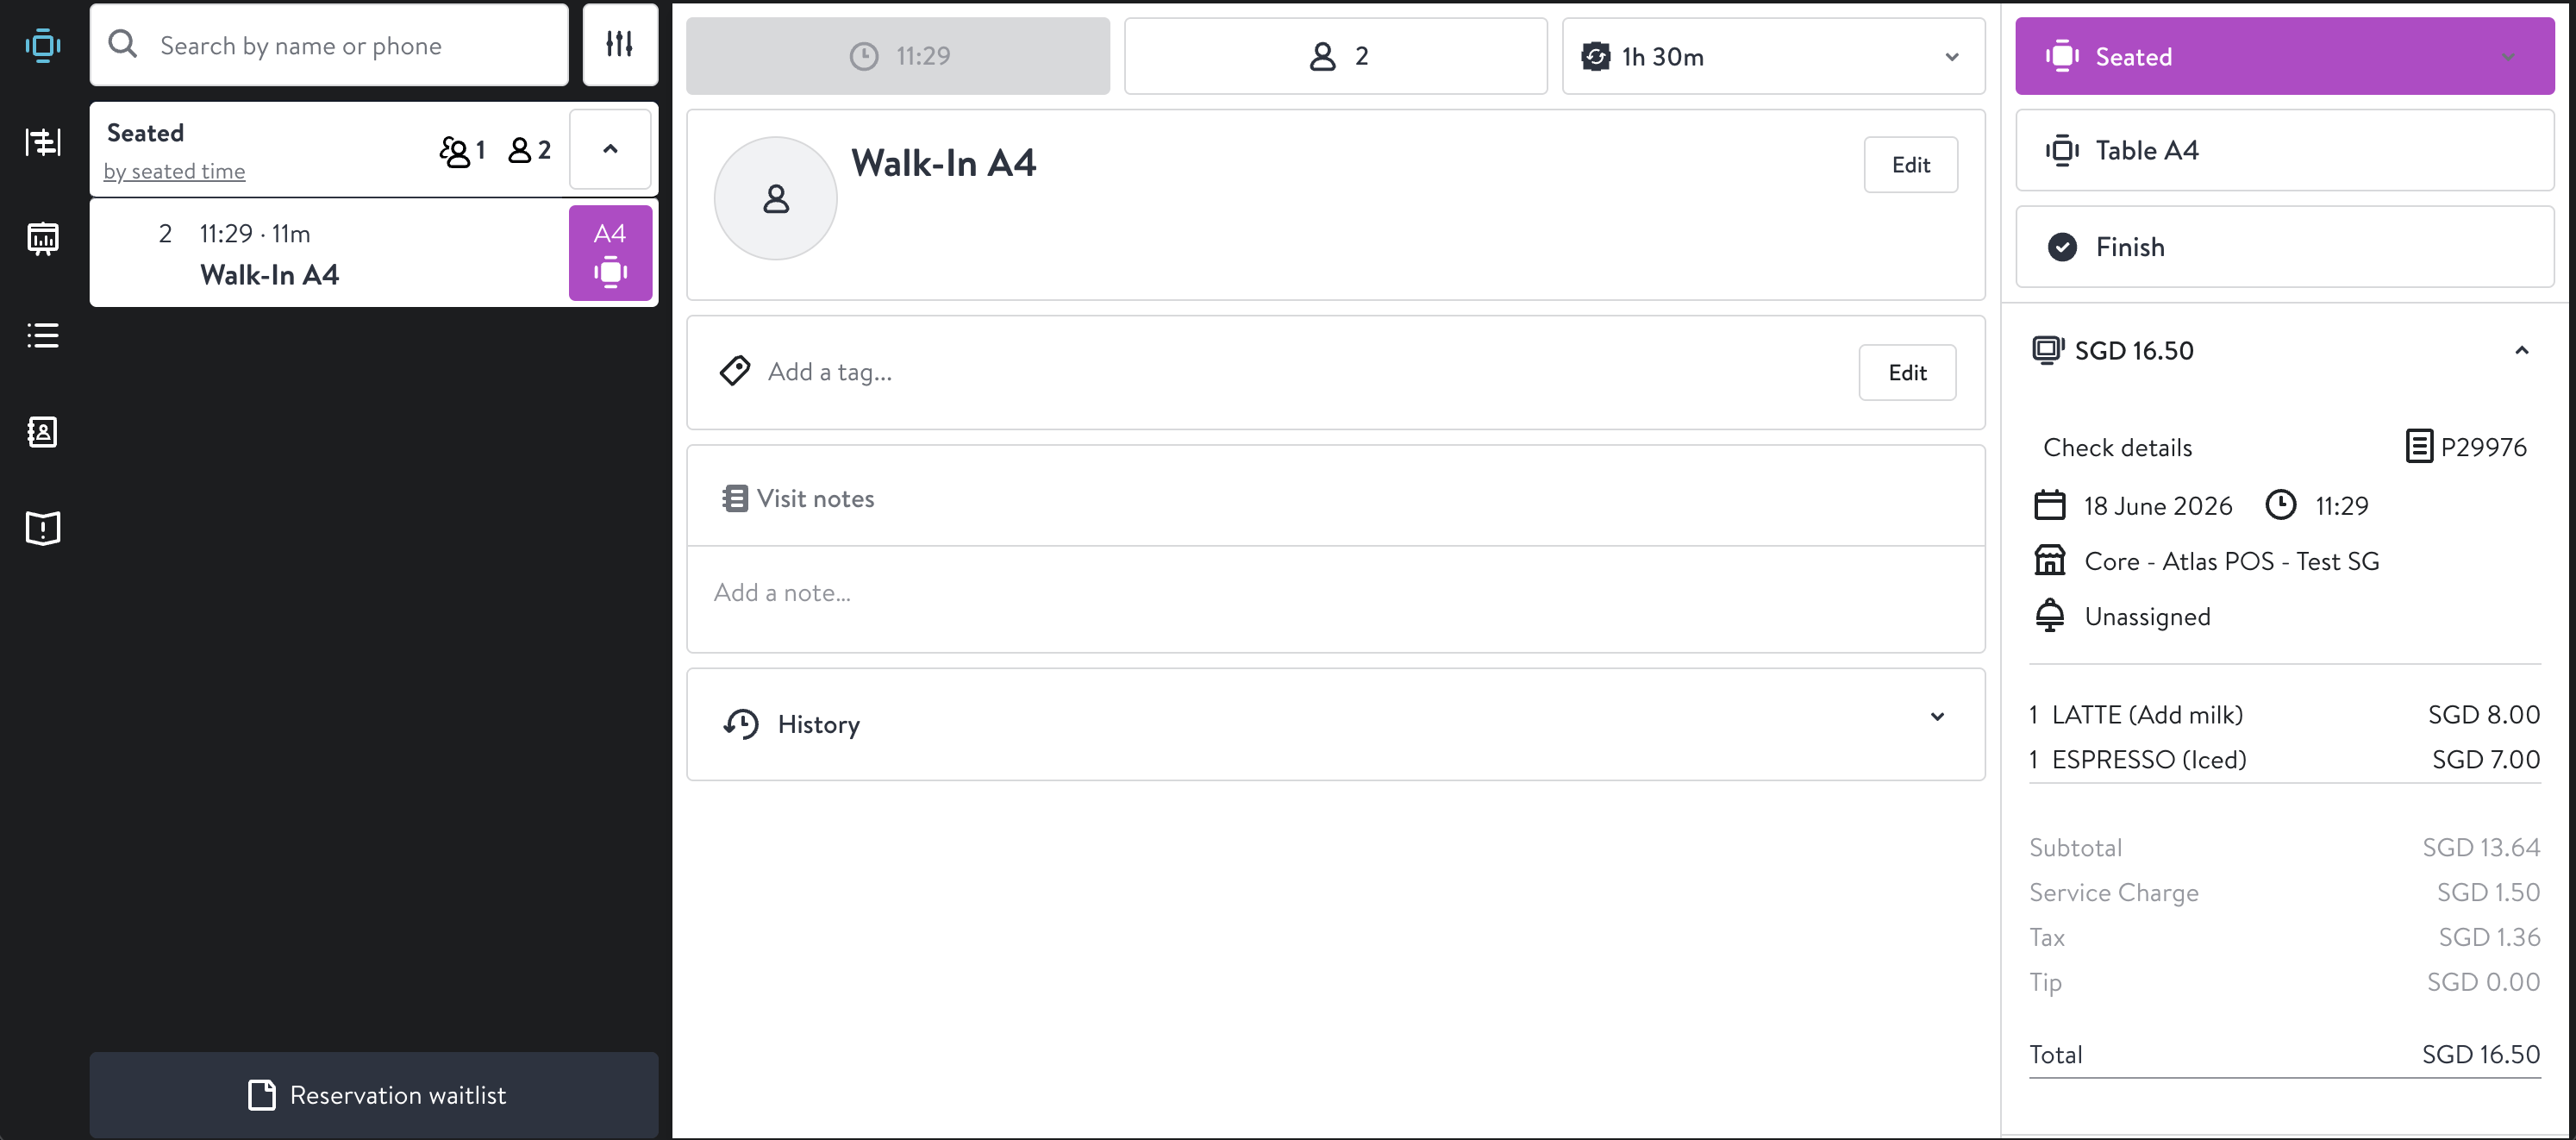
Click a finished party to see its order details — the items and total match the Atlas bill.
OpenTable finished reservation for Walk-In A4 showing the espresso, latte, and total of SGD 16.50 matching Atlas

Finished order details on OpenTable

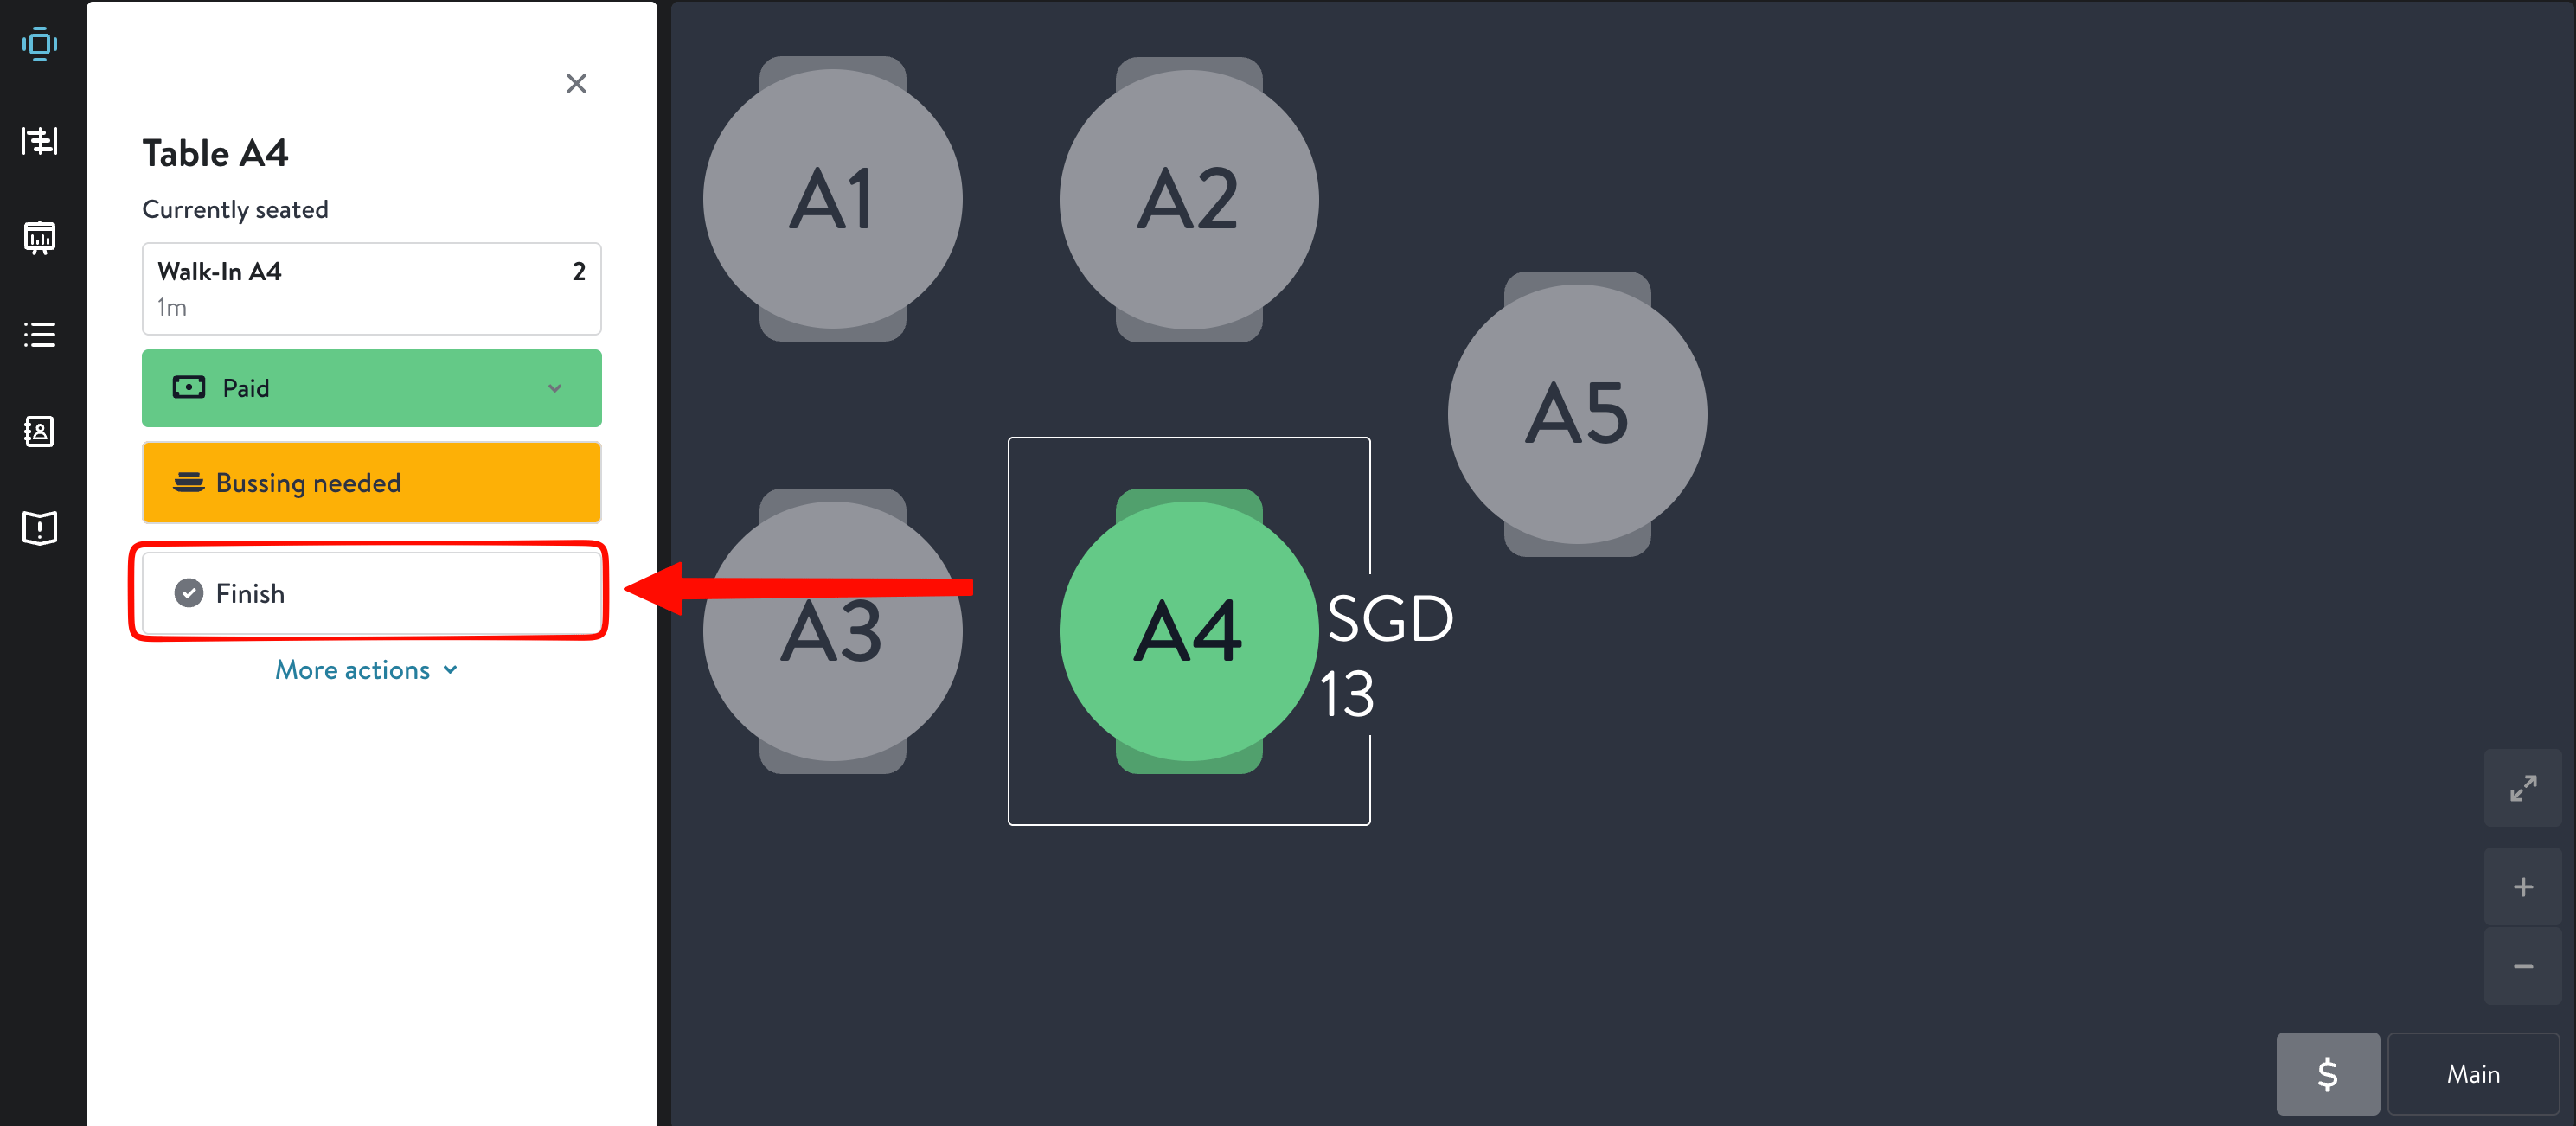
If auto-finish is off, the table stays marked as paid until you finish it by hand. Click the table, then click Finish to release it.
OpenTable Table A4 panel showing a Paid status and the Finish button highlighted to release the table manually

Finishing a paid table by hand on OpenTable

To turn auto-finish on, see Optional: release tables automatically below.

Optional: release tables automatically

Once the integration is live, OpenTable can free up tables for the next seating on its own. Turn on Automatically finish tables after payment in your OpenTable settings. When the bill is paid on Atlas POS, OpenTable marks the table as finished and releases it after a set time. Staff can still finish a table manually at any time.

OpenTable setting titled Automatically finish tables after payment, with a toggle to release tables once POS checks are paid

The auto-finish setting in OpenTable

If it doesn’t work

A cart didn’t open when a guest was seated
  1. Check the table name. It must match OpenTable exactly, including capitalisation and spaces.
  2. Seat the reservation manually from the POS in the meantime — service is not blocked.
  3. If table names match and it still fails, contact support with the reservation time and table name. Support can check whether the integration is enabled for your outlet.
Reservations are not appearing in Atlas
  1. Confirm the reservation exists in OpenTable for the correct restaurant location.
  2. If it does, contact support with the guest name and reservation time. Support can check whether the integration is enabled for your outlet.
Orders or bills are not showing in OpenTable
  1. Wait up to two minutes. OpenTable caches order and pricing data on its side, so updates from Atlas take a short while to display. The delay is on OpenTable, not Atlas.
  2. If your account was connected recently, the outlet may not be fully set up yet.
  3. Contact support with the outlet name. Support can check the connection and outlet setup.
If the issue persists, contact support at hello@atlas.kitchen.

What’s next