> ## Documentation Index
> Fetch the complete documentation index at: https://help.atlas.kitchen/llms.txt
> Use this file to discover all available pages before exploring further.
# How to use POS for QSR
> Accept payments in-store and show customers their order details.
**Who is this guide for?**
* Atlas users subscribed to Atlas POS.
* Staff taking orders on the tablet during service.
## Before you begin
Accept all kinds of payments in-store. You can also choose whether to show customers their order details on screen.
Your POS tile layout is fully customisable. Set up your pages, product tiles, and discount tiles from [Menu builder > POS layouts](/menu-builder/pos-layout).
## Taking an order
When you open the POS, you land on the ordering screen. Your menu items display as tiles on the left, and the cart displays on the right.
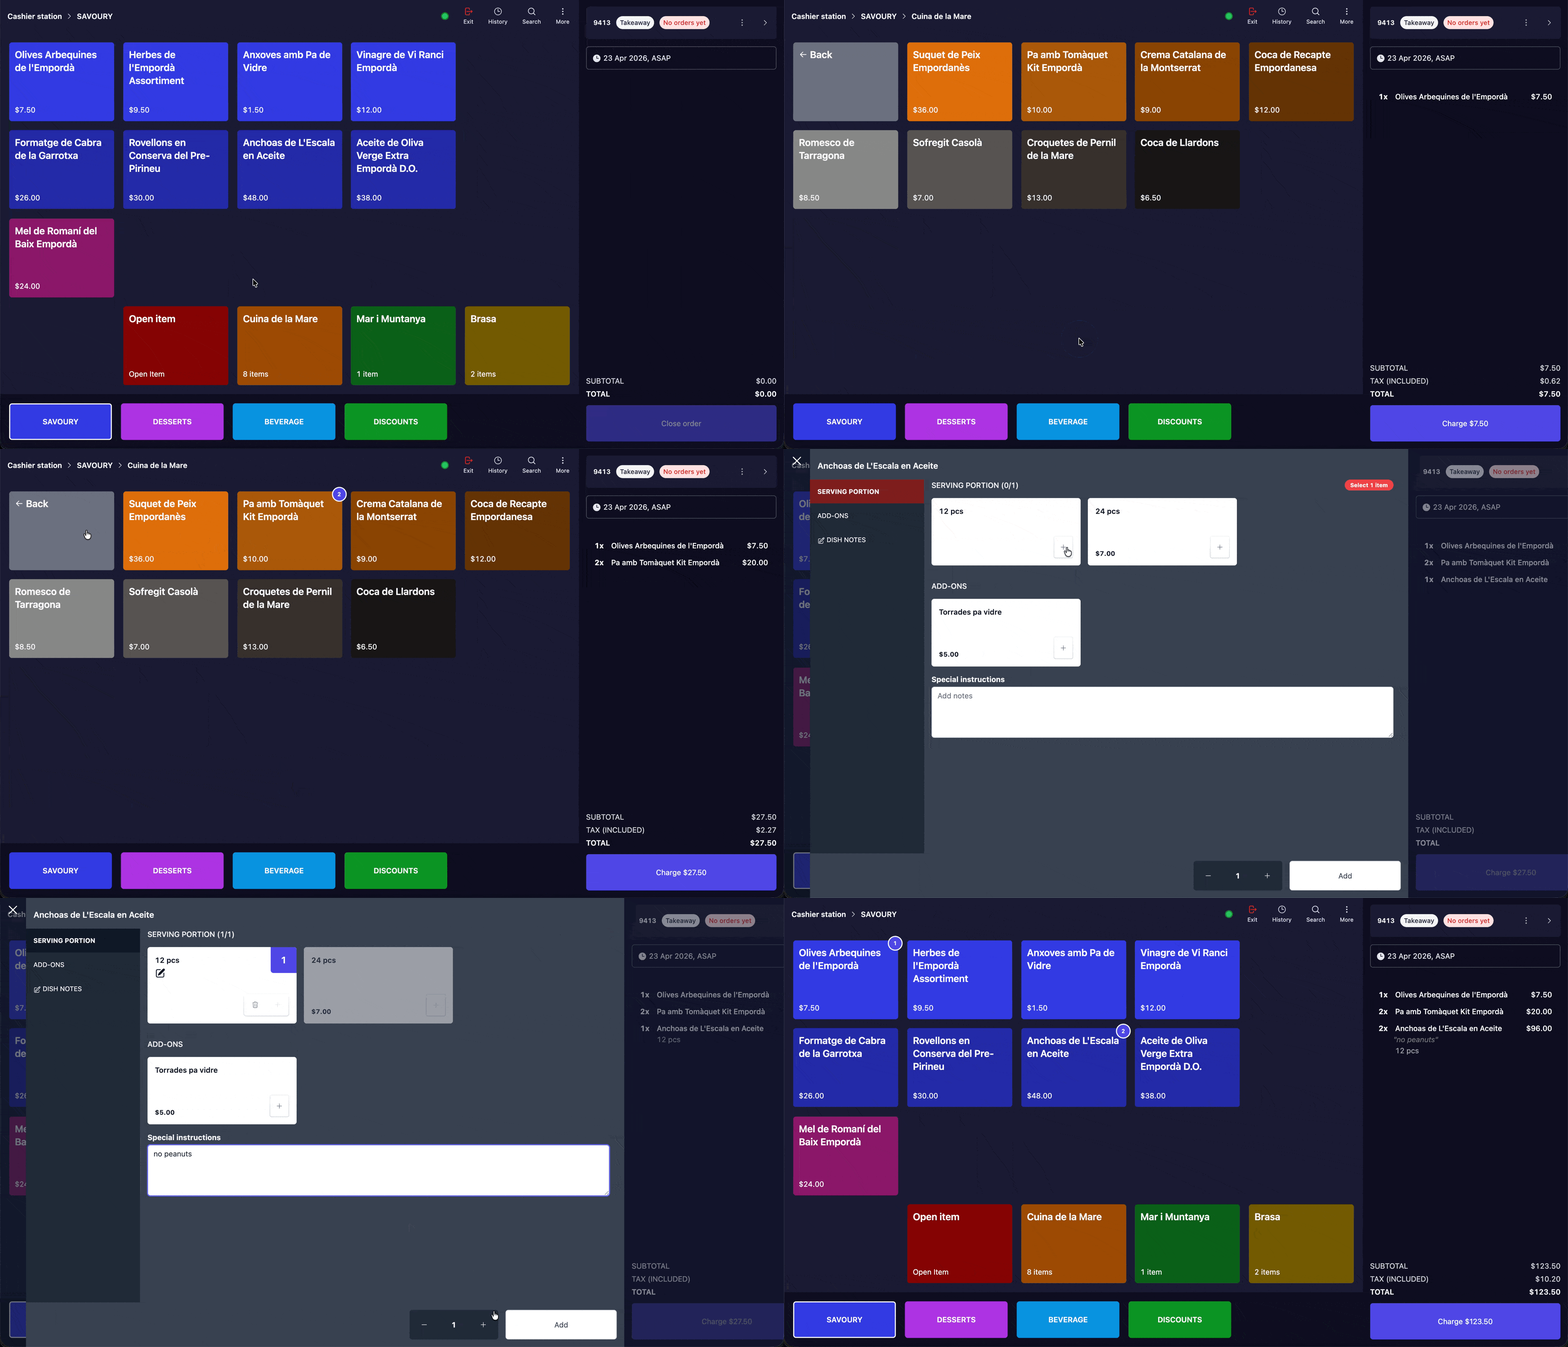 If the item has no modifiers, it adds directly to the cart.
Select the required options (e.g. serving portion, add-ons). You can also:
* Add **special instructions** in the text field at the bottom
* Change the **quantity** using the **-** and **+** buttons
Use the category tabs at the bottom of the screen (e.g. **Savoury**, **Desserts**, **Beverage**, **Discounts**) to navigate between menu sections. Tap a folder tile to open subcategories.
## Editing items in the cart
To modify an item already in the cart, tap the item in the cart panel on the right. A modal appears with these options:
If the item has no modifiers, it adds directly to the cart.
Select the required options (e.g. serving portion, add-ons). You can also:
* Add **special instructions** in the text field at the bottom
* Change the **quantity** using the **-** and **+** buttons
Use the category tabs at the bottom of the screen (e.g. **Savoury**, **Desserts**, **Beverage**, **Discounts**) to navigate between menu sections. Tap a folder tile to open subcategories.
## Editing items in the cart
To modify an item already in the cart, tap the item in the cart panel on the right. A modal appears with these options:
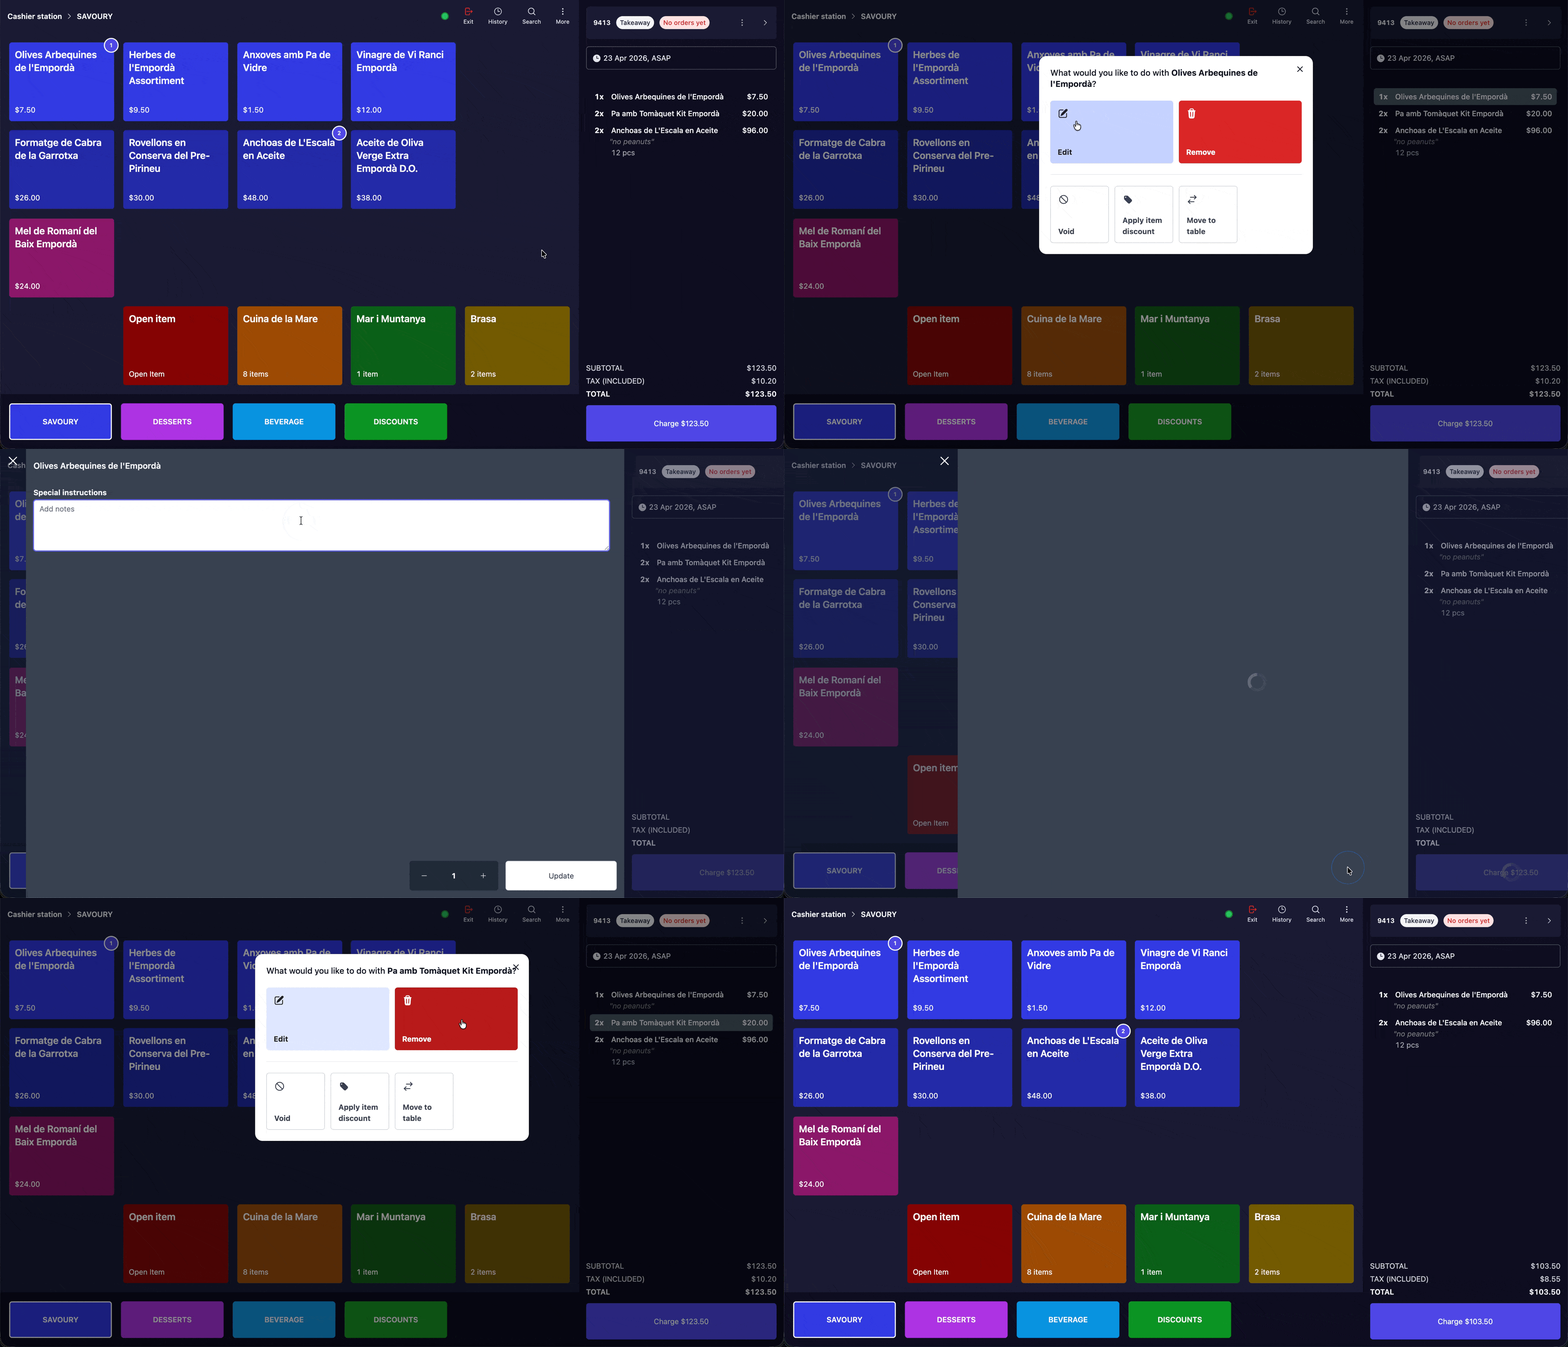 * **Edit** — change modifiers, quantities, or add item notes
* **Remove** — remove the item from the cart
* **Void** — void the item (records it as voided in reports)
* **Apply item discount** — apply a discount to this specific item
## Order actions
For actions that apply to the whole order, tap the **three dots** (Ȯ) in the top-right corner of the cart panel.
* **Edit** — change modifiers, quantities, or add item notes
* **Remove** — remove the item from the cart
* **Void** — void the item (records it as voided in reports)
* **Apply item discount** — apply a discount to this specific item
## Order actions
For actions that apply to the whole order, tap the **three dots** (Ȯ) in the top-right corner of the cart panel.
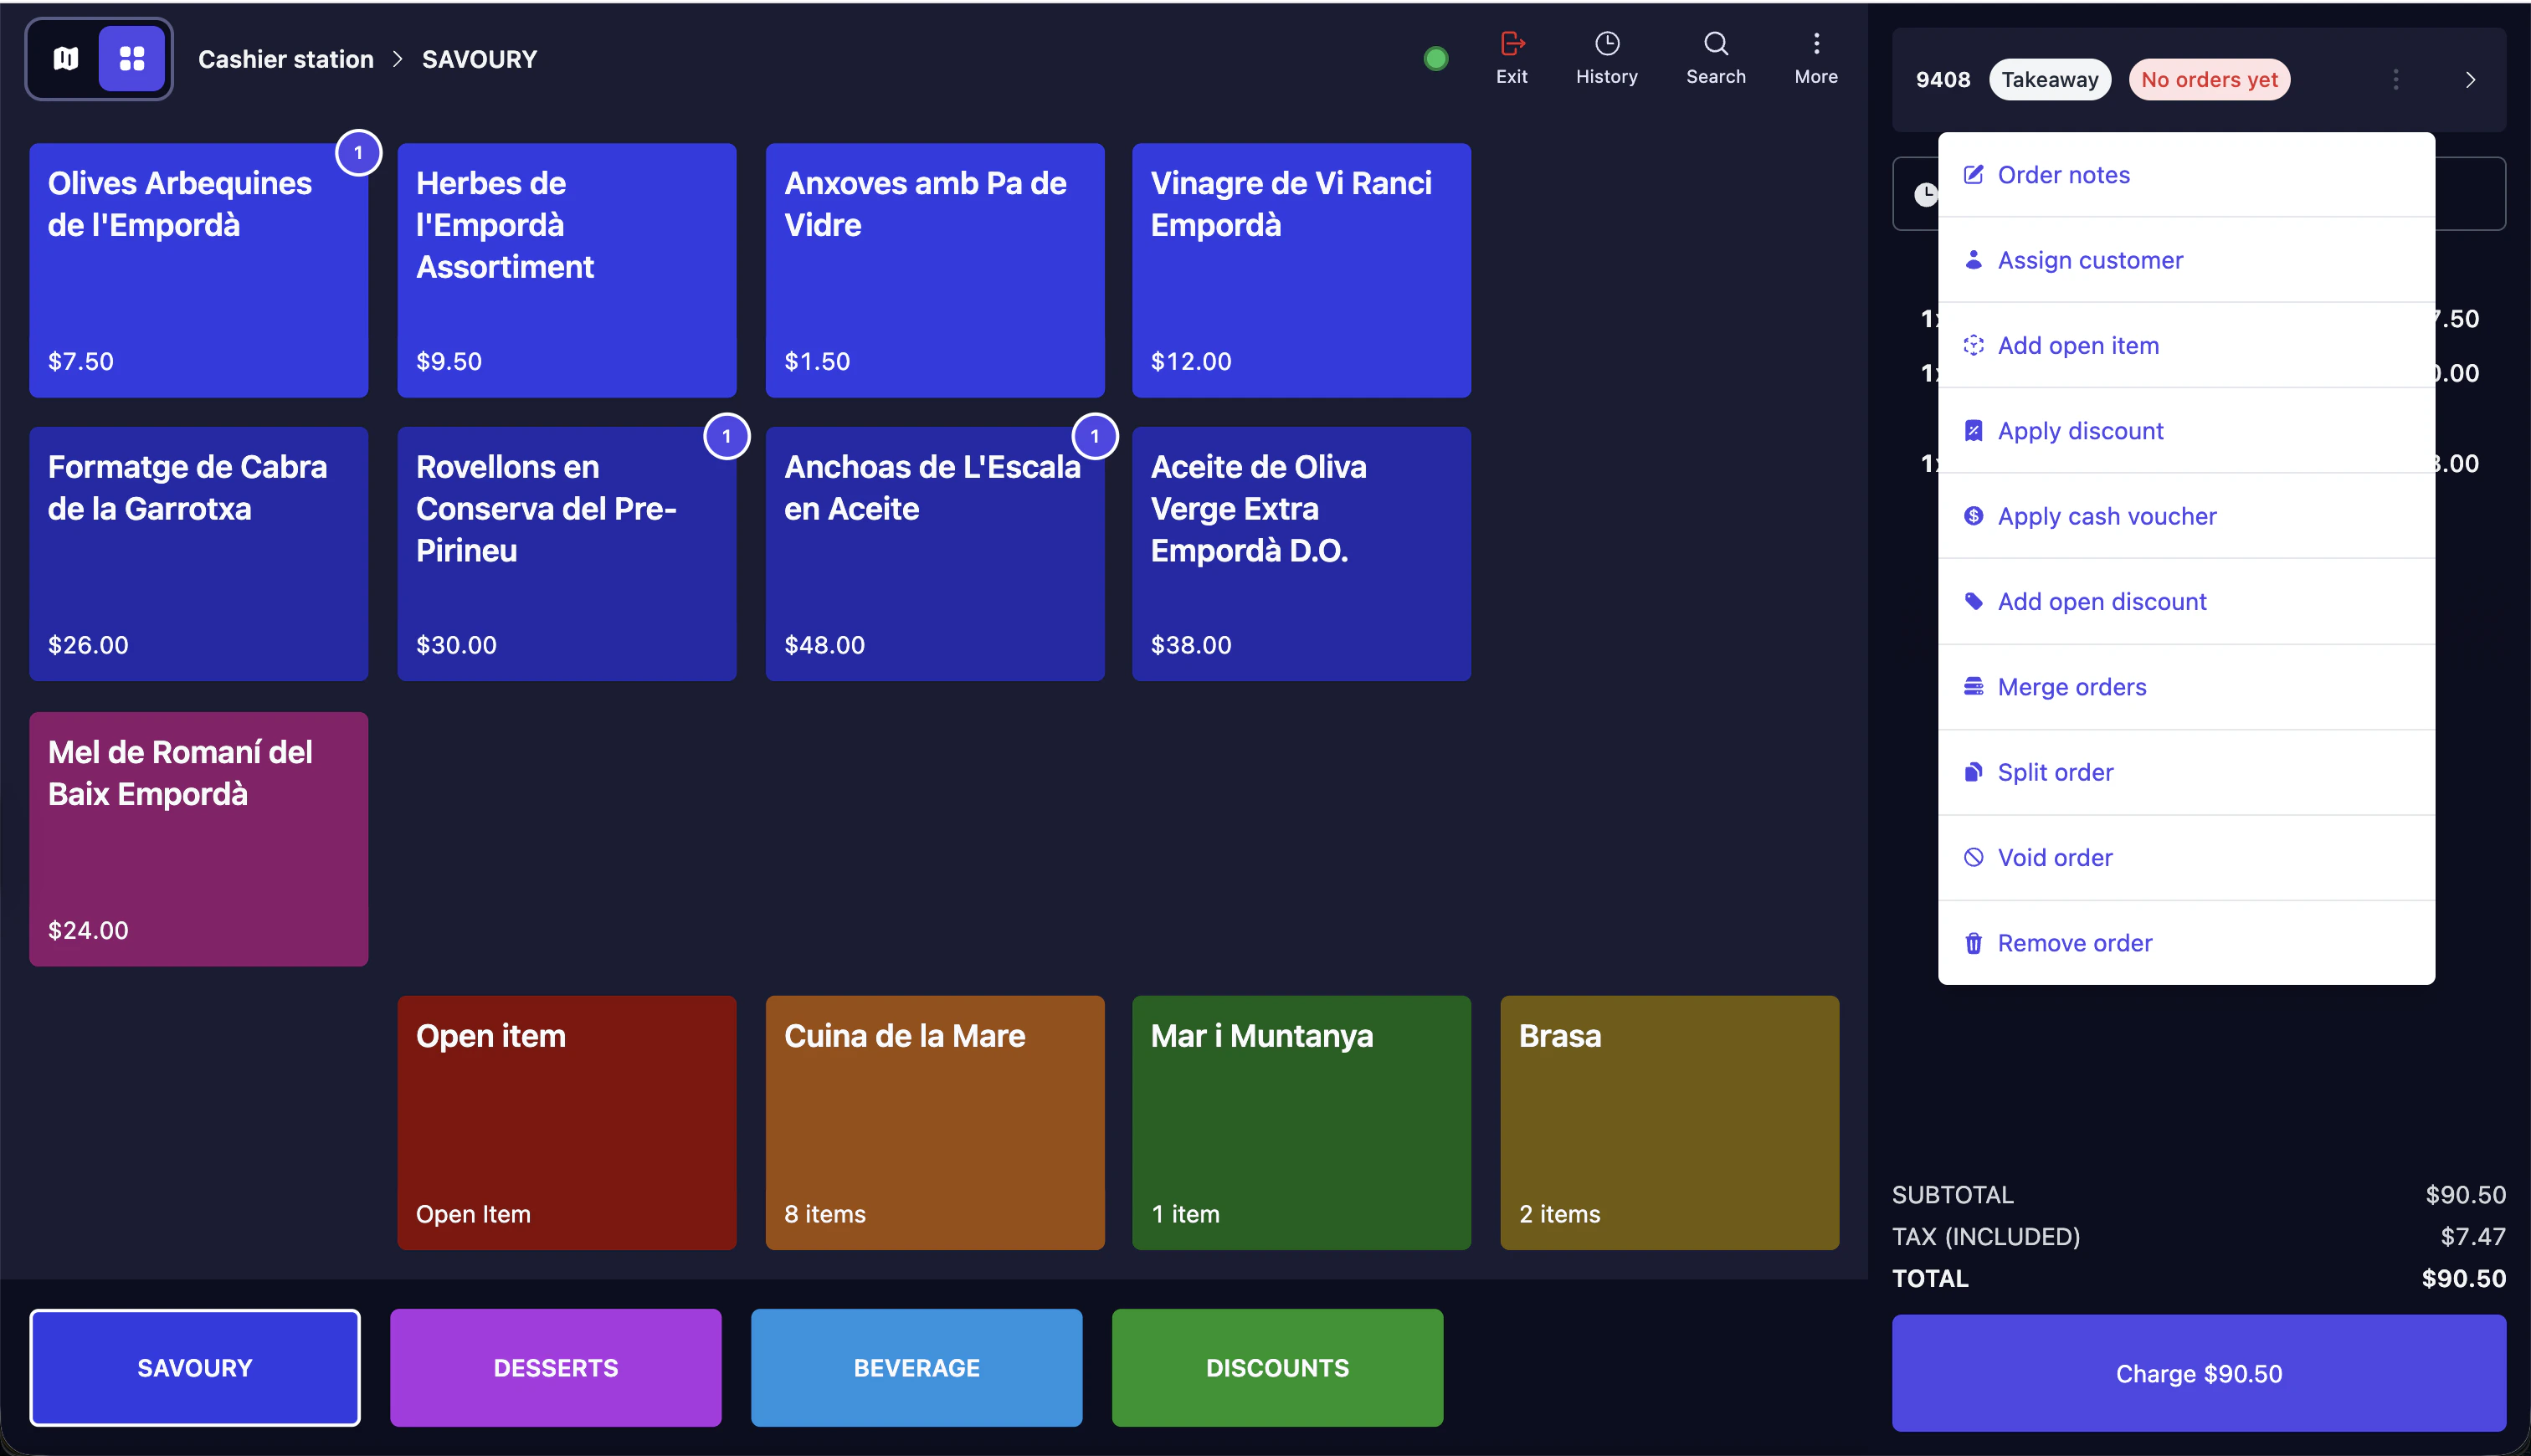 Available actions:
* **Order notes** — add notes visible to the kitchen
* **Assign customer** — link a customer profile (useful if running a loyalty programme)
* **Add open item** — add a custom item not on the menu
* **Apply discount** — apply a discount to the entire order
* **Apply cash voucher** — redeem a cash voucher code
* **Merge orders** — combine with another open order
* **Split order** — split the charge across multiple payments
* **Void order** — void the entire order
* **Remove order** — delete the order completely
## Charging an order
Atlas Pay integrates your terminal directly with the POS. The exact order amount is sent automatically — no manual keying, no reconciliation mismatches, and faster checkouts. Your terminal must be connected and online.
The button shows the total amount (e.g. **Charge \$90.50**).
Payment methods are grouped into two categories:
* **Terminal** — integrated payments processed through your Atlas Pay terminal
* **Credit Card** — the exact order amount reflects on the terminal automatically. The customer taps or inserts their card.
* **PayNow, WeChat Pay, Alipay** — the terminal shows a QR code for the customer to scan and pay.
* **Manual** — non-integrated payments you record manually (e.g. ShoppePay, Cash, Invoiced Payment)
For terminal payments, wait for the customer to complete the payment on the terminal. The order is marked as paid automatically.
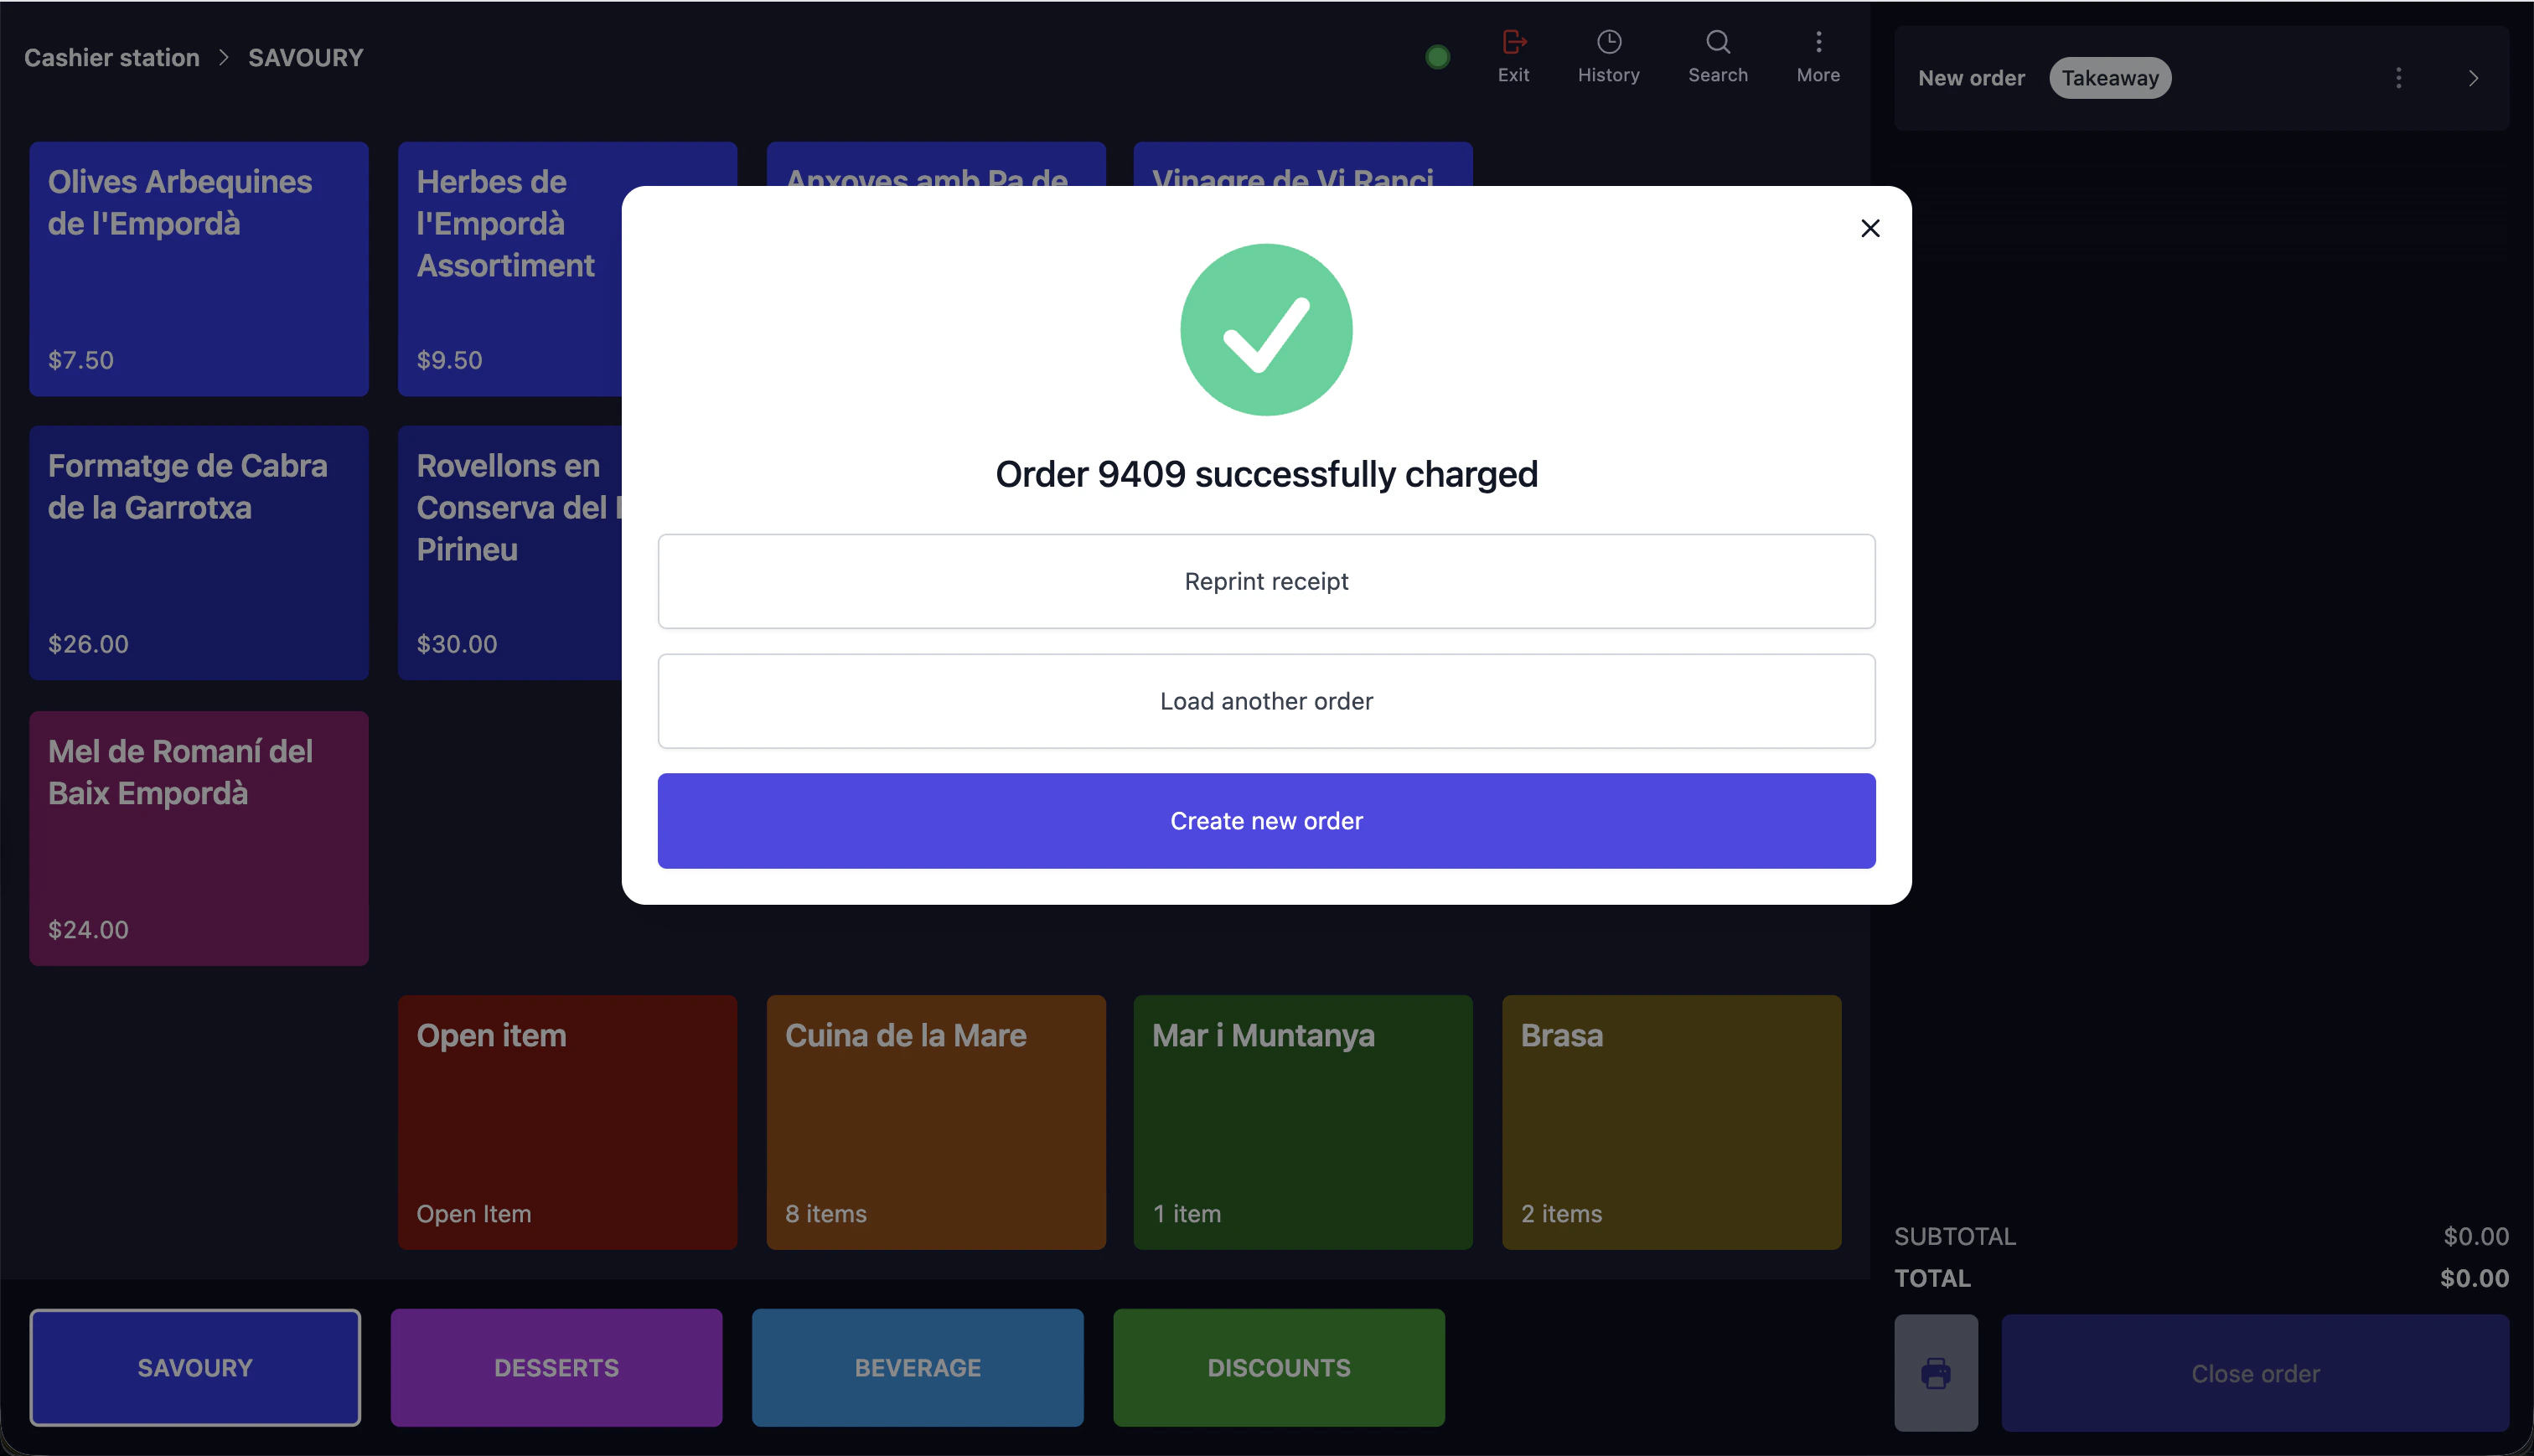
After payment, a confirmation screen lets you reprint the receipt or start a new order immediately. From here you can:
* **Reprint receipt** — print or reprint the receipt
* **Load another order** — open a different existing order
* **Create new order** — start the next order immediately
Available actions:
* **Order notes** — add notes visible to the kitchen
* **Assign customer** — link a customer profile (useful if running a loyalty programme)
* **Add open item** — add a custom item not on the menu
* **Apply discount** — apply a discount to the entire order
* **Apply cash voucher** — redeem a cash voucher code
* **Merge orders** — combine with another open order
* **Split order** — split the charge across multiple payments
* **Void order** — void the entire order
* **Remove order** — delete the order completely
## Charging an order
Atlas Pay integrates your terminal directly with the POS. The exact order amount is sent automatically — no manual keying, no reconciliation mismatches, and faster checkouts. Your terminal must be connected and online.
The button shows the total amount (e.g. **Charge \$90.50**).
Payment methods are grouped into two categories:
* **Terminal** — integrated payments processed through your Atlas Pay terminal
* **Credit Card** — the exact order amount reflects on the terminal automatically. The customer taps or inserts their card.
* **PayNow, WeChat Pay, Alipay** — the terminal shows a QR code for the customer to scan and pay.
* **Manual** — non-integrated payments you record manually (e.g. ShoppePay, Cash, Invoiced Payment)
For terminal payments, wait for the customer to complete the payment on the terminal. The order is marked as paid automatically.
After payment, a confirmation screen lets you reprint the receipt or start a new order immediately. From here you can:
* **Reprint receipt** — print or reprint the receipt
* **Load another order** — open a different existing order
* **Create new order** — start the next order immediately
 ### Splitting the bill
On the payment screen, tap **"Split bill"** in the bottom-right corner.
### Splitting the bill
On the payment screen, tap **"Split bill"** in the bottom-right corner.
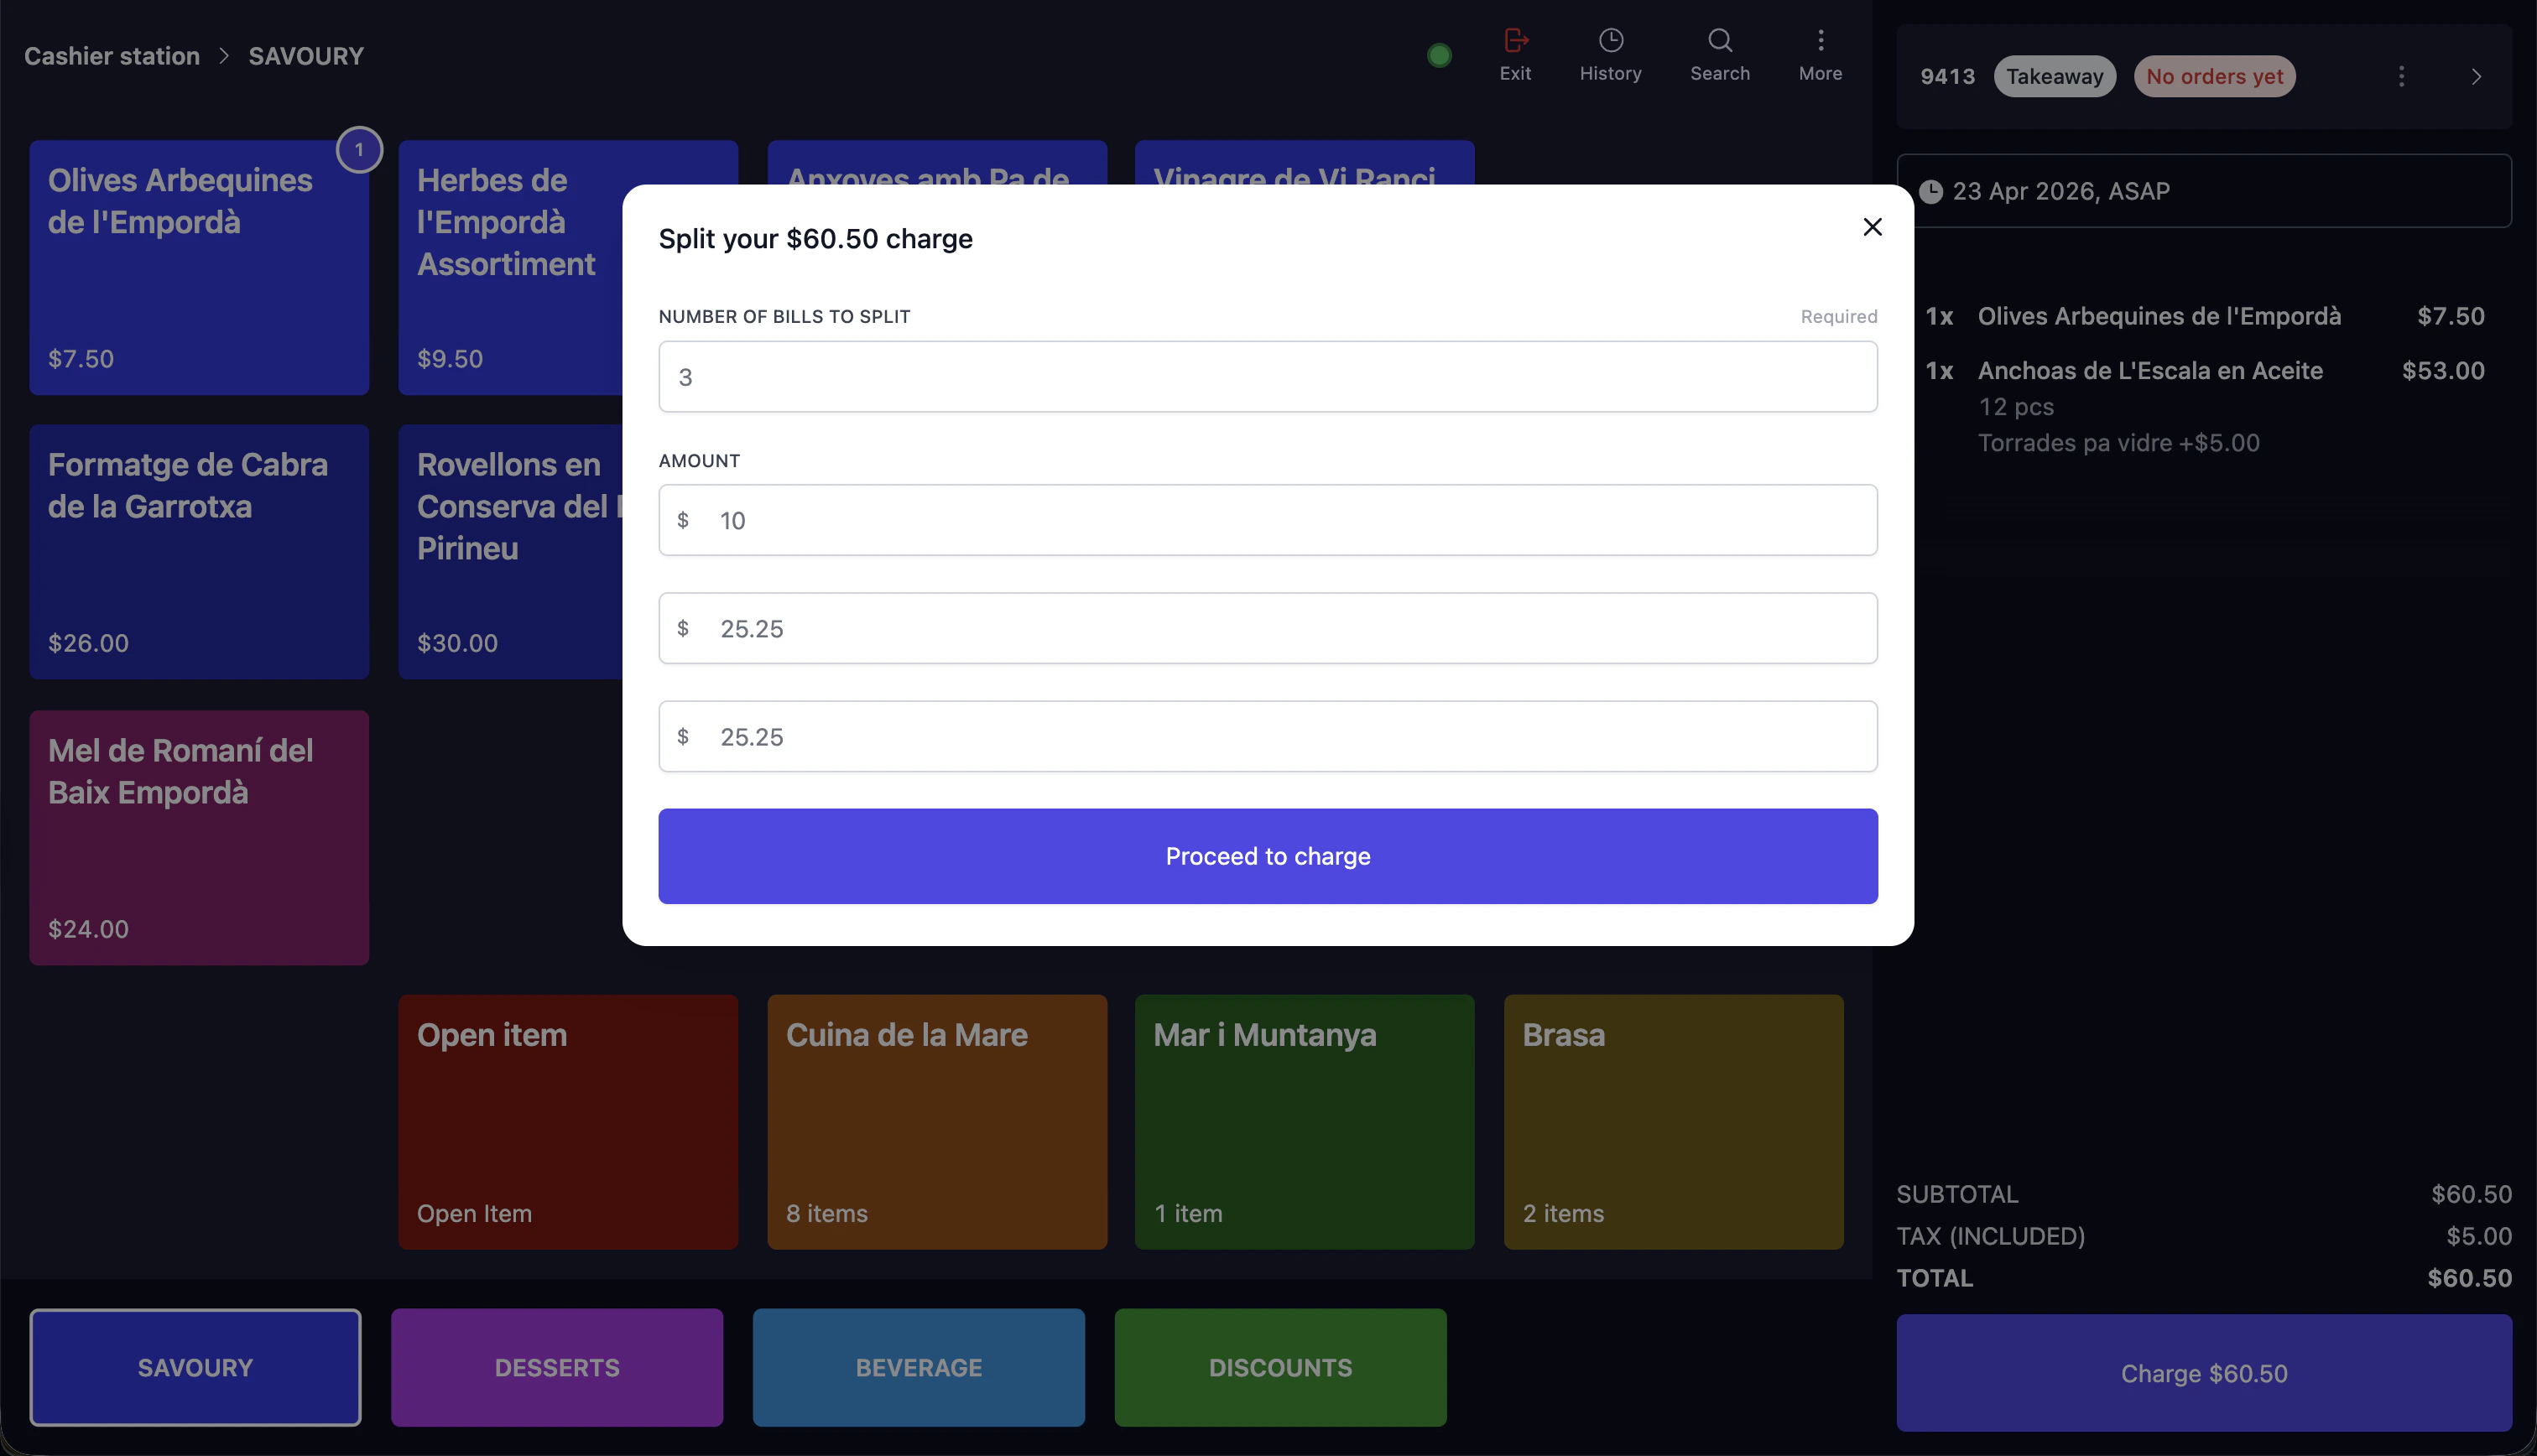 1. Enter the **number of bills to split**.
2. Adjust the amounts if needed.
3. Tap **"Proceed to charge"** and charge each split separately.
A receipt prints automatically for each partial payment.
### Connecting your Atlas Pay terminal to WiFi
1. On your Atlas Pay terminal, go to **Settings** > **Network**.
2. Enter the WiFi password.
3. Tap **WiFi** > select your network and connect.
To turn WiFi off, toggle it from the same screen. The terminal has a 4G backup and will continue processing payments over mobile data.
If the terminal feels unstable or does not sync with the POS properly, switch to 4G by turning off WiFi.
### Checking transactions on your Atlas Pay terminal
If a payment didn't go through or you need to verify a charge, you can check the transaction history directly on the terminal.
1. On your Atlas Pay terminal, go to **Transactions** > **History**.
2. Enter the terminal password.
3. Scroll through the transaction list or search for the one you need.
4. Tap the transaction to view more details.
The **Merchant reference** field shows the last digits of the Atlas order ID. Use this to match the transaction with the correct order in Atlas.
### Force checkout
This is a rare situation that happens when either the POS or the Atlas Pay terminal disconnects from the network mid-payment. The POS cannot confirm whether the payment went through, so it asks you to verify manually.
When this happens, a screen appears asking you to ensure the payment was authorised on the terminal. Before tapping **"I understand, force checkout"**:
1. Check the terminal screen — it should show **"Approved"** with a green checkmark.
2. If unsure, go to **Transactions** > **History** on the terminal and confirm the transaction shows a green tick.
**Do not force checkout without verifying the terminal.** If the payment was declined or did not go through, force checkout will mark the order as paid and the customer could walk away without paying. Always confirm the terminal shows "Approved" first.
## Refunding an order
Tap **"History"** in the top toolbar to view past orders. Search by order number or scroll through the list, then tap **"View"** on the order.
1. Enter the **number of bills to split**.
2. Adjust the amounts if needed.
3. Tap **"Proceed to charge"** and charge each split separately.
A receipt prints automatically for each partial payment.
### Connecting your Atlas Pay terminal to WiFi
1. On your Atlas Pay terminal, go to **Settings** > **Network**.
2. Enter the WiFi password.
3. Tap **WiFi** > select your network and connect.
To turn WiFi off, toggle it from the same screen. The terminal has a 4G backup and will continue processing payments over mobile data.
If the terminal feels unstable or does not sync with the POS properly, switch to 4G by turning off WiFi.
### Checking transactions on your Atlas Pay terminal
If a payment didn't go through or you need to verify a charge, you can check the transaction history directly on the terminal.
1. On your Atlas Pay terminal, go to **Transactions** > **History**.
2. Enter the terminal password.
3. Scroll through the transaction list or search for the one you need.
4. Tap the transaction to view more details.
The **Merchant reference** field shows the last digits of the Atlas order ID. Use this to match the transaction with the correct order in Atlas.
### Force checkout
This is a rare situation that happens when either the POS or the Atlas Pay terminal disconnects from the network mid-payment. The POS cannot confirm whether the payment went through, so it asks you to verify manually.
When this happens, a screen appears asking you to ensure the payment was authorised on the terminal. Before tapping **"I understand, force checkout"**:
1. Check the terminal screen — it should show **"Approved"** with a green checkmark.
2. If unsure, go to **Transactions** > **History** on the terminal and confirm the transaction shows a green tick.
**Do not force checkout without verifying the terminal.** If the payment was declined or did not go through, force checkout will mark the order as paid and the customer could walk away without paying. Always confirm the terminal shows "Approved" first.
## Refunding an order
Tap **"History"** in the top toolbar to view past orders. Search by order number or scroll through the list, then tap **"View"** on the order.
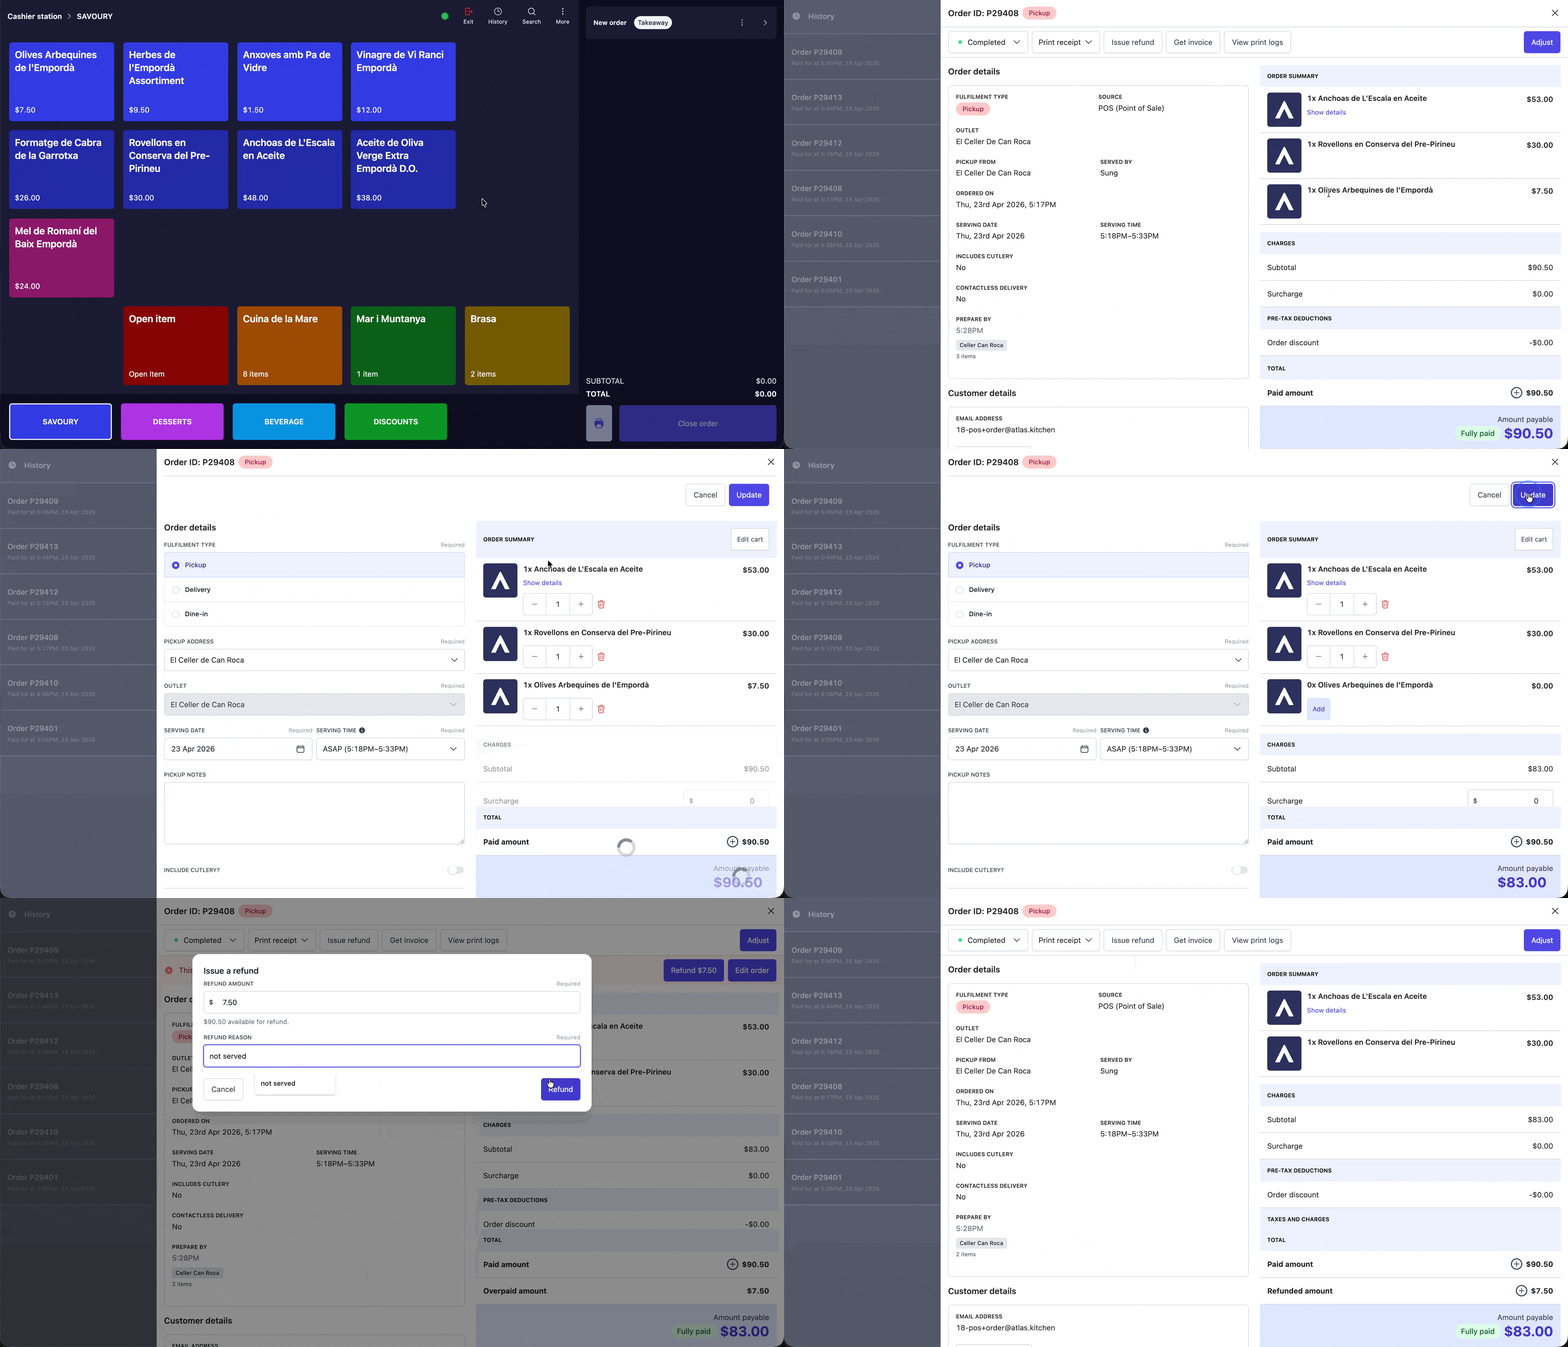 To do a partial refund from the POS:
1. Tap the order history button > Tap the order.
2. Alternatively: Tap the search button and key in your order number > Tap the order.
3. In the order details modal: Tap "Adjust" > Tap "Edit order".
4. You will see your cart is now editable. A few things you can do from here:
1. Remove an item by tapping on the remove button .
2. Adjust quantity with the minus and plus buttons .
3. Adjust sales quantities, scrolling down and selecting the editable boxes.
4. Add and remove new items, by tapping on the top-right corner "Edit cart" button.
5. Once you are done with your changes, tap "Update" in the top-right corner.
6. A red banner will prompt with the calculated difference to refund. Tap "Refund".
7. In the refund confirmation page, confirm the amount and refund reason, and tap "Refund".
After this, you can print a refund receipt from the dropdown "Print receipt" > "Refund receipt".
For full refunds, refund and recharge, and other refund options, see the [full refunds guide](/merchant-portal/refunds).
## Changing fulfilment type
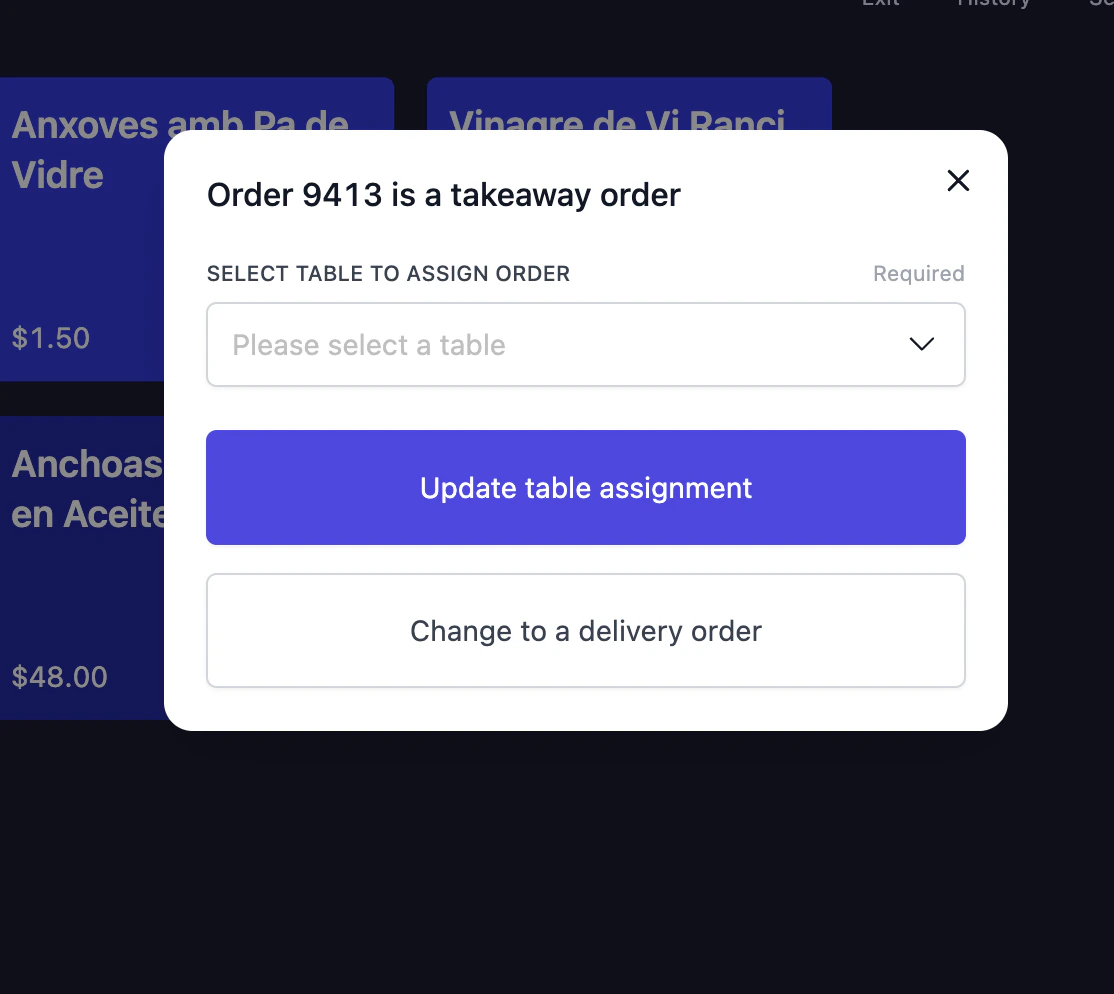
The current fulfilment type displays in the top-right corner (e.g. **Takeaway**, **Dine-in**).
Tap the label to change it. A modal lets you switch between dine-in, takeaway, or delivery.
To do a partial refund from the POS:
1. Tap the order history button > Tap the order.
2. Alternatively: Tap the search button and key in your order number > Tap the order.
3. In the order details modal: Tap "Adjust" > Tap "Edit order".
4. You will see your cart is now editable. A few things you can do from here:
1. Remove an item by tapping on the remove button .
2. Adjust quantity with the minus and plus buttons .
3. Adjust sales quantities, scrolling down and selecting the editable boxes.
4. Add and remove new items, by tapping on the top-right corner "Edit cart" button.
5. Once you are done with your changes, tap "Update" in the top-right corner.
6. A red banner will prompt with the calculated difference to refund. Tap "Refund".
7. In the refund confirmation page, confirm the amount and refund reason, and tap "Refund".
After this, you can print a refund receipt from the dropdown "Print receipt" > "Refund receipt".
For full refunds, refund and recharge, and other refund options, see the [full refunds guide](/merchant-portal/refunds).
## Changing fulfilment type
The current fulfilment type displays in the top-right corner (e.g. **Takeaway**, **Dine-in**).
Tap the label to change it. A modal lets you switch between dine-in, takeaway, or delivery.
 ## Managing open orders
If a customer needs time to decide, you can park their order and serve the next person in line.
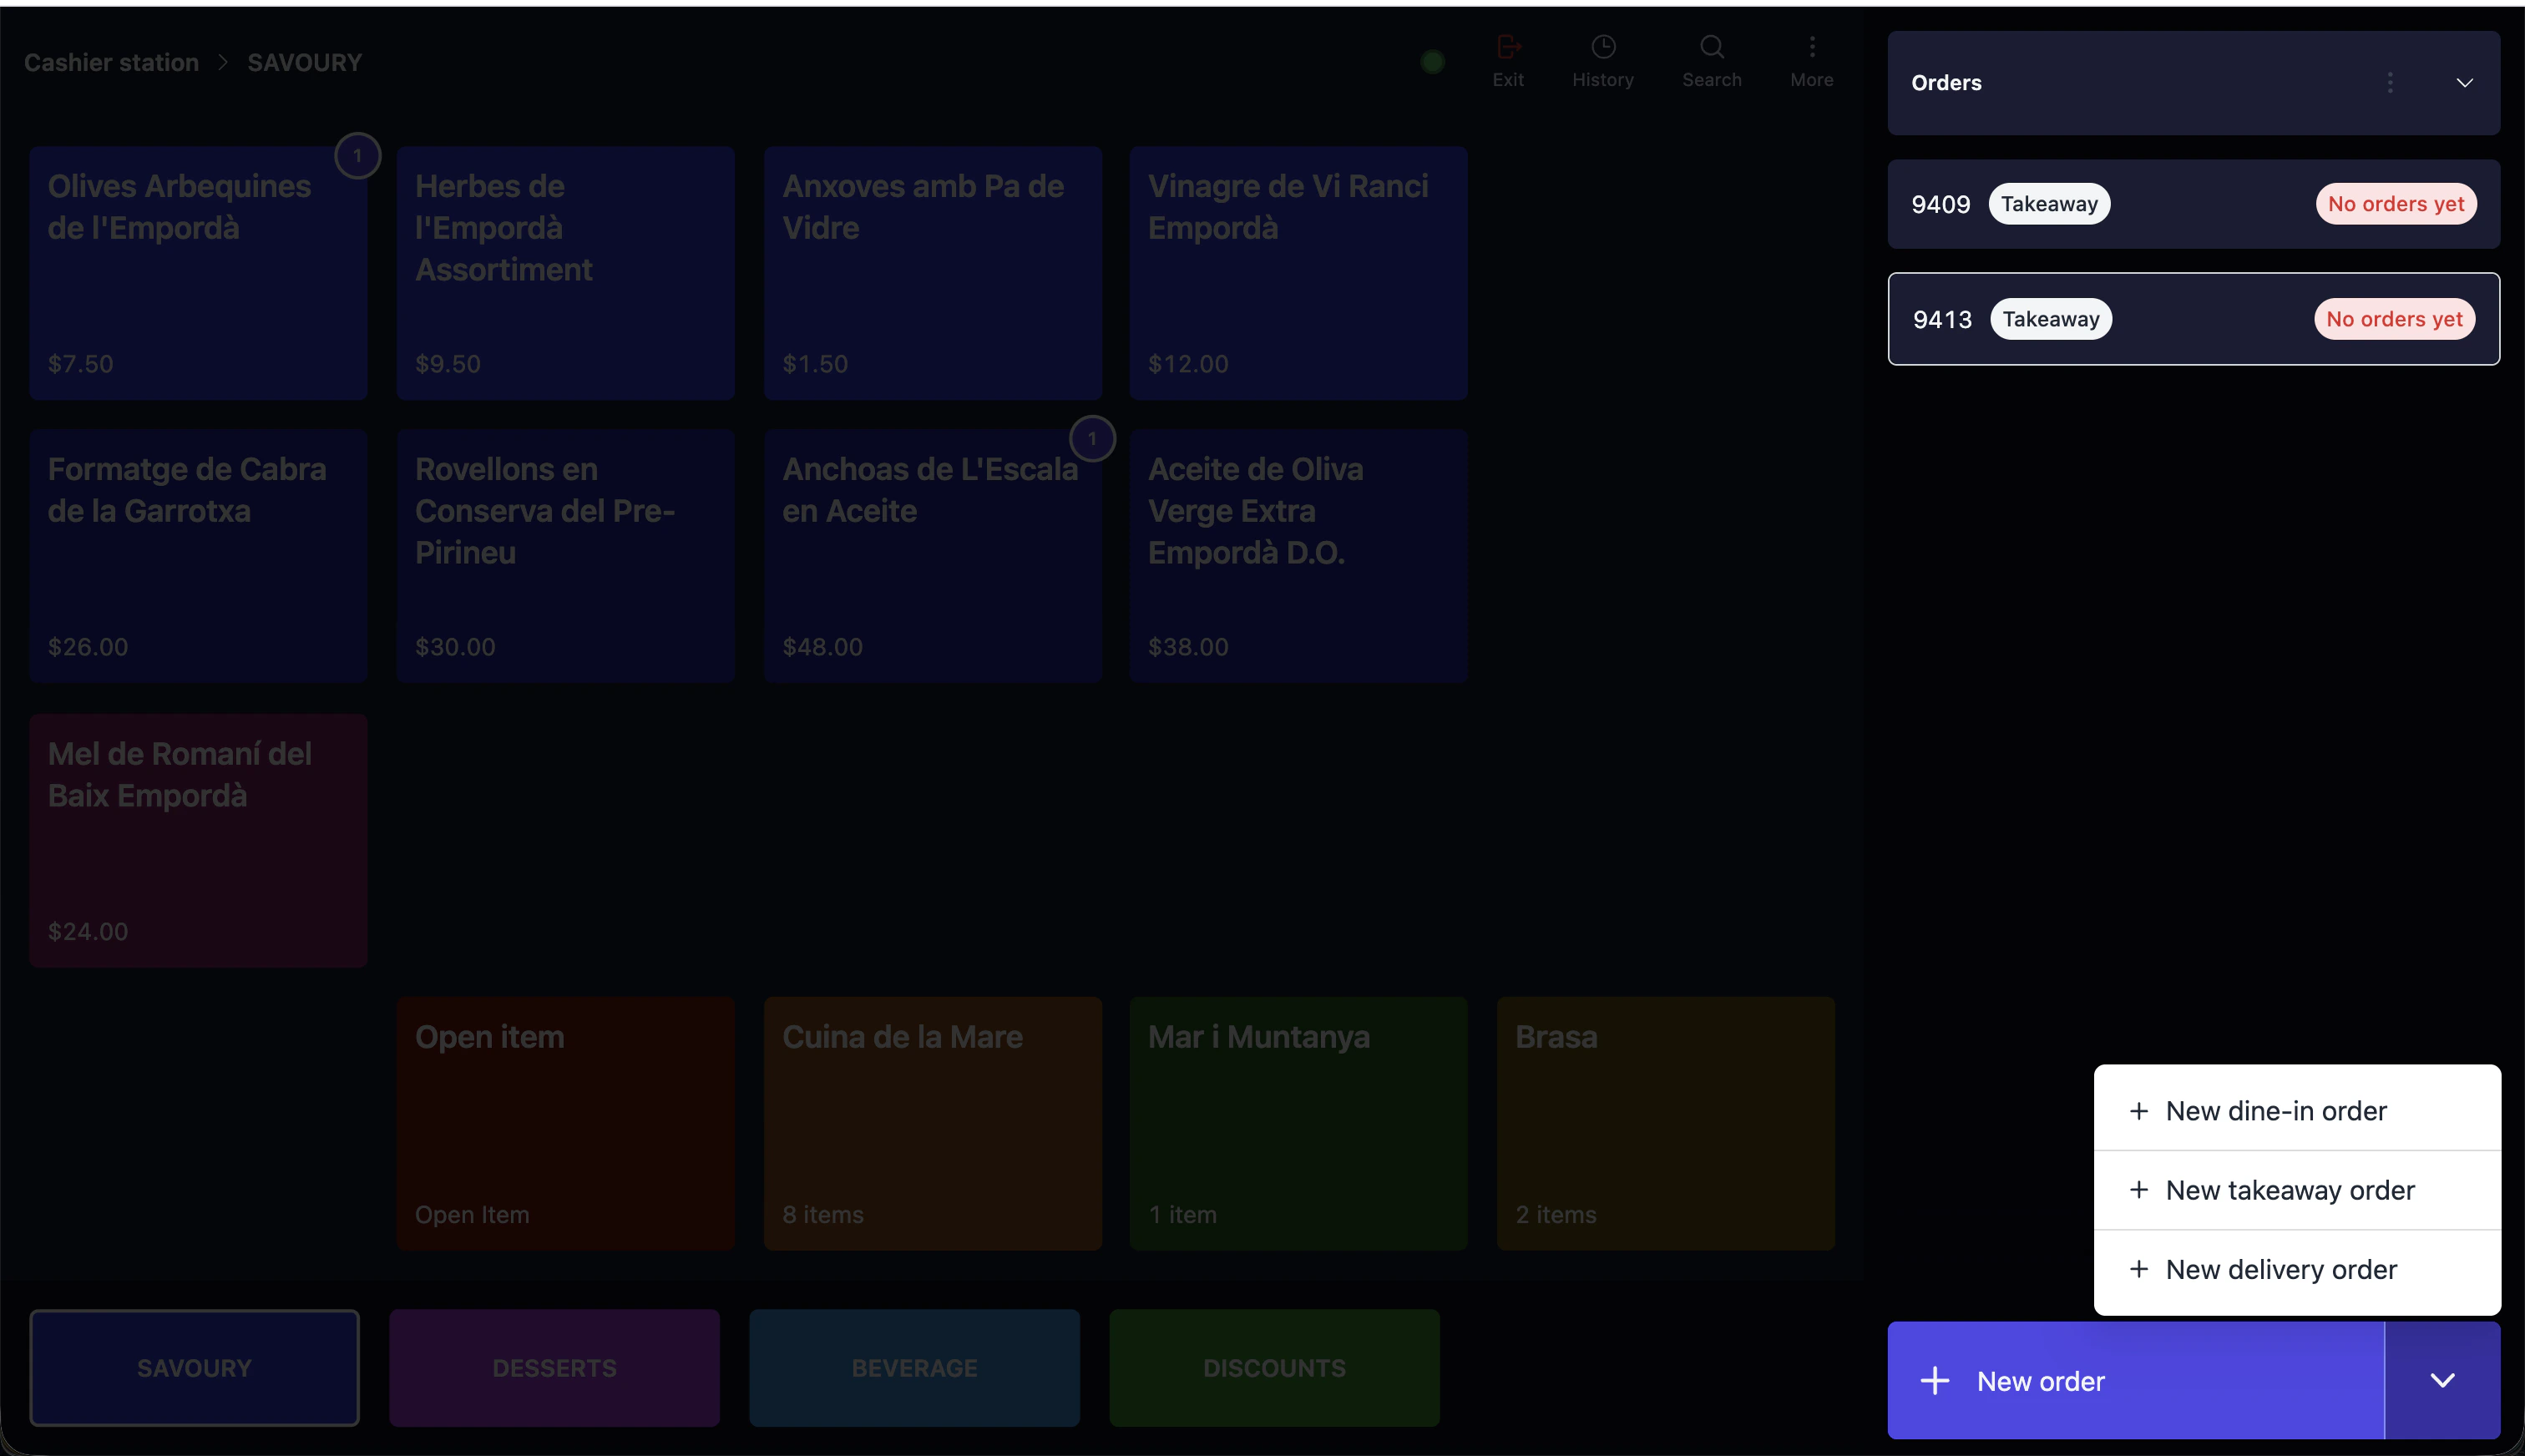
Tap the **arrow** (›) in the top-right corner to expand the open orders list. All unsettled orders display here with their order number and fulfilment type. Tap any order to return to it.
To start a new order while leaving the current one open, tap **"+ New order"** at the bottom of the list. Tap the **arrow** next to it to pick a specific order type (dine-in, takeaway, or delivery).
## Managing open orders
If a customer needs time to decide, you can park their order and serve the next person in line.
Tap the **arrow** (›) in the top-right corner to expand the open orders list. All unsettled orders display here with their order number and fulfilment type. Tap any order to return to it.
To start a new order while leaving the current one open, tap **"+ New order"** at the bottom of the list. Tap the **arrow** next to it to pick a specific order type (dine-in, takeaway, or delivery).
 Keep your open orders list empty by end of day. Open orders left overnight can cause reporting discrepancies.
## If it doesn't work
1. Check if the item opened a modifier modal — you need to complete the selection and tap "Add"
2. Scroll down in the cart — the item may be below the visible area
3. Verify you are on the correct order (check the order number in the top-right corner)
1. Check that the terminal is powered on and connected to WiFi
2. Verify the green dot in the top toolbar is green (indicates the terminal is connected)
3. Try selecting the payment method again and tap "Charge"
4. If the terminal still doesn't respond, use a manual payment method instead and contact support
1. Tap the arrow (›) in the top-right corner to expand the list
2. Scroll through the list — orders are listed by order number
3. Use the **Search** button in the top toolbar to find the order by number
4. The order may have already been charged — check **History** instead
1. Tap the fulfilment label (e.g. "Takeaway") in the top-right corner
2. Select the correct type from the modal
3. If the order is already charged, you cannot change the fulfilment type — contact support
1. Follow the [refund and recharge steps](/merchant-portal/refunds#processing-a-full-refund-and-recharging-the-order) to refund and recharge with the correct payment type
## Next steps
* [Customer-facing display](/stations/customer-facing-display) - Set up your customer-facing display for easier checkouts
* [Process refunds](/merchant-portal/refunds) — Refund or cancel orders from POS
* [Set up POS layouts](/menu-builder/pos-layout) — Customise your POS tile layout
* [Manage stocks](/merchant-portal/stocks) — Block or set quantities for items during service
Keep your open orders list empty by end of day. Open orders left overnight can cause reporting discrepancies.
## If it doesn't work
1. Check if the item opened a modifier modal — you need to complete the selection and tap "Add"
2. Scroll down in the cart — the item may be below the visible area
3. Verify you are on the correct order (check the order number in the top-right corner)
1. Check that the terminal is powered on and connected to WiFi
2. Verify the green dot in the top toolbar is green (indicates the terminal is connected)
3. Try selecting the payment method again and tap "Charge"
4. If the terminal still doesn't respond, use a manual payment method instead and contact support
1. Tap the arrow (›) in the top-right corner to expand the list
2. Scroll through the list — orders are listed by order number
3. Use the **Search** button in the top toolbar to find the order by number
4. The order may have already been charged — check **History** instead
1. Tap the fulfilment label (e.g. "Takeaway") in the top-right corner
2. Select the correct type from the modal
3. If the order is already charged, you cannot change the fulfilment type — contact support
1. Follow the [refund and recharge steps](/merchant-portal/refunds#processing-a-full-refund-and-recharging-the-order) to refund and recharge with the correct payment type
## Next steps
* [Customer-facing display](/stations/customer-facing-display) - Set up your customer-facing display for easier checkouts
* [Process refunds](/merchant-portal/refunds) — Refund or cancel orders from POS
* [Set up POS layouts](/menu-builder/pos-layout) — Customise your POS tile layout
* [Manage stocks](/merchant-portal/stocks) — Block or set quantities for items during service