> ## Documentation Index
> Fetch the complete documentation index at: https://help.atlas.kitchen/llms.txt
> Use this file to discover all available pages before exploring further.
# Storefront look and feel
> Change your website banner, logo, colours, footer, and the look of your digital receipts.
**Who is this article for?**
* Merchant Portal users with **Marketing** permissions (banners)
* Users with **Admin** access (outlet and receipt settings)
Your storefront is what diners see when they order from you: your Atlas Online website, your Scan-to-Order and Kiosk screens, and the receipt that lands in their inbox.
Banners, announcements, pop-ups, and receipt footer text are yours to change in the Merchant Portal. The website header, the website footer, and the receipt template are part of your website build, so the Atlas team changes those for you. Contact support when you need them updated.
## What you can change, and where
| You want to change… | Where |
| ----------------------------------------------------- | --------------------------------------------------------------------- |
| The big hero banner at the top of your website | **Marketing tools → Banners** |
| The banner on your Scan-to-Order menu | **Marketing tools → Banners** (Channel banners) |
| Your website logo and colours | Contact Atlas support |
| A message strip across the top of the storefront | **Marketing tools → [Announcements](/merchant-portal/announcements)** |
| A full-screen image when diners land on your menu | **Marketing tools → [Pop-ups](/merchant-portal/pop-ups)** |
| Custom text at the bottom of digital (email) receipts | **Settings → Outlets → Printers and receipts** |
| The logo and colours in the digital receipt header | Contact Atlas support |
| Custom text at the bottom of printed receipts | **Settings → Outlets → Printers and receipts** |
| Your website footer (logo, links, contact info) | Contact Atlas support |
| The rest of the digital receipt layout | Contact Atlas support |
## Website banner
The banner is the hero area at the top of your storefront. It uses a background image, plus an optional logo, headline, description, and call-to-action button.
There are two kinds, shown as tabs on the Banners screen:
* **Website banners** — for your Atlas Online website
* **Channel banners** — for Scan-to-Order menus
### Create a banner
In the Merchant Portal, go to **Marketing tools → Banners** and click **Create new banner**. Choose **Websites** or **Channels**.
* **Name** — for your own reference. Diners never see it.
* **Outlet** — pick one or more outlets, or leave it as **All outlets**.
* **Website** / **Channel** — where the banner should show.
* **Headline** and **Description** — the copy shown on top of the image.
* **Logo / title image** — optional image shown above the headline. Minimum recommended size is 100px by 100px, and you can set its display width.
* **Include button** — turn this on to add a call-to-action button, then set the **button text** and **button URL**.
Under **Screen variants**, upload a separate image for **Desktop** and **Mobile** and set the **background position** for each.
Recommended minimum sizes:
| Banner type | Desktop | Mobile |
| -------------- | ------------ | ----------- |
| Website banner | 1400 × 720px | 640 × 420px |
| Channel banner | 880 × 880px | 880 × 880px |
Use **Banner preview** to lay out the text over the image, separately for desktop and mobile:
* **Content box width** and **content box position**
* **Content alignment**
* **Space above content** and **space below content**
* **Hide logo for desktop** / **Hide logo for mobile** — useful when your background image already contains your logo
The preview updates as you change these, so you can check both screen sizes before saving.
* **Activate banner** — an active banner displays according to the start and end times below it.
* **Start time** and **End time** — leave these empty for a banner that runs until you turn it off.
* **Set as default** — the default banner is shown whenever no other banner is active.
Save the banner. If the website already has a default banner, Atlas asks whether you want to replace it.
## Website logo and colours
Your website logo and colours are part of your website build, so the Atlas team applies them. To change them, send Atlas support:
* **The logo** as a transparent PNG or SVG
* **The colours** you want, as hex values such as `#1a1a1a` or `#fff`
Keep your text and background colours high-contrast so your website stays readable.
## Website footer
The footer at the bottom of your Atlas Online website is part of your website configuration, so the Atlas team makes these changes for you.
You can customise:
* **Footer logo** — the logo shown at the top of the footer
* **Short brand copy** — a line or two about your business next to the logo
* **Contact information** — address, opening hours, phone number, or anything else you want listed
* **Social links** — Instagram, Facebook, X (Twitter), and any other links you want to add
* **Legal links** — privacy policy, cookies policy, and documentation
Email support with what you'd like and we'll apply it.
## Digital receipts
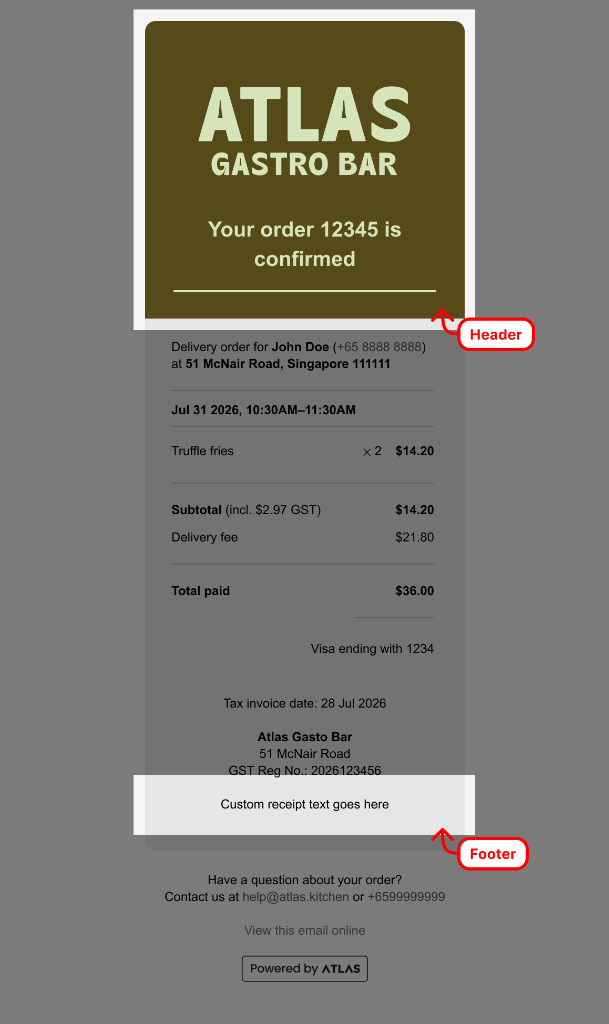
A digital receipt is the email a diner gets after ordering. Two parts of it can be changed: the **header** and the **footer**.
 ### Header: logo and colours
The header is the branded block at the top of the receipt. You can change:
1. The **logo**
2. The **text colour**
3. The **background colour**
Only the Atlas team can save changes to them, so contact Atlas support with your logo file and the colours you want.
### Footer: add your own text
You can do this yourself if you have **Admin** access to the Merchant Portal.
1. Go to **Settings → Outlets** and open the outlet.
2. Scroll to **Printers and receipts**.
3. Enter your message in **Custom digital receipt footer text** (up to 450 characters). A character counter shows how much room is left.
4. Save.
### Header: logo and colours
The header is the branded block at the top of the receipt. You can change:
1. The **logo**
2. The **text colour**
3. The **background colour**
Only the Atlas team can save changes to them, so contact Atlas support with your logo file and the colours you want.
### Footer: add your own text
You can do this yourself if you have **Admin** access to the Merchant Portal.
1. Go to **Settings → Outlets** and open the outlet.
2. Scroll to **Printers and receipts**.
3. Enter your message in **Custom digital receipt footer text** (up to 450 characters). A character counter shows how much room is left.
4. Save.
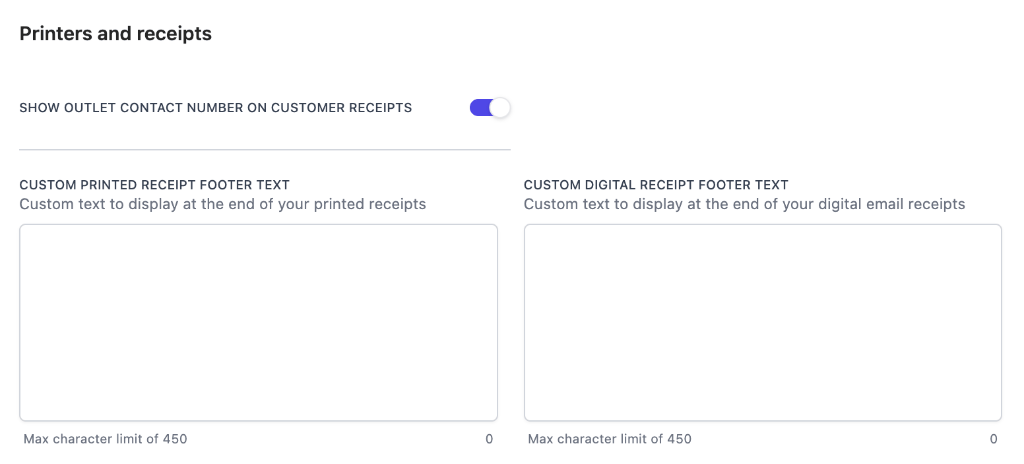 Anything you enter appears at the end of every digital receipt for that outlet. Common uses: a thank-you note, refund or exchange policy, loyalty sign-up prompt, social handles, or a reminder about opening hours.
Because this is set per outlet, each location can carry its own message. Remember to repeat the change for every outlet that needs it.
### Other things you can control
* **Show outlet contact number on customer receipts** — the switch just above the footer fields. Turn it off if you'd rather diners contact you another way.
* **Outlet details** — the name, address, business registration number, and the contact email at the bottom of the email all come from that outlet's settings, so keep them current.
### Printed receipts
**Custom printed receipt footer text**, in the same section, does the same job for the receipts your thermal printer produces. The two are separate fields, so a long marketing message online won't lengthen every printed chit. Set each one to suit the format.
The rest of the receipt layout, including the order of the sections, fonts, and spacing, is part of the Atlas receipt template. If you need changes there, or a different header for a specific brand, contact Atlas support.
## Next steps
* [Announcements](/merchant-portal/announcements)
* [Pop-ups](/merchant-portal/pop-ups)
* [Cross-sell](/merchant-portal/cross-sell)
Anything you enter appears at the end of every digital receipt for that outlet. Common uses: a thank-you note, refund or exchange policy, loyalty sign-up prompt, social handles, or a reminder about opening hours.
Because this is set per outlet, each location can carry its own message. Remember to repeat the change for every outlet that needs it.
### Other things you can control
* **Show outlet contact number on customer receipts** — the switch just above the footer fields. Turn it off if you'd rather diners contact you another way.
* **Outlet details** — the name, address, business registration number, and the contact email at the bottom of the email all come from that outlet's settings, so keep them current.
### Printed receipts
**Custom printed receipt footer text**, in the same section, does the same job for the receipts your thermal printer produces. The two are separate fields, so a long marketing message online won't lengthen every printed chit. Set each one to suit the format.
The rest of the receipt layout, including the order of the sections, fonts, and spacing, is part of the Atlas receipt template. If you need changes there, or a different header for a specific brand, contact Atlas support.
## Next steps
* [Announcements](/merchant-portal/announcements)
* [Pop-ups](/merchant-portal/pop-ups)
* [Cross-sell](/merchant-portal/cross-sell)