> ## Documentation Index
> Fetch the complete documentation index at: https://help.atlas.kitchen/llms.txt
> Use this file to discover all available pages before exploring further.
# Delivery settings, fees and minimum orders
> Set up delivery fees, free delivery thresholds, minimum order amounts, large-order lead time, and delivery logistics for your Atlas Online store.
**Who is this for?**
* Atlas merchants who run delivery orders through an Atlas Online website
* Admin or Manager users configuring outlet delivery settings
Delivery fees are configured per outlet, and minimum order amounts per brand, in the Atlas Merchant Portal. Changes take effect immediately for new orders.
## Where delivery fees are set
Delivery fees are managed under **Settings → Delivery fee**, and assigned to each outlet from **Outlet settings → Delivery fee settings** in Atlas Merchant Portal.
Log in to the [Atlas Merchant Portal](https://portal.atlas.kitchen). In the left sidebar, under **Setup**, tap **Outlet settings**.
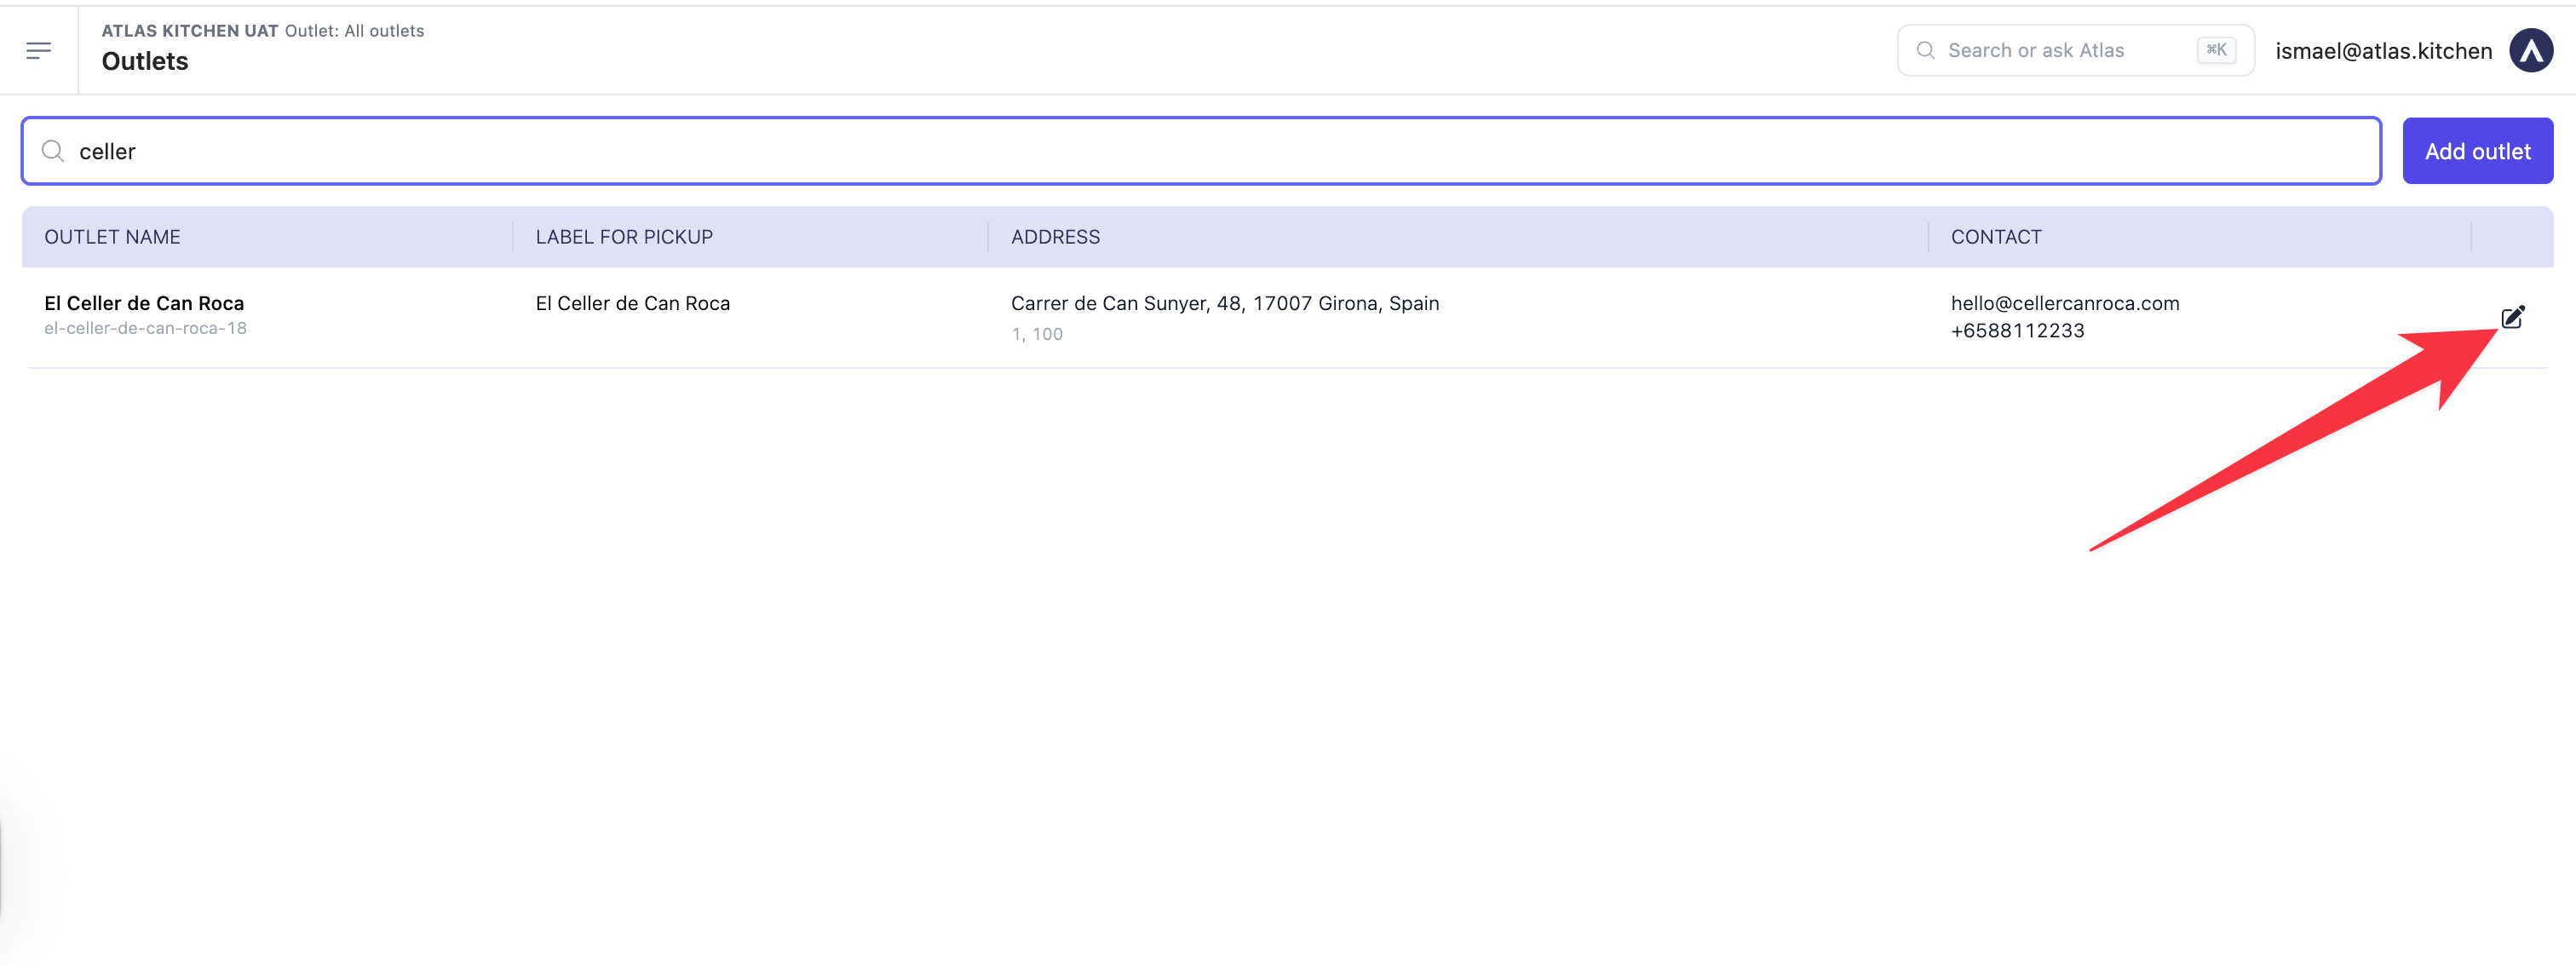
Find your outlet in the list and tap the edit (pencil) icon on the right of its row.
 In the outlet's left sidebar, tap **Delivery settings**. You will see **Service zone** and **Delivery fee**, with the fee config currently assigned to this outlet.
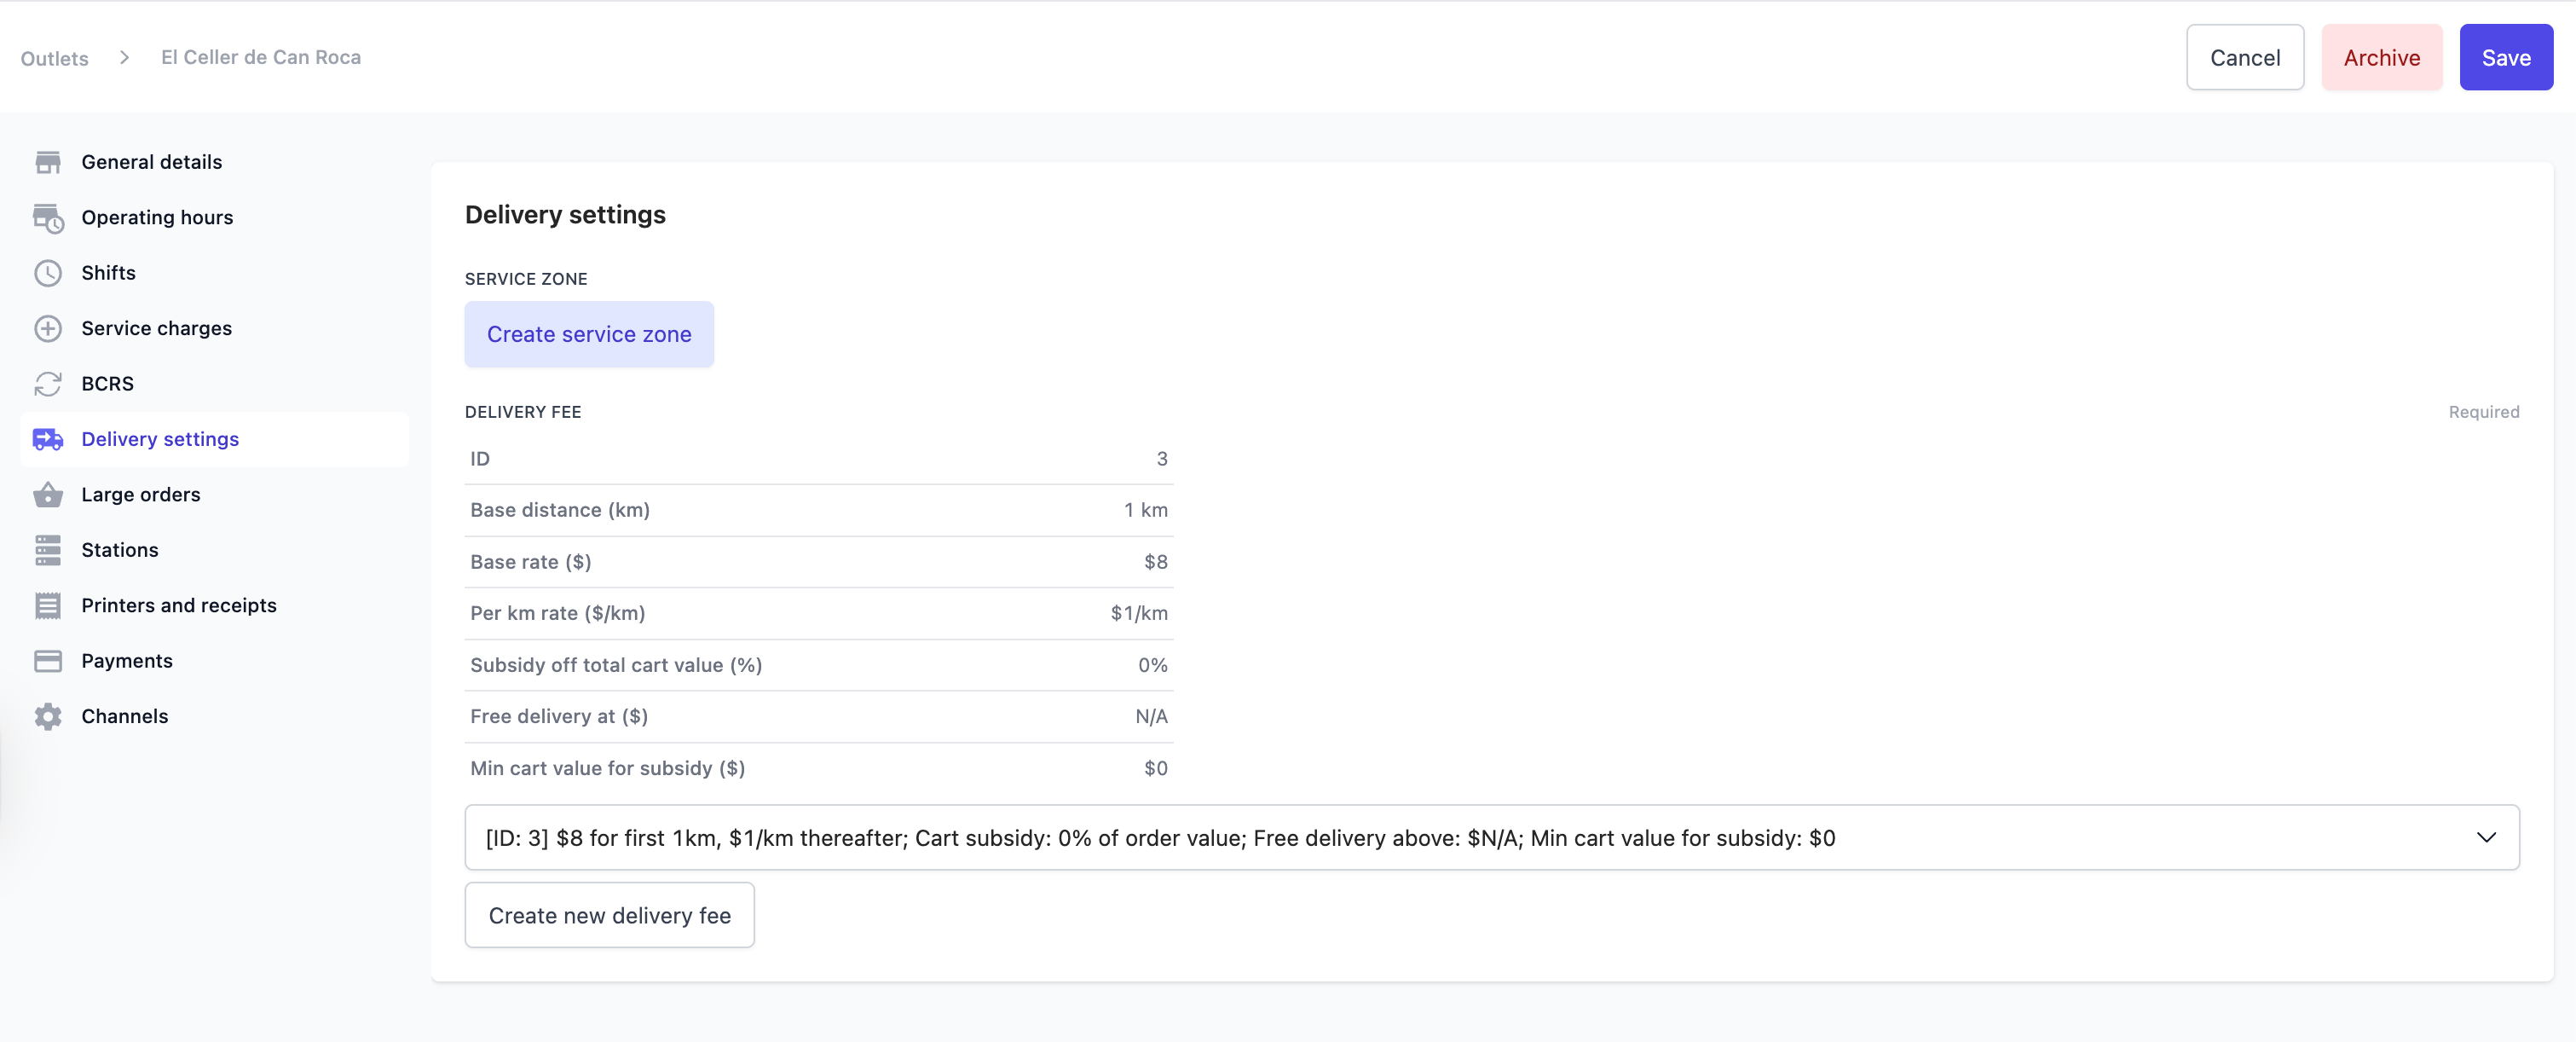 Select an existing delivery fee config from the dropdown, or click **Create new delivery fee** to build one from scratch. You can manage delivery fees from Settings → Delivery fee, and assign them here later.
Click **Save** at the top of the page.
## Fee structures
Atlas builds your delivery fee the way last-mile couriers like Lalamove, GrabExpress, and PandaGo price a trip: a base fee that covers a set distance, then a per-kilometre rate beyond it.
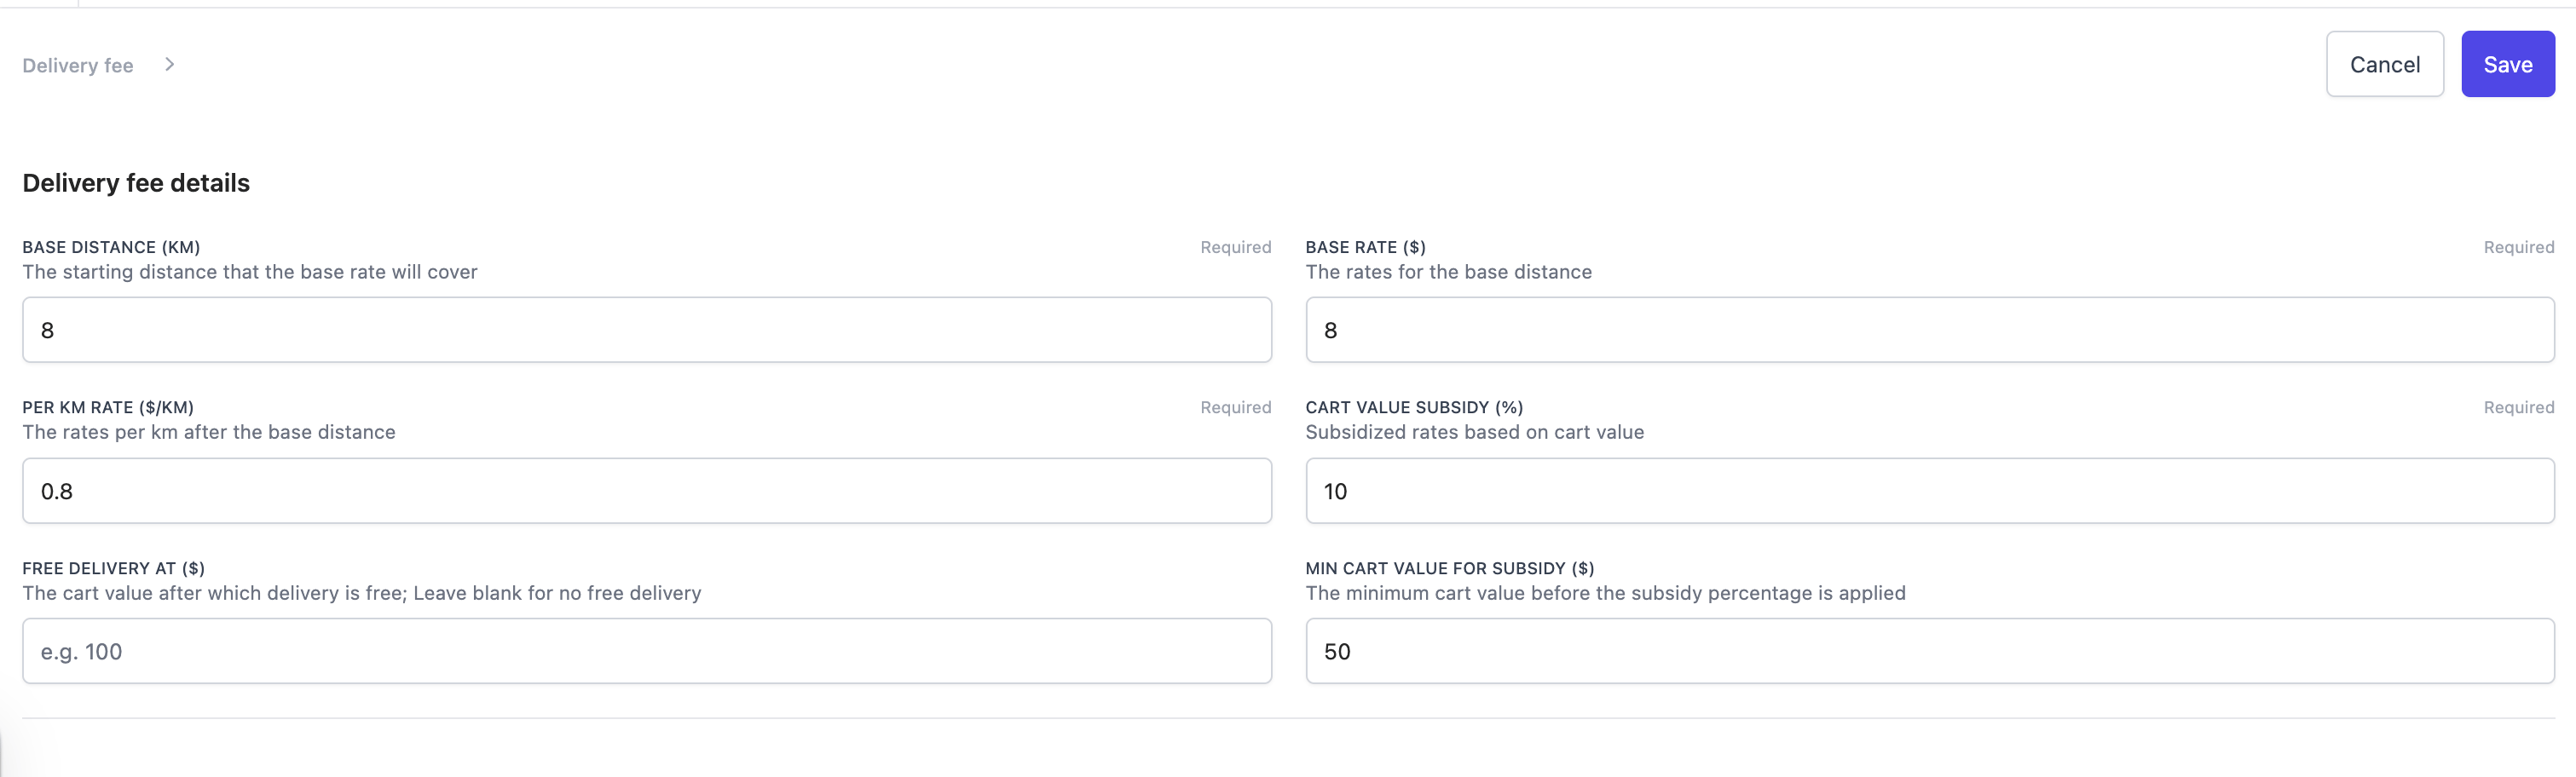
The most common setup is a **base rate** for a **base distance**, plus a **per km rate** for anything further (e.g. $10 for the first 5km, $1/km after that). You can also offer free delivery in two ways: a **% subsidy** that covers more of the fee as the customer's cart grows, or a flat **free delivery** threshold that drops the fee to zero once the cart reaches a set amount.
Each field is explained below.
Select an existing delivery fee config from the dropdown, or click **Create new delivery fee** to build one from scratch. You can manage delivery fees from Settings → Delivery fee, and assign them here later.
Click **Save** at the top of the page.
## Fee structures
Atlas builds your delivery fee the way last-mile couriers like Lalamove, GrabExpress, and PandaGo price a trip: a base fee that covers a set distance, then a per-kilometre rate beyond it.
The most common setup is a **base rate** for a **base distance**, plus a **per km rate** for anything further (e.g. $10 for the first 5km, $1/km after that). You can also offer free delivery in two ways: a **% subsidy** that covers more of the fee as the customer's cart grows, or a flat **free delivery** threshold that drops the fee to zero once the cart reaches a set amount.
Each field is explained below.
 ### Base distance and base rate
These two work as a pair. The **base rate** is the flat fee a customer pays for any delivery within the **base distance**. It is the starting price that covers the first stretch of the trip, whatever the exact distance within it.
Example: base distance = 3 km, base rate = \$5.00 → every delivery up to 3 km costs \$5.00.
### Per km rate
Beyond the base distance, this rate is added for each extra kilometre. It is what makes the fee grow for customers who live further away.
Example: base distance 3 km, base rate \$5.00, per km rate \$1.00. An order 5 km away pays \$5.00 + (2 km × \$1.00) = \$7.00.
### Cart value subsidy (%)
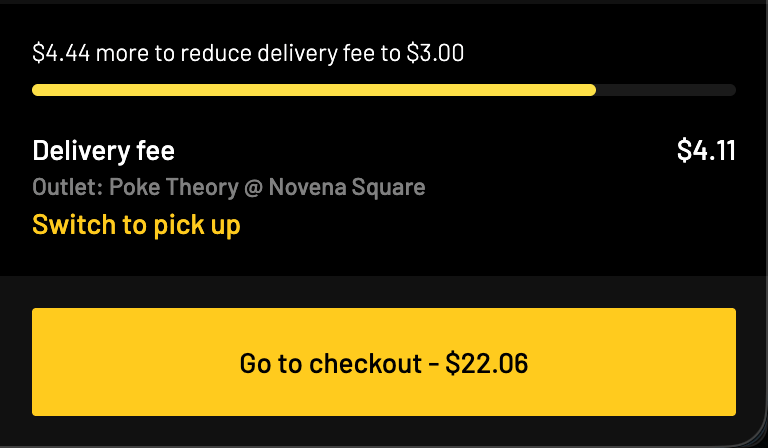
A discount you put towards the customer's delivery fee, sized as a percentage of their order value. The bigger the order, the bigger the discount, so delivery gets cheaper as customers spend more. Once the discount covers the whole fee, delivery is free.
Example: cart value subsidy = 20% → the customer gets \$20 off delivery for every \$100 of order. A \$100 cart takes \$20 off the delivery fee; a \$200 cart takes \$40 off.
**What customers see:** at the Atlas Online checkout, a progress bar shows how much more to spend to lower the delivery fee, and the discounted fee updates as they add items.
### Base distance and base rate
These two work as a pair. The **base rate** is the flat fee a customer pays for any delivery within the **base distance**. It is the starting price that covers the first stretch of the trip, whatever the exact distance within it.
Example: base distance = 3 km, base rate = \$5.00 → every delivery up to 3 km costs \$5.00.
### Per km rate
Beyond the base distance, this rate is added for each extra kilometre. It is what makes the fee grow for customers who live further away.
Example: base distance 3 km, base rate \$5.00, per km rate \$1.00. An order 5 km away pays \$5.00 + (2 km × \$1.00) = \$7.00.
### Cart value subsidy (%)
A discount you put towards the customer's delivery fee, sized as a percentage of their order value. The bigger the order, the bigger the discount, so delivery gets cheaper as customers spend more. Once the discount covers the whole fee, delivery is free.
Example: cart value subsidy = 20% → the customer gets \$20 off delivery for every \$100 of order. A \$100 cart takes \$20 off the delivery fee; a \$200 cart takes \$40 off.
**What customers see:** at the Atlas Online checkout, a progress bar shows how much more to spend to lower the delivery fee, and the discounted fee updates as they add items.
 ### Min cart value for subsidy (\$)
The amount a cart must reach before the subsidy starts to apply. Below this, the customer pays the full delivery fee. **Leave it blank to apply the subsidy to every order.**
Example: min cart value for subsidy = \$50 → only orders of \$50 or more get the subsidy.
### Free delivery at (\$)
The cart value at which delivery becomes completely free, regardless of distance. **Leave it blank to never offer free delivery.**
Example: free delivery at = \$100.00 → any cart of \$100.00 or more ships free.
**What customers see:** a progress bar on the checkout page shows how close they are to the free delivery threshold.
Delivery distances are calculated from the outlet's address, not the customer's nearest MRT. Make sure your outlet address is set correctly under **Outlet settings → Address**.
## Setting a minimum order amount
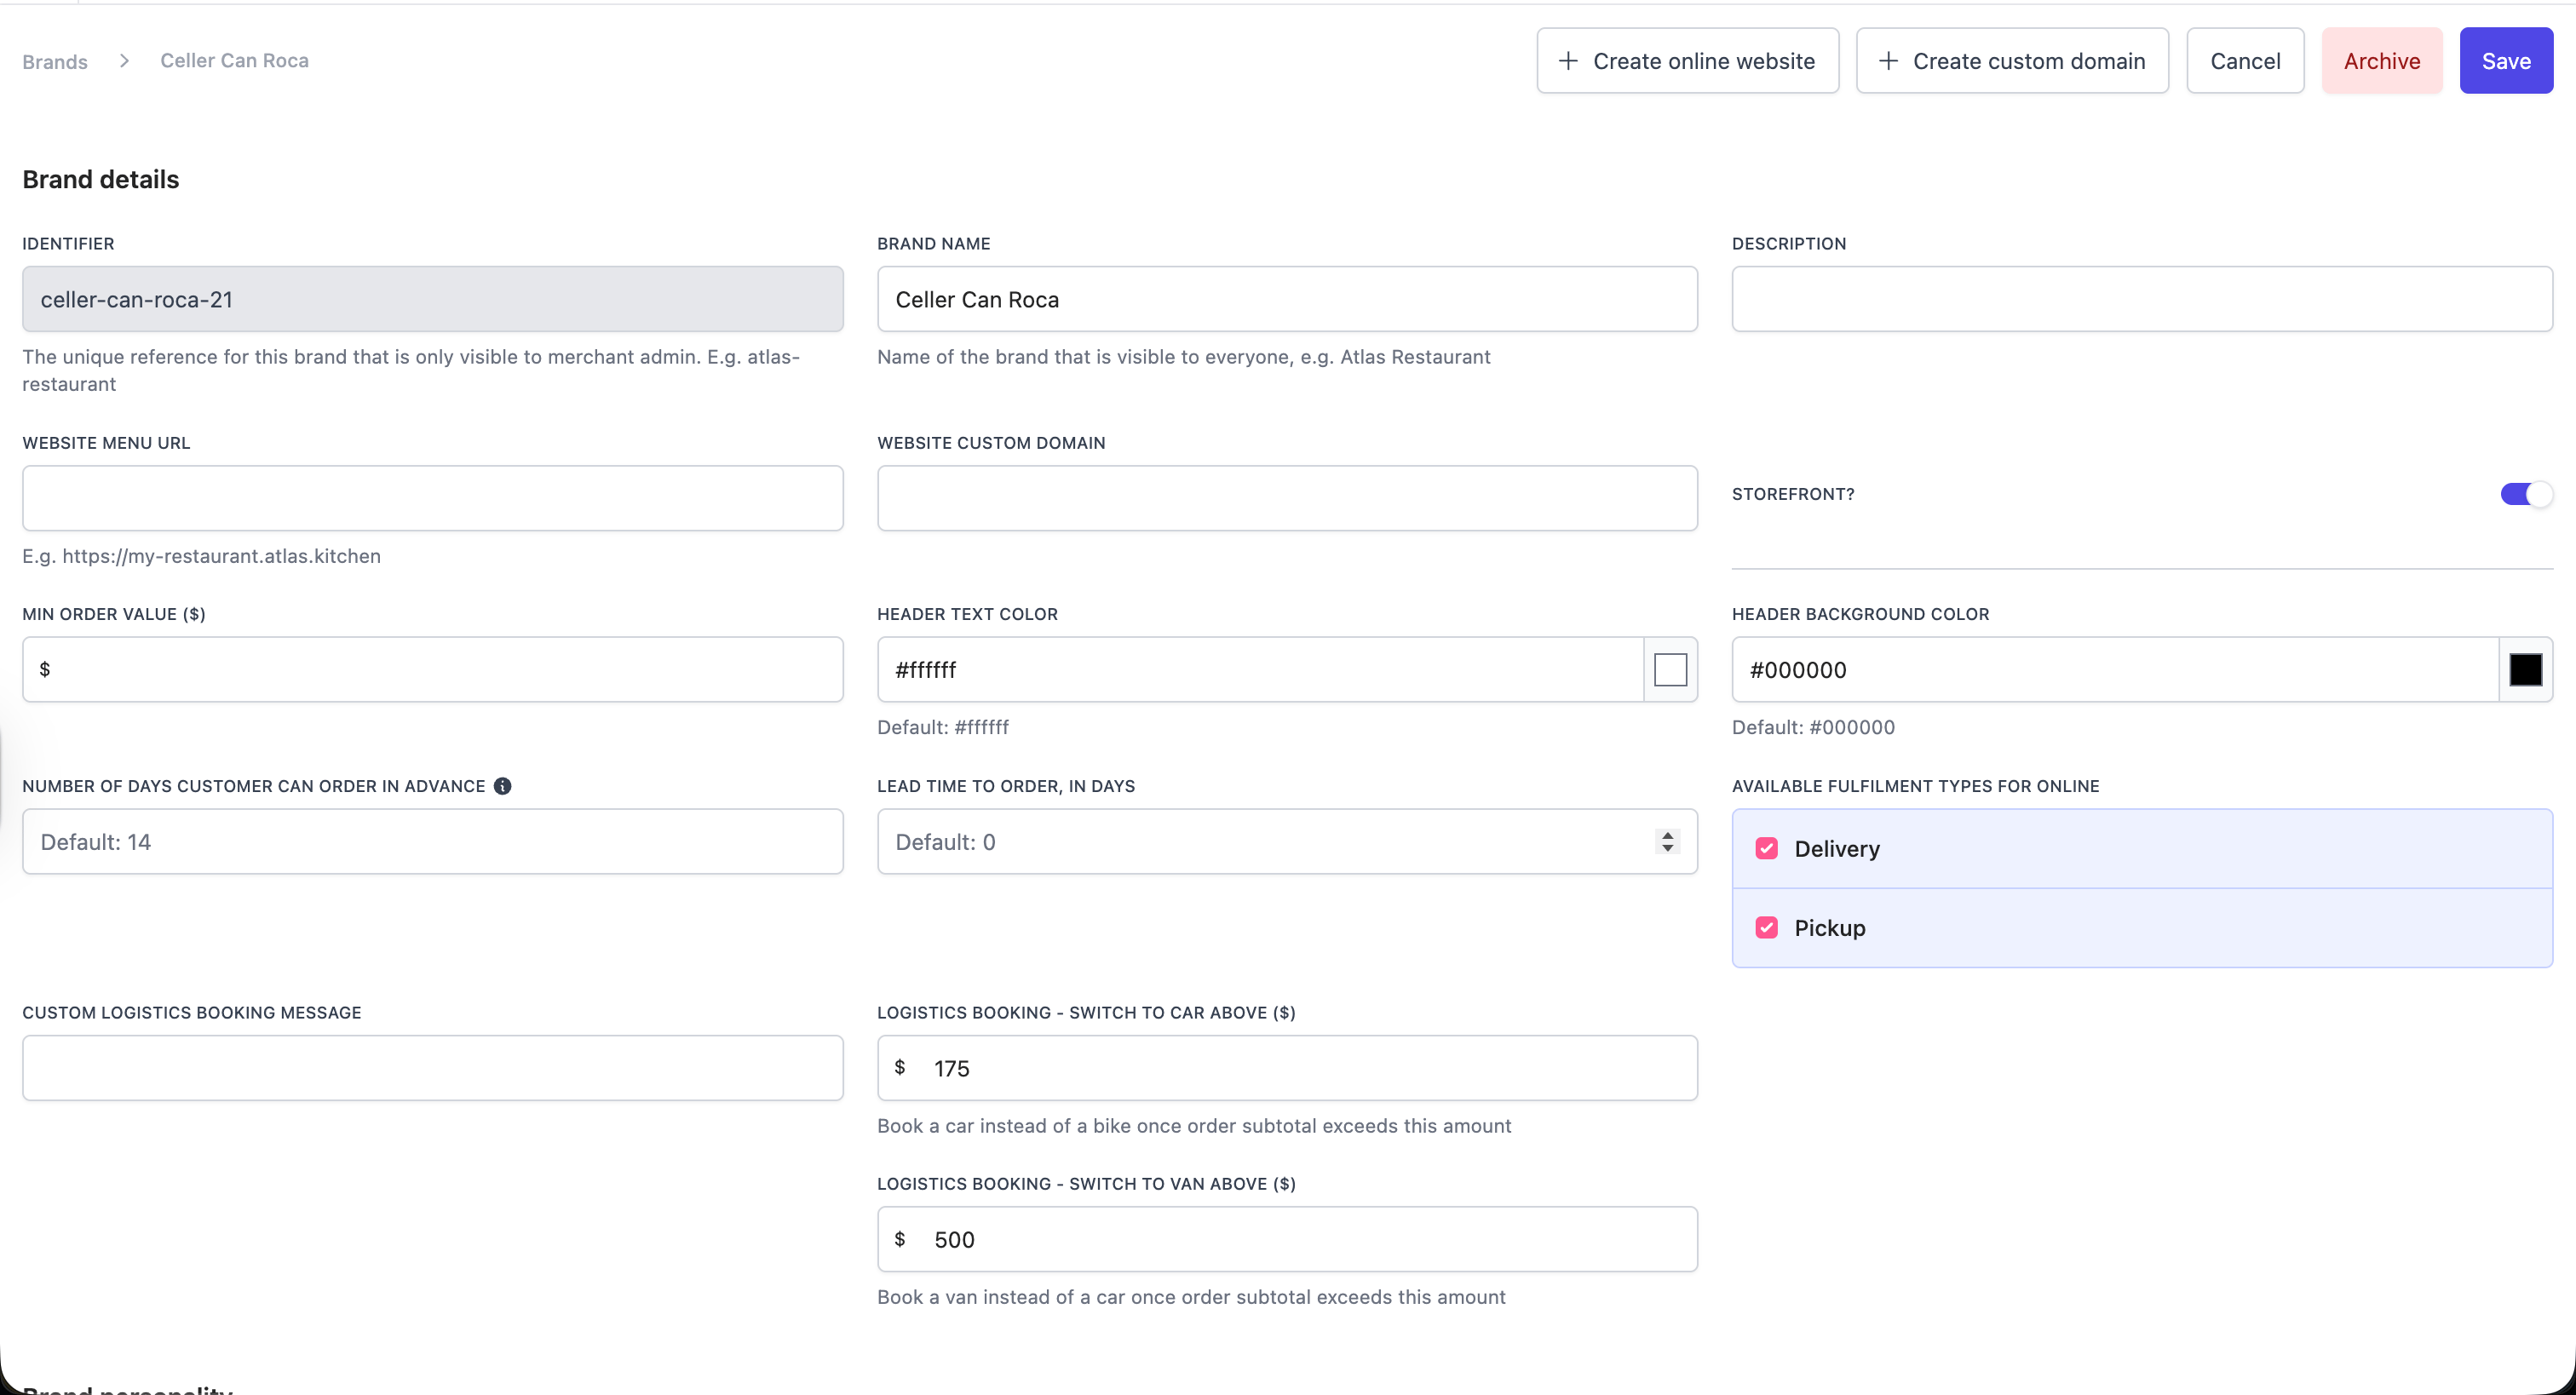
The minimum order amount for Atlas Online is set per **brand**, not in the delivery fee config. It applies to delivery orders only; pickup orders are not affected.
In the left sidebar, go to **Settings → Brands**.
Click the brand you want to configure to open **Brand details**.
In **Min order value (\$)**, enter the smallest order total a customer must reach to check out. Leave it blank for no minimum.
Click **Save** at the top of the page.
### Min cart value for subsidy (\$)
The amount a cart must reach before the subsidy starts to apply. Below this, the customer pays the full delivery fee. **Leave it blank to apply the subsidy to every order.**
Example: min cart value for subsidy = \$50 → only orders of \$50 or more get the subsidy.
### Free delivery at (\$)
The cart value at which delivery becomes completely free, regardless of distance. **Leave it blank to never offer free delivery.**
Example: free delivery at = \$100.00 → any cart of \$100.00 or more ships free.
**What customers see:** a progress bar on the checkout page shows how close they are to the free delivery threshold.
Delivery distances are calculated from the outlet's address, not the customer's nearest MRT. Make sure your outlet address is set correctly under **Outlet settings → Address**.
## Setting a minimum order amount
The minimum order amount for Atlas Online is set per **brand**, not in the delivery fee config. It applies to delivery orders only; pickup orders are not affected.
In the left sidebar, go to **Settings → Brands**.
Click the brand you want to configure to open **Brand details**.
In **Min order value (\$)**, enter the smallest order total a customer must reach to check out. Leave it blank for no minimum.
Click **Save** at the top of the page.
 For Grab and Foodpanda, minimum order amounts are set in each platform's merchant portal (GrabMerchant, Foodpanda for Partners), not in Atlas. Atlas syncs the menu and items, but platform order minimums are managed on the aggregator side.
## Large order lead time
Large orders need more prep time. **Large order lead time** automatically adds extra time to the kitchen's estimate once an order passes a value you set, so customers get a realistic ready time and the kitchen isn't caught short.
Go to **Outlet settings → Outlets**, open your outlet, and tap **Delivery settings**. Scroll to **Large order lead time**.
In **Orders above**, enter the order value that counts as large. Then set the **additional** time and unit. For example, orders above \$300 will require an additional 90 minutes.
Click **Save**.
For Grab and Foodpanda, minimum order amounts are set in each platform's merchant portal (GrabMerchant, Foodpanda for Partners), not in Atlas. Atlas syncs the menu and items, but platform order minimums are managed on the aggregator side.
## Large order lead time
Large orders need more prep time. **Large order lead time** automatically adds extra time to the kitchen's estimate once an order passes a value you set, so customers get a realistic ready time and the kitchen isn't caught short.
Go to **Outlet settings → Outlets**, open your outlet, and tap **Delivery settings**. Scroll to **Large order lead time**.
In **Orders above**, enter the order value that counts as large. Then set the **additional** time and unit. For example, orders above \$300 will require an additional 90 minutes.
Click **Save**.
![The Large order lead time panel showing 'Orders above [SGD] will require an additional 90 Minutes' with a Save button.](https://mintcdn.com/atlaskitchen/5GkVM2TY1bzqc72r/images/merchant-portal/delivery-large-order-lead-time.png?fit=max&auto=format&n=5GkVM2TY1bzqc72r&q=85&s=c16ff313420e35c372b257307ab29605) ## Delivery vehicle auto-assignment
For Atlas-managed delivery, Atlas books the right vehicle based on the order subtotal, so larger orders go out in something that can carry them. These thresholds are on the same **Brand details** page (**Settings → Brands**, then edit your brand).
* **Logistics booking — switch to car above (\$)** — book a car instead of a bike once the order subtotal passes this amount (e.g. \$175).
* **Logistics booking — switch to van above (\$)** — book a van instead of a car once the order subtotal passes this amount (e.g. \$500).
* **Custom logistics booking message** — an optional note passed to the courier as part of the logistics booking through Atlas Smart Logistics (e.g. building access, unit number, or handling instructions).
## Testing the configuration before going live
Before your next service, verify the delivery fee settings are working correctly.
Visit your Atlas storefront URL (e.g., `yourbrand.atlas.kitchen`) in a private browser window.
Add items that bring your cart to just below and just above any thresholds you have set (minimum order, free delivery, subsidy).
Confirm the delivery fee shown matches your configuration. Confirm the free delivery threshold bar appears if you set one.
**What should happen**: The delivery fee displayed on the customer checkout screen matches your outlet config exactly. Free delivery applies automatically when the threshold is met.
## If the delivery fee looks wrong
Check that the correct delivery fee config is assigned to the outlet. Go to **Outlet settings → Delivery settings** and confirm the config is not set to a \$0 flat-rate option. Also check whether **Free delivery at** is set too low on the config.
Aggregator orders (Grab, Foodpanda) use the delivery fee set by the platform, not Atlas. Only Atlas online orders use your Merchant Portal delivery fee config. This is expected behaviour.
No delivery fee config has been assigned to this outlet. Go to **Outlet settings → Delivery settings** and select or create one.
Delivery fee changes take effect immediately for new orders. Refresh your test browser window in private mode. If you made a change in the past 2 minutes, wait 30 seconds and try again.
If the issue persists after checking the above, contact support at [hello@atlas.kitchen](mailto:hello@atlas.kitchen) with your outlet name and the order number where the fee appeared incorrectly.
## Next steps
* [Surcharges](/merchant-portal/surcharges) — add a temporary fee for holidays, weekends, or peak periods
* [Managing operating hours](/merchant-portal/operating-hours) — set when your outlet accepts delivery orders
* [Adding discounts](/merchant-portal/add-discounts) — set promotional discounts separate from delivery fee subsidies
## Delivery vehicle auto-assignment
For Atlas-managed delivery, Atlas books the right vehicle based on the order subtotal, so larger orders go out in something that can carry them. These thresholds are on the same **Brand details** page (**Settings → Brands**, then edit your brand).
* **Logistics booking — switch to car above (\$)** — book a car instead of a bike once the order subtotal passes this amount (e.g. \$175).
* **Logistics booking — switch to van above (\$)** — book a van instead of a car once the order subtotal passes this amount (e.g. \$500).
* **Custom logistics booking message** — an optional note passed to the courier as part of the logistics booking through Atlas Smart Logistics (e.g. building access, unit number, or handling instructions).
## Testing the configuration before going live
Before your next service, verify the delivery fee settings are working correctly.
Visit your Atlas storefront URL (e.g., `yourbrand.atlas.kitchen`) in a private browser window.
Add items that bring your cart to just below and just above any thresholds you have set (minimum order, free delivery, subsidy).
Confirm the delivery fee shown matches your configuration. Confirm the free delivery threshold bar appears if you set one.
**What should happen**: The delivery fee displayed on the customer checkout screen matches your outlet config exactly. Free delivery applies automatically when the threshold is met.
## If the delivery fee looks wrong
Check that the correct delivery fee config is assigned to the outlet. Go to **Outlet settings → Delivery settings** and confirm the config is not set to a \$0 flat-rate option. Also check whether **Free delivery at** is set too low on the config.
Aggregator orders (Grab, Foodpanda) use the delivery fee set by the platform, not Atlas. Only Atlas online orders use your Merchant Portal delivery fee config. This is expected behaviour.
No delivery fee config has been assigned to this outlet. Go to **Outlet settings → Delivery settings** and select or create one.
Delivery fee changes take effect immediately for new orders. Refresh your test browser window in private mode. If you made a change in the past 2 minutes, wait 30 seconds and try again.
If the issue persists after checking the above, contact support at [hello@atlas.kitchen](mailto:hello@atlas.kitchen) with your outlet name and the order number where the fee appeared incorrectly.
## Next steps
* [Surcharges](/merchant-portal/surcharges) — add a temporary fee for holidays, weekends, or peak periods
* [Managing operating hours](/merchant-portal/operating-hours) — set when your outlet accepts delivery orders
* [Adding discounts](/merchant-portal/add-discounts) — set promotional discounts separate from delivery fee subsidies