> ## Documentation Index
> Fetch the complete documentation index at: https://help.atlas.kitchen/llms.txt
> Use this file to discover all available pages before exploring further.
# Connect Atlas printer to WiFi
> Connect Atlas receipt printers to WiFi network. Choose manual browser pairing or QR pairing with WeChat for wireless printer setup.
Atlas printers can be connected to WiFi wirelessly using one of these two methods:
* Mode A: QR pairing with WeChat.
* Mode B: Manual pairing via browser (recommended).
Follow these steps to pair your printer using WeChat:
1. Connect to the outlet's WiFi network (must be 2.4GHz).
2. Download WeChat and create an account.
3. Locate the small black button at the back of the printer.
4. Press and hold the button for 2 seconds and release → A receipt will print.
5. Repeat step 4 → A receipt will print with a QR code.
6. Open WeChat and scan the QR code.
* Note: This connects the printer to WiFi.
7. Enter your WiFi password and confirm.
* Note: Ensure Bluetooth and Local Network access are enabled if needed.
8. On the next screen, select the Printer network and tap Connect.
9. Wait for the printer to connect and print a success receipt.
10. If the connection failed receipt prints, repeat the steps or check your WiFi stability.
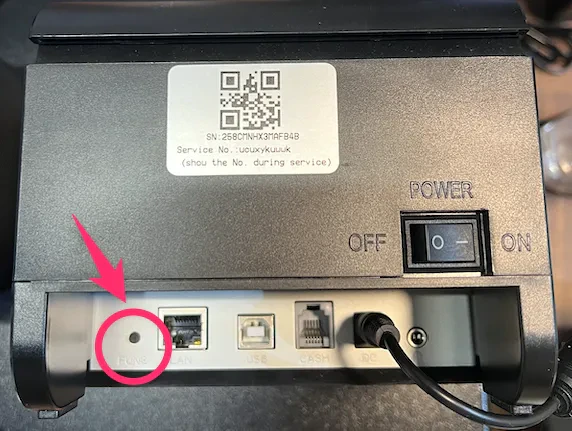
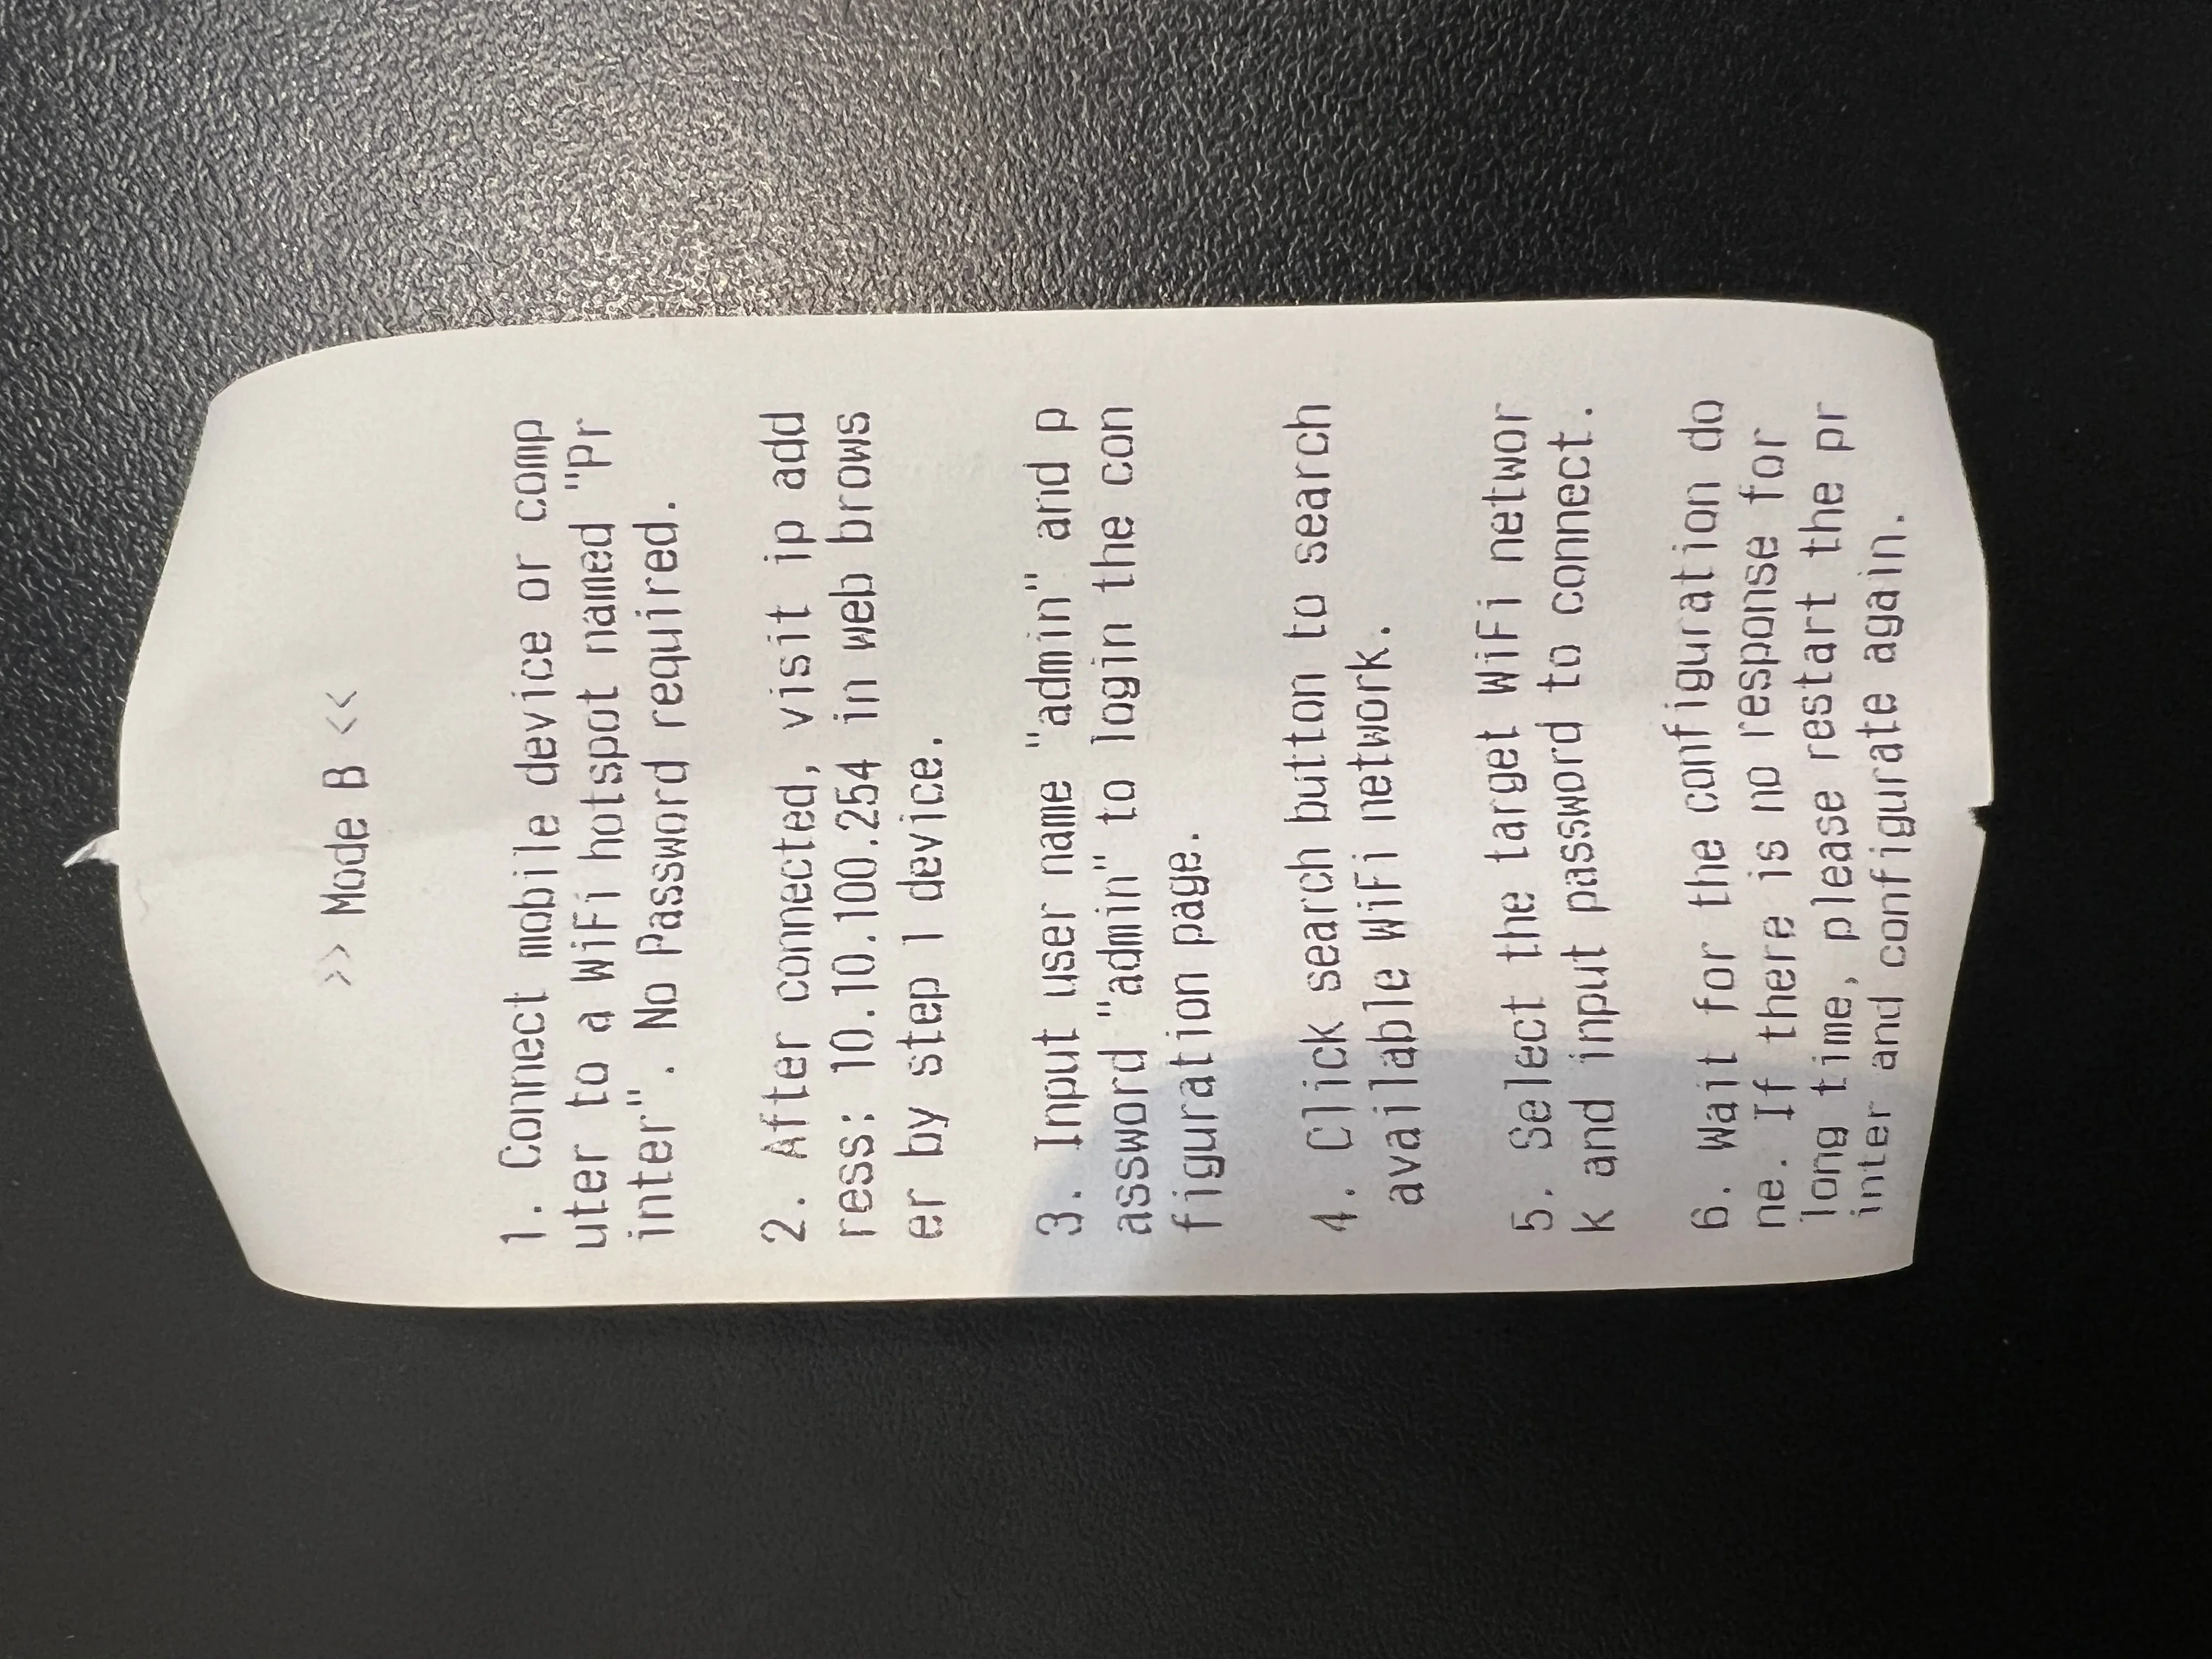
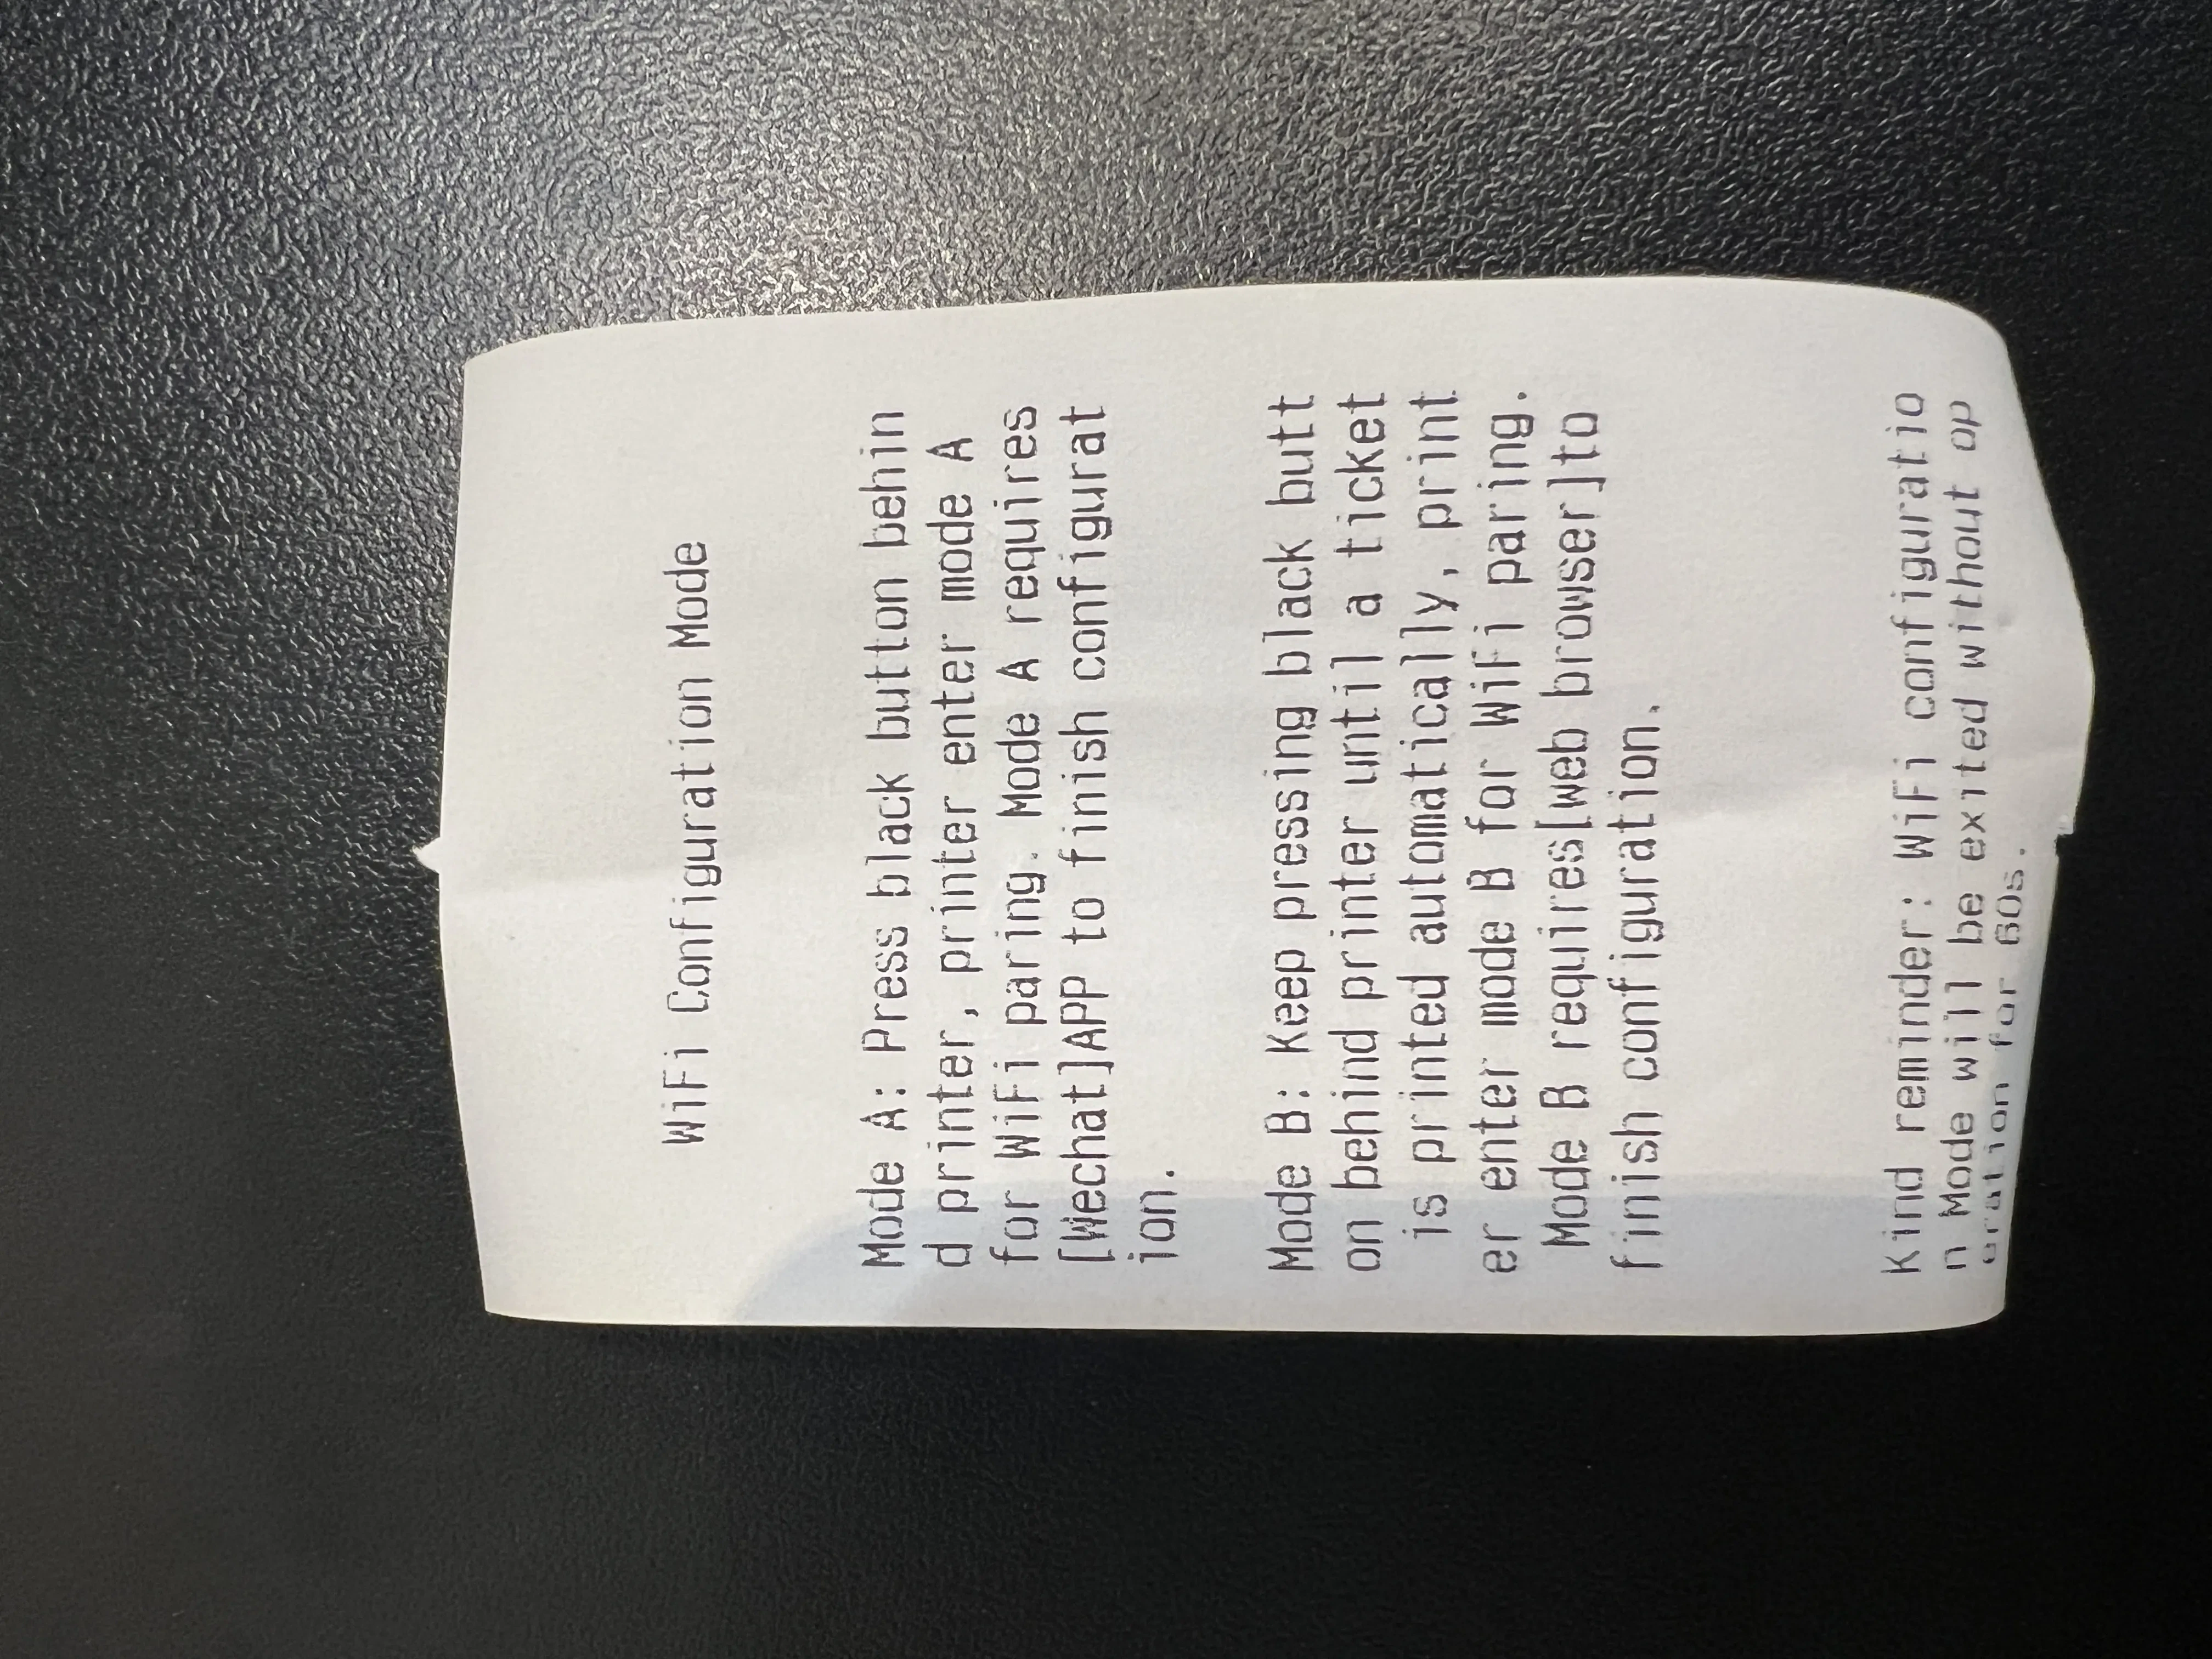 This enters Mode B: Manual WiFi pairing mode (lasts 5-10 minutes)
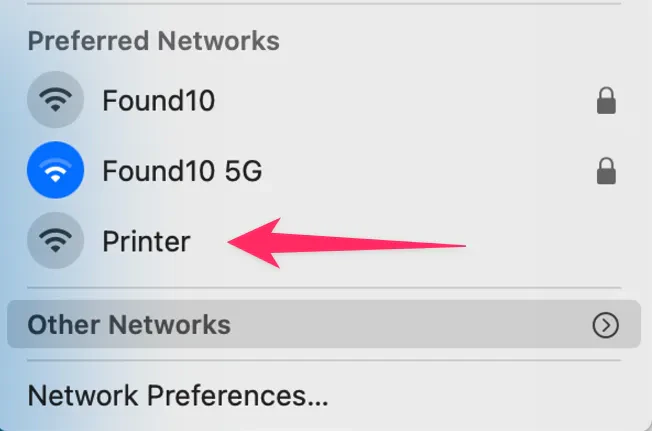
 Wait until your device is connected. This network has no internet access, but that's fine for this setup.
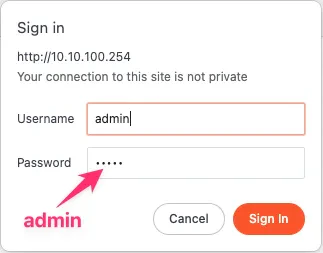 You can change the language (Mandarin or English) from the top-right corner.
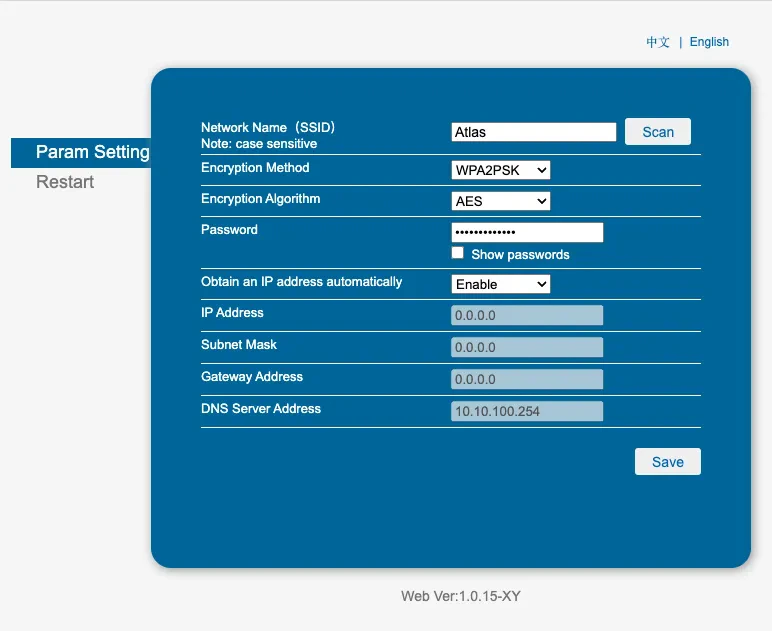
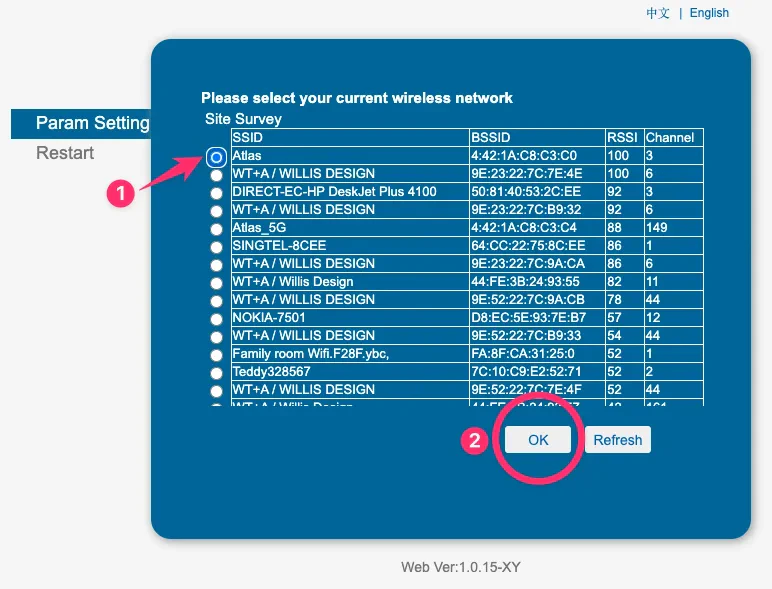 A prompt saying the password is empty will come up. Just press ok, and move to the next step.
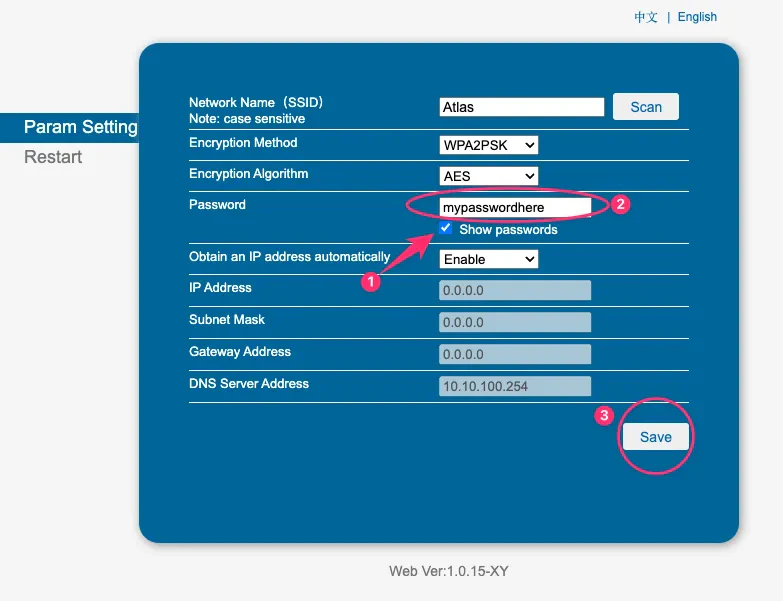
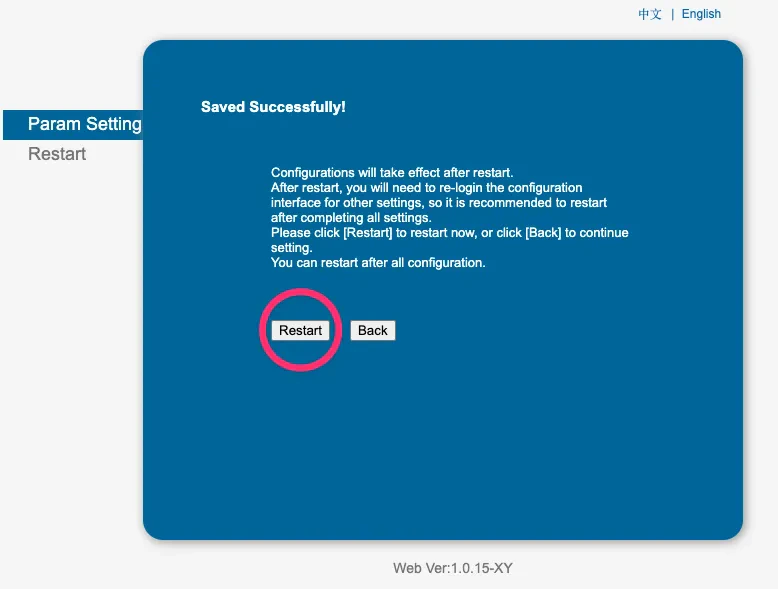 Within a few minutes, a successful connection receipt should print. *This may take up to 10 minutes in some cases.*
If a connection failed receipt prints instead, go through the guide again and ensure all steps were followed correctly. Also, check your WiFi stability.
## What should happen
After completing the WiFi setup:
* The printer prints a "Connection Successful" receipt showing it's connected to your WiFi network
* The printer appears in Atlas Merchant Portal under your outlet's printer settings
* You can send test prints from Atlas POS or the Merchant Portal
## If it doesn't work
1. Verify your WiFi password is correct — re-enter it carefully
2. Check that your WiFi network is 2.4GHz (not 5GHz) — the printer only supports 2.4GHz
3. Move the printer closer to your WiFi router
4. Check if your WiFi network has a captive portal (login page) — the printer cannot connect to networks requiring browser login
5. Restart your WiFi router and try again
1. Make sure you're in Mode B (manual pairing mode) — press and hold the button until the second receipt prints
2. The printer's WiFi mode only lasts 5-10 minutes. If it timed out, press the button again to re-enter pairing mode
3. Check that your phone/tablet WiFi is turned on
4. If "Printer" doesn't appear in your WiFi list, restart the printer and try again
1. Make sure you're connected to the "Printer" WiFi network (not your regular WiFi)
2. Wait 10-15 seconds after connecting before opening the browser
3. Type the address exactly: `10.10.100.254` — no "http\://" or "www"
4. Try a different browser if the first one doesn't work
5. Disable any VPN on your device
1. Try lowercase `admin` for both username and password
2. If the printer was previously configured, it may have a different password. Factory reset the printer and try again
3. Check your printer documentation for default credentials
1. Wait 10-15 seconds and tap SCAN again
2. Check that your WiFi router is powered on and broadcasting
3. Move the printer closer to the router
4. Your WiFi may be set to "hidden" — you'll need to enter the network name manually
1. In Atlas Merchant Portal, go to **Settings > Printers** and verify the printer is listed
2. Check that the printer is assigned to the correct outlet and station
3. Send a test print from Atlas to verify the connection
4. Restart the printer and check if it reconnects
5. Contact support at [hello@atlas.kitchen](mailto:hello@atlas.kitchen) if the printer still doesn't appear
## Next steps
* [Set up Atlas POS](/get-started/installing-atlas) — Install Atlas on your tablet
* [Configure your outlet](/merchant-portal/operating-hours) — Set operating hours and menu
* [Start taking orders](/merchant-portal/admin-orders) — Create your first order
Within a few minutes, a successful connection receipt should print. *This may take up to 10 minutes in some cases.*
If a connection failed receipt prints instead, go through the guide again and ensure all steps were followed correctly. Also, check your WiFi stability.
## What should happen
After completing the WiFi setup:
* The printer prints a "Connection Successful" receipt showing it's connected to your WiFi network
* The printer appears in Atlas Merchant Portal under your outlet's printer settings
* You can send test prints from Atlas POS or the Merchant Portal
## If it doesn't work
1. Verify your WiFi password is correct — re-enter it carefully
2. Check that your WiFi network is 2.4GHz (not 5GHz) — the printer only supports 2.4GHz
3. Move the printer closer to your WiFi router
4. Check if your WiFi network has a captive portal (login page) — the printer cannot connect to networks requiring browser login
5. Restart your WiFi router and try again
1. Make sure you're in Mode B (manual pairing mode) — press and hold the button until the second receipt prints
2. The printer's WiFi mode only lasts 5-10 minutes. If it timed out, press the button again to re-enter pairing mode
3. Check that your phone/tablet WiFi is turned on
4. If "Printer" doesn't appear in your WiFi list, restart the printer and try again
1. Make sure you're connected to the "Printer" WiFi network (not your regular WiFi)
2. Wait 10-15 seconds after connecting before opening the browser
3. Type the address exactly: `10.10.100.254` — no "http\://" or "www"
4. Try a different browser if the first one doesn't work
5. Disable any VPN on your device
1. Try lowercase `admin` for both username and password
2. If the printer was previously configured, it may have a different password. Factory reset the printer and try again
3. Check your printer documentation for default credentials
1. Wait 10-15 seconds and tap SCAN again
2. Check that your WiFi router is powered on and broadcasting
3. Move the printer closer to the router
4. Your WiFi may be set to "hidden" — you'll need to enter the network name manually
1. In Atlas Merchant Portal, go to **Settings > Printers** and verify the printer is listed
2. Check that the printer is assigned to the correct outlet and station
3. Send a test print from Atlas to verify the connection
4. Restart the printer and check if it reconnects
5. Contact support at [hello@atlas.kitchen](mailto:hello@atlas.kitchen) if the printer still doesn't appear
## Next steps
* [Set up Atlas POS](/get-started/installing-atlas) — Install Atlas on your tablet
* [Configure your outlet](/merchant-portal/operating-hours) — Set operating hours and menu
* [Start taking orders](/merchant-portal/admin-orders) — Create your first order